Bay 9 Lnum 0 [REPLACE] SN:Y60PFPEE /dev/da8
Bay 10 Lnum 11 [HEALTHY] SN:A60877NE /dev/da9
Bay 11 Lnum 11 [HEALTHY] SN:A60877NE /dev/da10
Bay 12 Lnum 11 [HEALTHY] SN:A60877NE /dev/da11
In this example output, the hard drive in Bay 9 shows a
REPLACE
state, indicating that it needs to be replaced.
2. Remove the chassis retaining screw that secures the node to the rack cabinet.
3. Slide the node out several inches from the rack cabinet to allow the front panel to open freely.
4. Open the node front panel.
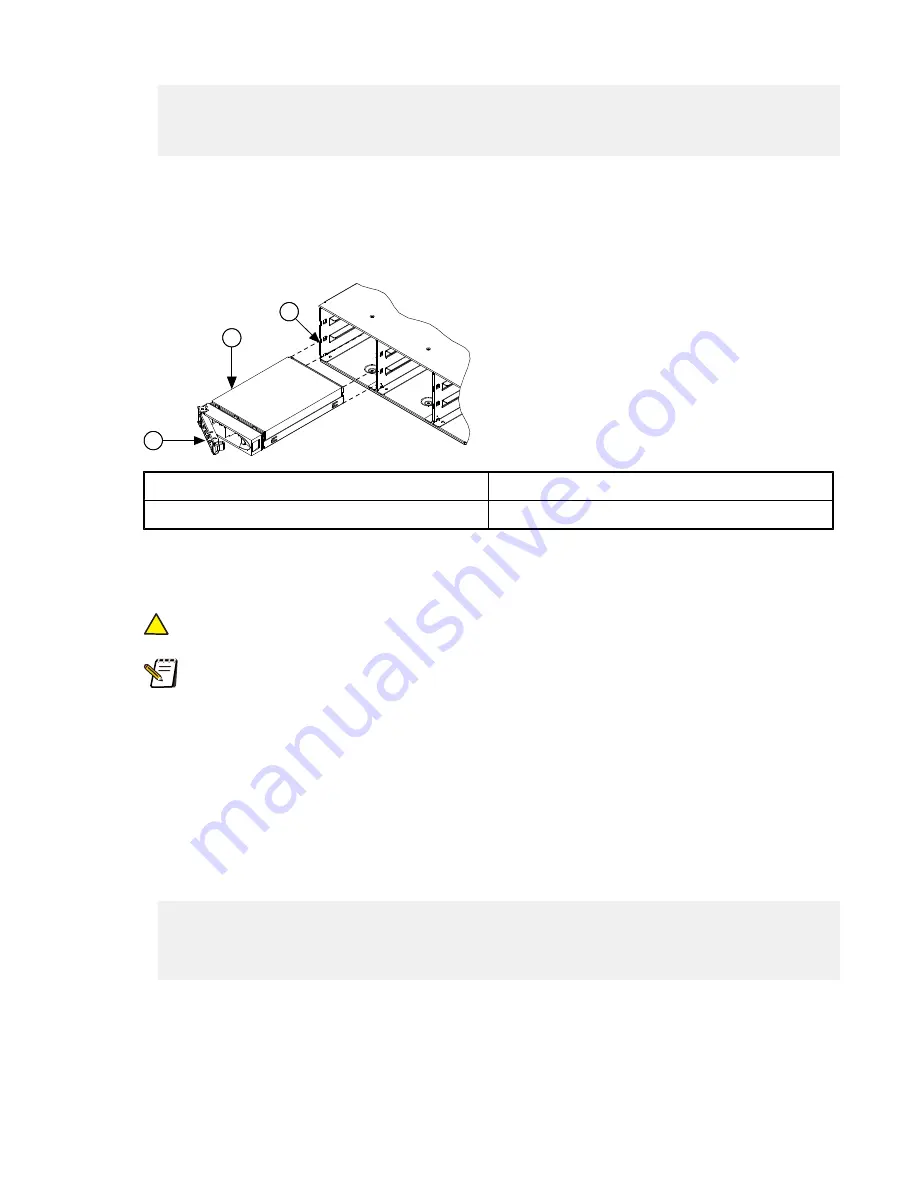
5. Locate the failed hard drive, release the drive locking handle, and remove the failed drive.
2
3
1
1 Locking handle
3 Hard drive bay
2 Hard drive
Figure 5. Removing a hard drive
6. With the locking handle open, insert a drive into an empty drive bay by sliding the drive along the bay rails until it
stops.
!
Caution: Do not force the drive into the drive bay. Forcing the drive into the drive bay could result in
irreparable damage to both the drive and the drive bay.
Note: SSDs can only go in Bay 1 (the upper-left drive bay). Non-SSD drives can go in any drive bay.
You can identify an SSD by the color of the drive tray locking handle; SSDs have silver handles, whereas
all other drive types have black handles. SSDs are also smaller 2 1/2" drives.
7. Gently push the locking handle on the drive until the drive clicks into place.
8. Close the node front panel.
9. Slide the node back into the rack cabinet.
10. Secure the node to the rack cabinet using the chassis mounting screw.
11. On the command-line interface, run the
isi devices -a add -d
<node ID number>
:
<drive bay
number>
command.
12. Complete one of the following options based on the result of the previous step.
•
If the inserted drive has been properly formatted, the following message appears:
The add operation succeeded. A OneFS-formatted drive was found in
bay
<drive bay number>
and is being attached to the file system. Wait a few
minutes and re-run 'isi devices' to verify that the attach
operation completed successfully.
Wait a few minutes, and then run the
isi devices
command again to verify that the drive was added
successfully.
•
If the inserted drive has encountered an add-operation failure, an error message appears. If the message indicates
that the failure is the result of an unrecognized drive or a previously used drive, or that the removed drive has
Hard drives
14
©
2010 Isilon Systems, Inc.
Содержание IQ S Series
Страница 1: ...Isilon IQ S Series Field Replacement Manual August 2010 120 0031 01 Rev C ...
Страница 4: ...Chapter 11 Air baffle 39 Removing the air baffle 39 Installing the air baffle 40 ...
Страница 8: ......
Страница 18: ......
Страница 22: ......
Страница 26: ......
Страница 36: ......
Страница 42: ......
Страница 44: ......


