English
- 24 -
ELECTRICAL CONNECTION
Connection of the cleaner to the mains must be carried out
be skilled technicians able to ensure that all regulations in
force are complied with
use in respect of current standards
and legislation.
Ensure that the mains voltage available is the same as the vol-
tage at which the cleaner is supposed to work; this is indicated
on the identification plate.
Danger
- The electric cable must be protected from accidental
crushing.
- Do not use the machine if the supply cable is damaged.
- The use of any electric appliance requires the respect of
some basic rules:
• Do not touch the appliance with wet or damp hands or feet.
• Do not use the appliance bare-footed or with unsuitable
clothing.
• Do not pull the supply cable or the appliance itself in order
to disconnect the plug from the electric supply.
(For water cleaners rated at less than 3 kW fitted with plug).
As for the protection against electric shock, the H.P.cleaner
belongs to
CLASS I.
Failure to observe the above warning frees the manufactu
-
rer from all responsibility and constitutes negligent use
of the product.
!
FIG. 7
STARTING THE CLEANER
1
) Turn on the water supply tap (fig. 5A).
2
) Connect the water cleaner to the mains electricity supply via
the omnipolar switch or by plugging the plug into the socket.
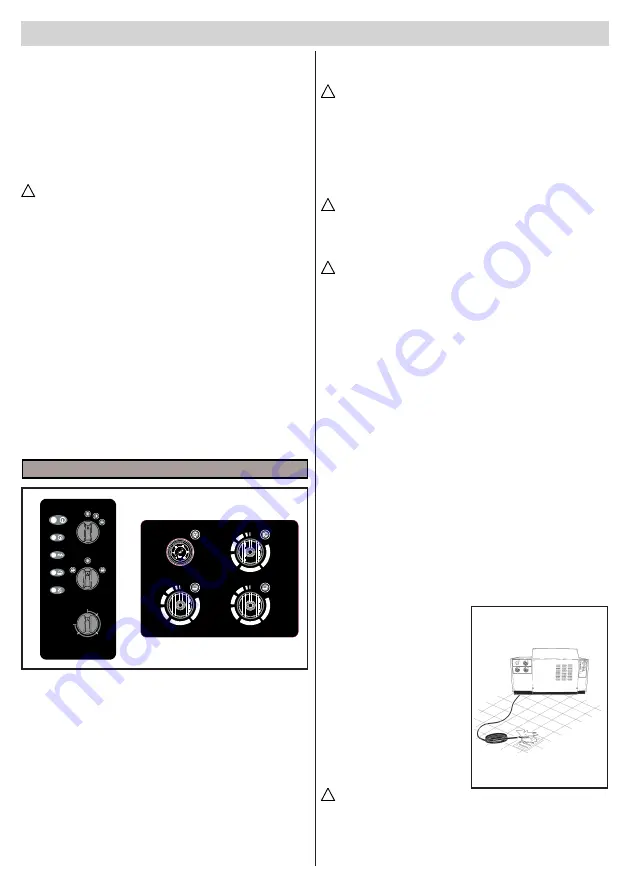
USING THE CLEANER
CONTROL PANEL
A)
On/off switch.
B)
Temperature regulator.
C)
Detergent selector.
D)
Power indicator.
E)
Heating system indicator
light.
F)
Descaler level indicator
light.
G)
Fault - Maintenance indica-
tor light.
H)
Pressure gauge.
I)
Pressure tap.
L)
Detergent 1 flow regulator.
M)
Detergent 2 flow regulator
N
) Remote Control Power
indicator.
3
) Start the cleaner by turning the selector switch to pos. 1
(fig. 7A).
Warning
The high pressure water jet generates a reaction force in the
lance. Keep a firm grip on the lance handle.
4
) Press the trigger on the gun and begin washing.
5
)
To operate the H.P. cleaner with hot water, turn the ignition
switch to the Heating position, turn the temperature controller
(fig. 7B) to the desired value, according to the type of cleaning
and the type of surface being cleaned.
Warning
In water cleaners with the “Total Stop” system, the motor starts
and stops when the lever on the lance handle is actioned or
released.
Danger
Do not block the handle lever in the delivery position.
WARNING SIGNALS AND FAULTS DISPLAYED.
Indicator light D):
Power is on when the indicator is permanent-
ly alight (switch “A” in position I); If Remote Control installed,
Indicator light N)
Indicator light E):
Heating system active.
Indicator light F):
Descaler level; when alight, indicates that
the level is too low.
Indicator light G):
Warns when faults occur and when sched-
uled maintenance is due.
- 2 flashes, minor leak alarm.
- 3 flashes, no water alarm.
- 4 flashes, motor thermal protector activated.
- 5 flashes, safety thermostat activated.
Indicator light on steady, 200h programmed maintenance inter-
val expired. Once the required maintenance has been carried
out by an IPC-approved Service Centre, the light will go off.
IMPORTANT !
To eliminate any impurities or air bubbles from the water
!
!
!
circuit we advise starting
the cleaner for the first time
without the lance and letting
the water run out for a few
seconds.
Impurities could block the
nozzle and cause malfun-
ction (Fig. 8).
USING THE ACCESSORIES.
The high pressure washer has
a nozzle with a flat angle jet for
cleaning large surfaces.
Warning
Aim the jet from a certain distance to avoid damage caused by
the high pressure.
ROTARY HEAD (optional accessory)
The high pressure washer can be fitted with a head with rotary
!
FIG. 8
REMOTE
CONTROL
1
2
MAX
50°C
30°C
0°
EC
O
M
O
D
E
2
1
A
C
B
N
D
E
F
G
H
I
L
M


