background image

3.

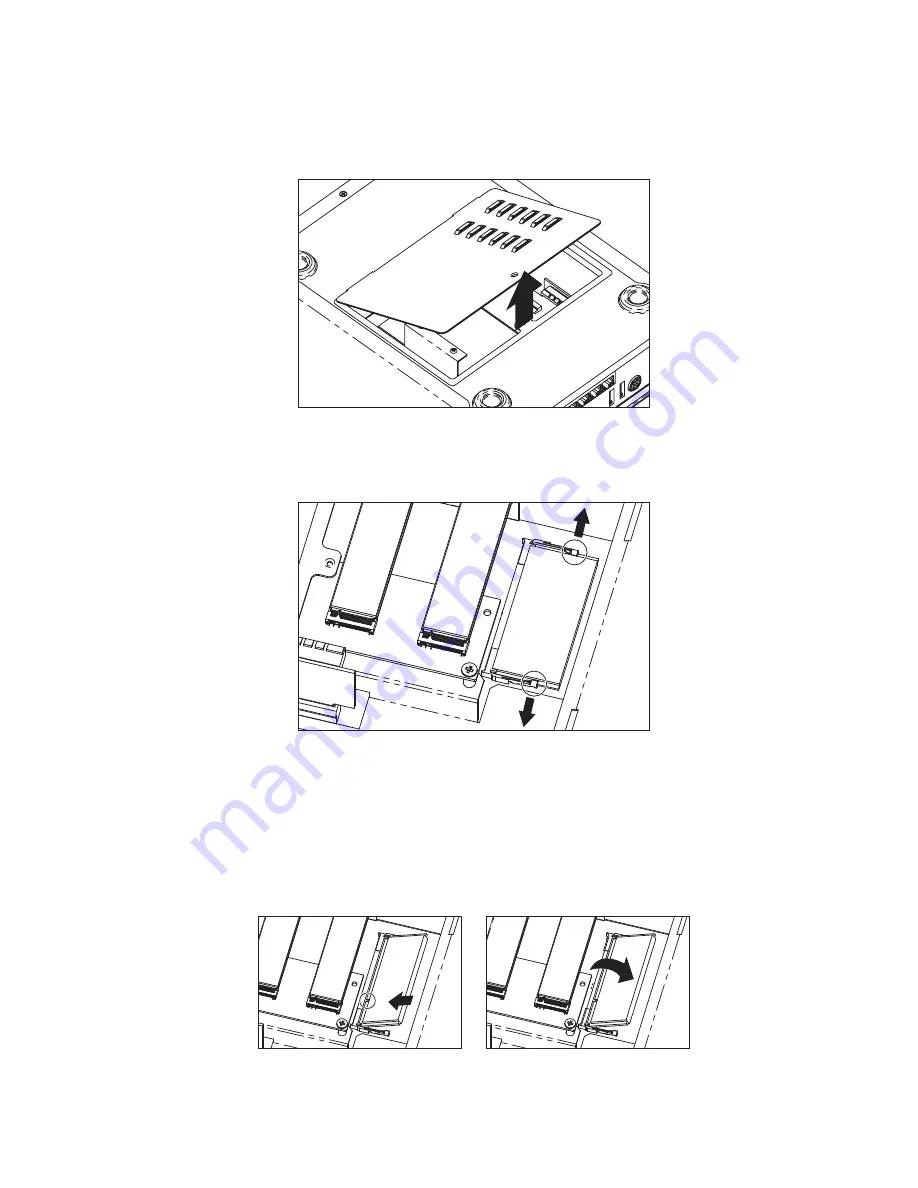
Use a Phillips screwdriver to remove the screw securing the bottom cover and remove it. You will see
three slots; one slot populated with RAM memory and two M.2 SATA slots for your SSD cache.

4.

Pull the levers on both sides of a memory module outward to release the module from the slot.

5.

Remove the memory module.

6.

Align the notch on the gold contacts of the memory module with the notch on the empty slot and insert
the memory module into the slot (Fig. 1). Push firmly until you hear a click to secure the memory
module in the slot (Fig. 2). If you encounter difficulty when pushing down, push the levers on either side
of the slot outward.

1

2

ioSafe 1520+ User Manual

15

Содержание 1520+

Страница 1: ...ioSafe 1520 User Manual ...

Страница 2: ...mployee is authorized to make any modification extension or addition to this warranty In no event will CDSG or its suppliers be liable for any costs of procurement of substitute products or services lost profits loss of information or data computer malfunction or any other special indirect consequential or incidental damages arising in any way out of the sale of use of or inability to use any CDSG...

Страница 3: ...on 12 3 4 Replace Memory Modules 14 3 5 Connecting the ioSafe 1520 16 4 Install Synology DiskStation Manager 18 5 Connect and Log in to Synology DiskStation Manager 20 6 Using Synology DiskStation Manager 22 7 Replace System Fans 23 8 Product Support and Data Recovery Service 24 8 1 Activate Data Recovery Service Protection 24 8 2 ioSafe No Hassle Warranty 24 8 3 Data Recovery Procedure 24 8 4 Con...

Страница 4: ...powered by Synology DSM The ioSafe 1520 ensures seamless business continuity with Synology DSM Synology s prize winning operating system The ioSafe 1520 also protects your data while fully submersed underwater for up to 72 hours and in temperatures up to 1550 F for 30 minutes ensuring that your data stays protected through floods and fires ioSafe 1520 User Manual 4 ...

Страница 5: ...age devices or in an area exposed to heat flame direct sunlight dampness moisture rain vibration shock dust or sand 4 To avoid overheating this product should be operated in a well ventilated area 5 Before starting any type of hardware installation ensure that all power switches have been turned off and all power cords have been disconnected to prevent personal injury and damage to the hardware 2 ...

Страница 6: ...ews Qty 24 Power Supply Qty 1 Power Cord Qty 1 Ethernet Cable Qty 1 Allen Wrench Qty 1 2 3 IDENTIFYING PARTS Front System Status Indicator Drive Status Indicators Power Button USB Type A Port ioSafe 1520 User Manual 6 ...

Страница 7: ...g accessed Amber Solid Indicates a drive error for the corresponding drive Off No internal drive installed in the corresponding drive bay or the drive is in hibernation Power Blue Solid Indicates that the unit is powered on Blinking The unit is booting up or shutting down Off The unit is powered off Left Rear LAN LEDs 1 4 left side of each jack Green Solid The network is connected Blinking Indicat...

Страница 8: ...ARNING Formatting a drive will result in data loss so be sure to back up your data before beginning this operation 3 2 SATA DRIVE INSTALLATION NOTE If you purchased an ioSafe 1520 that was shipped with hard drives pre installed skip this section and continue on to Section 3 3 M 2 NVMe SSD Cache Installation page 12 1 Use the included 3mm hex tool to remove the screws on the top and bottom of the f...

Страница 9: ...2 Remove the waterproof drive cover with the 3mm hex tool 3 Remove the drive trays with the 3mm hex tool ioSafe 1520 User Manual 9 ...

Страница 10: ...ist of qualified drive models NOTE When setting up a RAID set it is recommended that all installed drives should be the same size in order to make the best use of drive capacity 5 Insert each loaded drive tray into an empty drive bay ensuring that each one is pushed in all the way Then tighten the screws using the 3mm hex tool ioSafe 1520 User Manual 10 ...

Страница 11: ...he waterproof drive cover as when using other tools you could under tighten or break the screw The hex tool has been designed to flex slightly when the screw is sufficiently tight and the wateproof gasket is properly compressed 7 Install the front cover to finish installation and protect the drives from fire ioSafe 1520 User Manual 11 ...

Страница 12: ...des RAID 0 using two SSDs NOTE The SSD Cache must be configured in Synology DiskStation Manager DSM Please refer to the section for SSD Cache in DSM Help on the DSM desktop TIP ioSafe recommends that you configure the SSD cache as read only The drives in a RAID 5 mode are faster than the cache at sequential read and write operations The cache only provides a benefit with random read and write oper...

Страница 13: ...t populated with RAM memory and two M 2 SATA slots for your SSD cache 4 Remove the retainer screw from the retaining bracket for each SSD slot you intend to use 5 Install the SSD Align the notch on the gold contacts of the SSD with the notch on the empty slot and insert the module into the slot ioSafe 1520 User Manual 13 ...

Страница 14: ...ed in Step 3 9 Turn the ioSafe 1520 back over and reconnect the cables you removed in Step 1 see Section 3 5 Connecting the ioSafe 1520 page 16 10 Follow the instructions for configuring your SSD Cache in DSM Help on the DSM desktop 3 4 REPLACE MEMORY MODULES Follow these steps to remove install or check a memory module on your ioSafe 1520 1 Shut down your ioSafe 1520 Disconnect all cables connect...

Страница 15: ...ory module outward to release the module from the slot 5 Remove the memory module 6 Align the notch on the gold contacts of the memory module with the notch on the empty slot and insert the memory module into the slot Fig 1 Push firmly until you hear a click to secure the memory module in the slot Fig 2 If you encounter difficulty when pushing down push the levers on either side of the slot outwar...

Страница 16: ...dministrator see Connect to Synology DiskStation Manager 11 Go to Control Panel Info Center and check Total Physical Memory to verify that the correct amount of RAM memory is installed NOTE If your ioSafe 1520 does not recognize the memory or fails to start up please make sure that each memory module is correctly seated in its memory slot 3 5 CONNECTING THE IOSAFE 1520 WARNING Do not place the ioS...

Страница 17: ...he fans inside the unit will spin at full speed until you install Synology DiskStation Manager see Install Synology DiskStation Manager and Synology DiskStation Manager has booted up This is the default behavior for the cooling fans and is intended ioSafe 1520 User Manual 17 ...

Страница 18: ...PORTANT Your computer and your ioSafe 1520 must be connected to the same local network IMPORTANT To download the latest version of DSM Internet access must be available during installation NOTE Any ioSafe 1520 that was shipped with hard drives pre installed already has Synology DiskStation Manager installed If you have drives pre installed continue on to Section 5 Connect and Log in to Synology Di...

Страница 19: ... Chrome Edge and Firefox browsers http iosafe 5000 http diskstation 5000 PURCHASED WITH HARD DRIVES PURCHASED WITHOUT DRIVES http find synology com CONNECT VIA SYNOLOGY COM OR OR 3 Click the Connect button to begin the setup process ioSafe Connect 4 Follow the on screen instructions to install Synology DSM Your ioSafe 1520 will automatically restart in the middle of setup ioSafe 1520 User Manual 1...

Страница 20: ...000 http server_name 5000 PURCHASED WITH HARD DRIVES PURCHASED WITHOUT DRIVES http find synology com CONNECT VIA SYNOLOGY COM OR OR IMPORTANT If you do not have an Internet connection and you purchased the ioSafe 1520 without drives pre installed you will need to connect using the second method Use the server name you gave your ioSafe 1520 while installing Synology DiskStation Manager see Section ...

Страница 21: ...hased the ioSafe 1520 without drives the username and password are the ones you created while installing Synology DSM see Section 4 Install Synology DiskStation Manager page 18 ioSafe Sign In Stay signed in username password TIP You can change the username and password with the User Control Panel applet in the Synology DiskStation Manager user interface ioSafe 1520 User Manual 21 ...

Страница 22: ...d out more about how to use Synology DiskStation Manager DSM by refering to DSM Help on the Synology DSM desktop or by referring to the Synology NAS User s Guide available for download from the Synology com Knowledge Center ioSafe 1520 User Manual 22 ...

Страница 23: ...rimeter screws around the rear fan assembly plate 3 Pull the assembly from the back panel of your ioSafe 1520 to expose the fan connections 4 Disconnect the fan cables from the connector wires attached to the rest of the ioSafe 1520 and then remove the assembly 5 Install the new fan assembly or replace the existing fans Connect the fan cables of the new fans to the fan connector wires attached to ...

Страница 24: ...bilities for incidental or consequential damages resulting from the use of this product or arising out of any breach of this warranty Some states do not allow the exclusion or limitation of incidental or consequential damages so the above limitation may not apply to you This warranty gives you specific legal rights and you may have other rights as well which will vary from state to state 8 3 DATA ...

Страница 25: ...ata with the ioSafe backup data 8 4 CONTACT IOSAFE SUPPORT Your investment in ioSafe products is backed up by our free technical support for the lifetime of the product Use the support resources on our website iosafe com support email us or give us a call Customer and Technical Support Phone 1 530 820 3090 Option 2 Email customersupport iosafe com Data Recovery Services Phone 1 530 820 3090 Option...

Страница 26: ...ch SATA HDD 2 5 inch SATA HDD 2 5 inch SATA SSD Data Connectors Two 2 eSATA connectors for ioSafe x517 Expansion only Two 2 M 2 NVMe slots for SSD Cache only Four 1 RJ 45 1GbE LAN ports Two 2 USB Type A connectors Failover Support Link Aggregation Yes up to 450 MB s sequential read write when enabled NAS Operating System Synology DSM Supported File Systems Internal Drives Btrfs EXT4 Supported File...

Страница 27: ...g Populated 33 kg Dimensions Width 406 mm Length 483 mm Height 534 mm Compliance EMI Standard FCC Part 15 Class A EMC Standard EN55024 EN55032 CE RoHS RCM 1See all supported drives at iosafe com support hardware compatibility 2exFAT Access can be installed for free from Package Center in Synology DSM 7 0 ioSafe 1520 User Manual 27 ...

Страница 28: ...This page is intentionally left blank ...

Отзывы: