


12
setting if everything remains unchanged. The daylight saving, time zone and site info will be
stored in the hand controller memory.
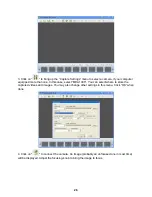
You may also get into this setup procedure by pressing MENU button from the main
menu, scrolling down and selecting “
Set Up Controller,
” then selecting “
Set Up Time and Site
”.
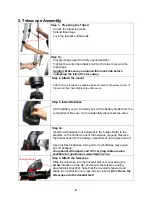
4.3. Using Your Telescope
4.3.1. Getting Familiar with Your Telescope
Always practice your telescope during the daytime to get familiar with the operation.
Eyepiece and diagonal:
1. Always begin viewing with the lowest power eyepiece. (Note: a 25 mm focal length
eyepiece has a lower power than a 10 mm one.) A formula can be used to determine the power
of each eyepiece: Telescope focal length divided by eyepiece focal length equals magnification.
Ex. 500mm ÷ 25mm = 20X (magnification)
2. Included with this telescope is a 45° Erecting Diagonal Prism. The Erecting Diagonal
Prism is used to erect the image you will see. Astronomical telescopes are designed in such a
way that the image you see may be UPSIDE DOWN and REVERSED. This is acceptable for
viewing celestial bodies. However, it will feel strange when observing a land object or a bird.
Focusing Telescope:
1. After selecting the desired eyepiece aim the telescope tube at a land-based target at
least 200 yards away (e.g. A telephone pole or building). Fully extend focusing tube by turning
the focuser.
2. While looking through selected eyepiece, slowly retract focusing tube by turning
focuser until object comes into focus.
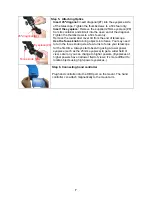
Electronic Eyepiece:
AstroBoy-70e comes with a plug and play electronic eyepiece, iE1300 1.3 megapixel
CMOS camera. An electronic eyepiece works just as a short focal length (few mm) eyepiece.
Therefore, you need to start the observation with the longer focal length eyepiece. In most
cases, directly replace an optical eyepiece with an electronic eyepiece will not bring an image
onto the computer screen immediately. Fine focusing is needed. You should practice in daytime
to get familiar with your setup.
4.3.2. Go to the Moon
After performing these setups, the mount is ready to GOTO and track objects. The most
common object will be Moon.
Press MENU button, select “Select and Slew” by press ENTER button. Select “Planets,
Sun, Moon”, and using
▲
or
▼
button to select Moon. Press ENTER. The telescope will start
slew to the general direction where the Moon should be. After the mount stops slewing, it will
automatically begin to track.