10
4. Getting Started
You may start observing land and astronomical objects using GoToNova’s arrow keys.
After the telescope was assembled (referring to Section 2. Telescope Assembly), flip the
I/O switch on the telescope mount to turn on the mount. Use
►
,
◄
,
▼
or
▲
buttons to point the
telescope to the desired object. Use the SPEED key to change the slewing speed.
In order to experience the full GOTO capability of GoToNova technology, it is very
important to set up the mount correctly before observation.
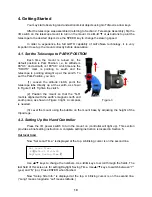
4.1. Set the Telescope to PARK POSITION
Each time the mount is turned on, the
default position is Park Position,
i.e.
, its altitude is
90º0.0’ and azimuth is 180º0.0’, which means the
“SOUTH” mark is pointing to south and the
telescope is pointing straight up at the zenith. To
set the Park Position, you can:
(1) Loosen the altitude clutch; point the
telescope tube directly up at the zenith, as shown
in Figure 3 left. Tighten the clutch.
(2) Position the mount so that the “N-S”
mark is aligned with the earth’s magnetic north and
south poles, as shown in Figure 3 right. A compass
is needed.
(3) Level the mount using the bubble on the mount base by adjusting the height of the
tripod legs.
4.2. Setting Up the Hand Controller
Press the I/O power switch to turn the mount on (controller will light up). This section
provides a brief setting instruction. A complete setting instruction is located in Section 5.
Set local time:
Now “Set Local Time:” is displayed at the top. A blinking cursor is on the second line.
Use
▲
/
▼
keys to change the numbers. Use
◄
/
►
keys to scroll through the fields. The
last field of this screen is for setting Daylight Saving Time. Use
▲
/
▼
keys to switch between “Y”
(yes) and “N” (no). Press ENTER when finished.
Now “Setup Site Info:” is displayed at the top. A blinking cursor is on the second line.
(“Longi” means longitude; “Lat” means latitude.)
Set Local Time:
2009-06-01 11:55:09
Daylight Saving Time Y
(1)
(2)
Figure 3


