background image

7

Do not connect Ethernet cable until last step! 
(See Internet Connection)

1. Make sure you have downloaded the NetShair Nano App prior  
  to setup! 

2. To download the NetShair Nano App, open the App Store

SM


  on your iPod, iPhone or iPad. Search for the 
  “NetShair Nano” App and download it to your device. 

3.  After installation is complete, the NetShair Nano App icon will 
  be shown on the device. Connect the NetShair Nano to a    

  powered USB port on your computer or to a USB charging  

  adapter of any mobile device.
 
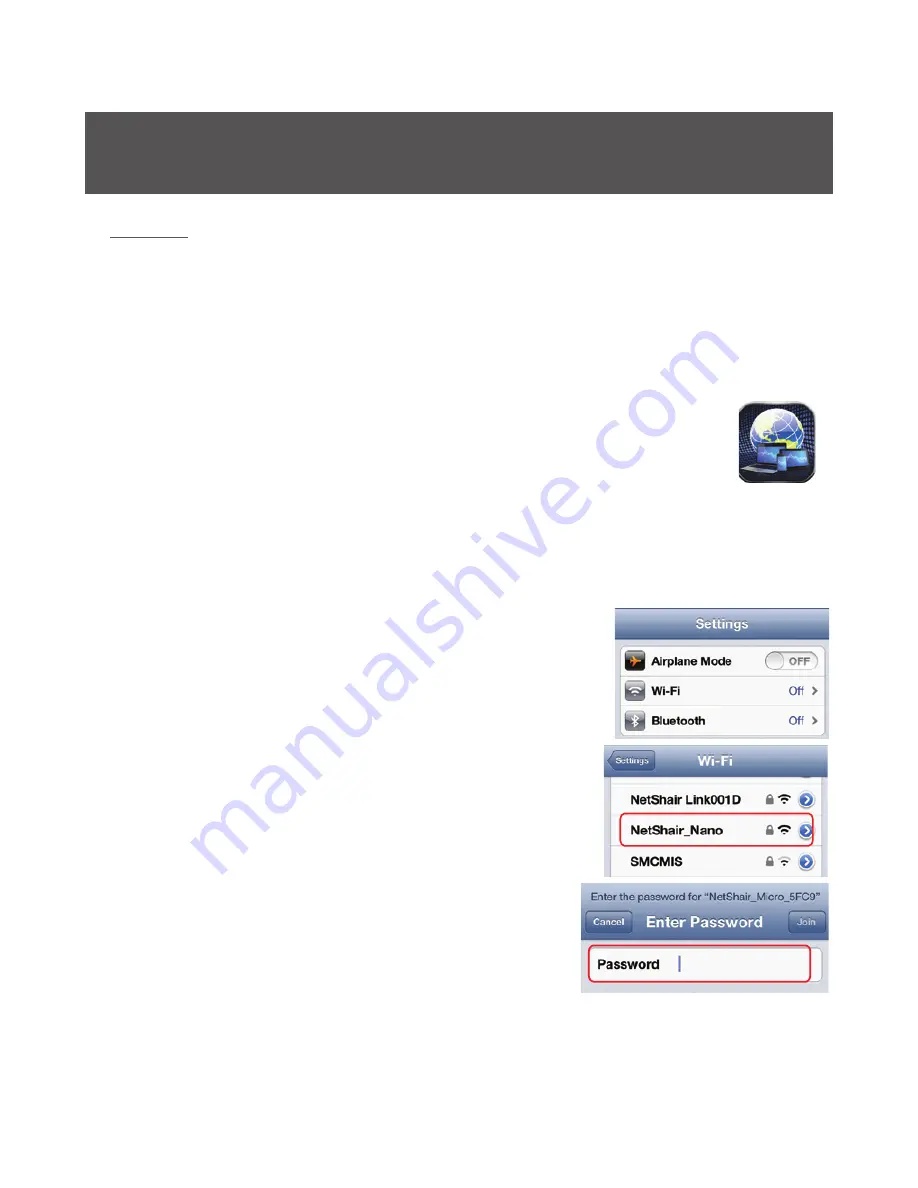
4. Open the Settings menu on your device 
  and set Wi-Fi to ON.

5. Choose “NetShair_Nano_XXXX”network.

6. Enter the default password “12345678” 

  and tap Join to connect. Wi-Fi will 

  display NetShair_Nano_XXXX. 

7. See 

Internet Connection

 on the next page to set 

  operating mode.

NetShair Nano Setup 

iPod / iPhone 

iPad

Содержание Q1376

Страница 1: ...1 Quick Start Guide NetShair Nano Ultra Portable Wi Fi Router Access Point GWPAP1 PART NO Q1376 www iogear com...

Страница 2: ...d and product names are trademarks or registered trademarks of their respective holders IOGEAR makes no warranty of any kind with regards to the information presented in this document All information...

Страница 3: ...ction iPod iPhone iPad 8 Wireless Security Settings iPod iPhone iPad 12 NetShair Nano Setup Android 13 Internet Connection Android 14 Wireless Security Settings Android 18 NetShair Nano Setup Computer...

Страница 4: ...3 or iOS 5 1 NetShair Nano App downloaded from Google Play Store or Apple App StoreSM App not required for PC MAC 1 WPS green LED status indicator Flashing WPS mode active Off WPS mode off 2 WLAN blu...

Страница 5: ...and share Internet access to multiple users and devices If using the NetShair Nano at home with a cable modem use Router Mode and the WAN setting for DHCP Client If using at home with a DSL modem use...

Страница 6: ...network Note XXXX Last 4 digits of the NetShair Nano s MAC ID Hardware Installation Do not connect the Ethernet cable until app client setup is complete USB wall charger not included iPod iPhone iPad...

Страница 7: ...er installation is complete the NetShair Nano App icon will be shown on the device Connect the NetShair Nano to a powered USB port on your computer or to a USB charging adapter of any mobile device 4...

Страница 8: ...he proper setting 1 Make sure the NetShair_Nano_XXXX Wi Fi network is connected Open the NetShair Nano App 2 On the Home screen tap Advance Setting 3 Tap the Set Operation Mode button 4 Select Router...

Страница 9: ...assword to access select PPPoE Enter the username and password then tap OK 3 Tap Restart to save settings 4 After the NetShair Nano reboots connect an Ethernet cable to the NetShair Nano The Network L...

Страница 10: ...password 4 Tap OK then Restart when prompted Wait approximately 60 seconds for the NetShair Nano to restart 5 Once restarted connect Ethernet cable to Netshair Nano 6 Connect back to NetShair_Nano_XXX...

Страница 11: ...ll light solid once a successful connection has been made 6 Connect back to NetShair_Nano_XXXX Wi Fi network Open your web browser to access the internet Access Point Mode Setting Follow the steps bel...

Страница 12: ...ap Restart Option 2 Network Name To change the name of your wireless network SSID enter the new name in the SSID box 1 Tap Basic Setting Set Wireless SSID Fill in new SSID Tap OK Tap Restart Wireless...

Страница 13: ...p and download it to your device 3 After installation is complete the NetShair Nano App icon will be shown on the device Connect the NetShair Nano to a powered USB port on your PC or connect to a USB...

Страница 14: ...rm the proper setting 1 Make sure the NetShair_Nano_XXXX Wi Fi network is connected Open the NetShair Nano App 2 On the Home screen tap Advance Setting 3 Tap Set Operation Mode and then tap Router and...

Страница 15: ...res a username and password to access select PPPoE Enter the username and password then tap OK 3 Tap Restart to save settings 4 After the NetShair Nano reboots connect an Ethernet cable The Network LE...

Страница 16: ...password 4 Tap OK then Restart when prompted Wait approximately 60 seconds for the NetShair Nano to restart 5 Once restarted connect Ethernet cable to Netshair Nano 6 Connect back to NetShair_Nano_XXX...

Страница 17: ...ernet will be live Access Point Mode Setting Follow the steps below to setup the NetShair Nano for AP Mode If you are unsure about which mode to use see Router Mode or AP Mode page 5 to confirm the pr...

Страница 18: ...Set Wireless Security Fill in new Password Tap OK Option 2 Network Name To change the name of your wireless network SSID enter the new name in the SSID box 1 Tap Basic Setting Set Wireless SSID Fill i...

Страница 19: ...net Connection 1 Power on the NetShair Nano by plugging it into a powered USB port on your laptop desktop or by plugging it into a USB charging adapter of a USB mobile device 2 Click on the wireless i...

Страница 20: ...menu and select Router then click Apply Change A notification saying your settings have been saved will appear click Reboot Later to continue without the NetShair Nano rebooting Router Mode Setting Fo...

Страница 21: ...nected to requires a username and password to access select TCP IP Settings then click WAN Interface Enter the username and password provided by the administrator and click Apply Changes 2 The NetShai...

Страница 22: ...Nano_XXXX Wi Fi Network is connected 2 After putting the NetShair Nano in Router Mode see Router Mode Setting open a browser to 192 168 1 254 to get to the setup page 3 Go to TC IP setting then go to...

Страница 23: ...s connected Open the Browser and enter 192 168 1 254 into the address bar to access the web client 2 On the Operation Mode page click the drop down menu and select AP then click Apply Change 3 The Net...

Страница 24: ...n click Security 3 Click the drop down menu for Encryption and select from the following WEP WPA WPA2 or WPA Mixed Recommended 4 Enter a new network key with a minimum of 8 characters and click Apply...

Страница 25: ...cted Open the Browser and enter 192 168 1 254 into the address bar to access the web client 2 Select Wireless then click Basic Settings 3 Enter the new network name in the SSID box and click Apply Cha...

Страница 26: ...pe 5 Connect the Ethernet cable in hotel to the WAN port of device 6 If hotel charges a fee for each device connected make sure to set the NetShair Nano to Router Mode If you are setting up the NetSha...

Страница 27: ...umis aux deux conditions suivantes 1 cet appareil ne peut pas causer d interf rences et 2 cet appareil doit accepater toute interf rences y comparis les interferences qui peuvent causer un mauvais fon...

Страница 28: ...ese limits are designed to provide reasonable protection against harmful radio frequency interference when operated in a commercial environment See User Manual for additional information This device h...

Страница 29: ...port Warranty Information This product carries a 1 Year Limited Warranty For the terms and conditions of this warranty please go to http www iogear com support warranty Register online at http www iog...

Страница 30: ...2014 IOGEAR...

Отзывы: