21
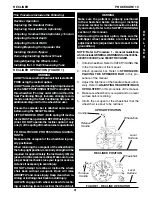
This Procedure Includes the Following:
Replacing the Seat Upholstery
Replacing the Back Upholstery
Adjusting the Back Height
Adjusting Seat Depth - 9000 XT/XDT Wheelchairs
Adjusting Back Angle - 9000 XT Adjustable
Back Models Only
Adjusting Seat Width - 9000SL, 9000XT, 9000XDT
WARNING
After making adjustments, always make sure
that parts are properly tightened BEFORE us-
ing the wheelchair.
NOTE: The procedures in this section apply to
NON-RECLINER models only. For 9000XT RE-
CLINER model, refer to PROCEDURE 10 of this
manual.
NOTE: Refer to Procedure 1 - General Guidelines
which include GENERAL WARNINGS for the 9000SL,
9000XT, 9000XDT, and 9000XT RECLINER.
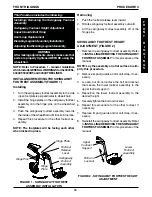
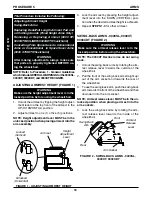
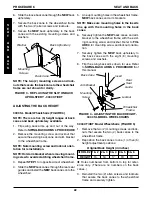
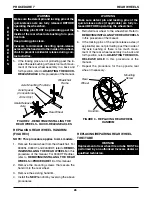
REPLACING THE SEAT UPHOLSTERY
(FIGURE 1)
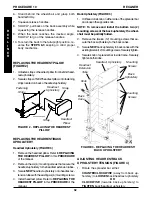
1. Remove the mounting screws that secure the ex-
isting seat upholstery to the wheelchair frame.
NOTE: The chart below determines the number
of mounting screws for each seat depth.
2. Remove the existing seat upholstery from the wheel-
chair frame.
3. Install
NEW
seat upholstery by reversing
STEPS
1
-
2
.
SEAT DEPTH
NUMBER OF SCREWS
16-inch
8
17-inch to 20-inch
10
Mounting
Screws
Washers
Washers
Mounting Screws
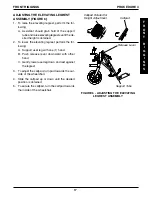
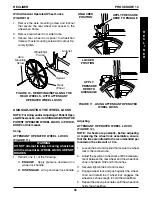
REPLACING THE BACK UPHOLSTERY
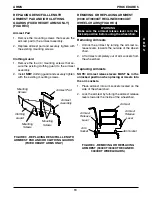
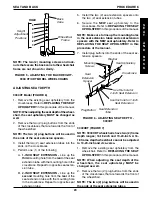
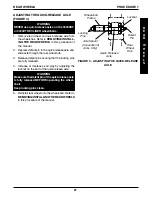
Screw On Back Upholstery - 9000 SL (FIGURE 2)
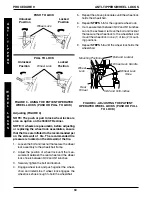
1. Flip swing back arms up and out of the way.
Refer to
SWING-BACK ARMS
in
PROCEDURE
5
of this manual.
2. Remove the eight (8) mounting screws and
washers that secure the existing back upholstery
to the back canes.
3. Securely tighten the
NEW
back upholstery to
the back canes with the eight (8) mounting
screws and washers.
4. Flip swing-back arms down for use. Refer to
SWING-BACK ARMS
in
PROCEDURE 5
of this
manual.
FIGURE 2 - REPLACING THE SCREW ON
BACK UPHOLSTERY - 9000 SL
SEAT AND BACK
PROCEDURE 6
S
E
A
T
A
N
D
B
A
C
K
FIGURE 1 - REPLACING THE SEAT UPHOLSTERY
Seat
Upholstery
16-inch
Seat Depth
Mounting
Screws
Wheelchair
Frame
Back Upholstery
Back
Cane
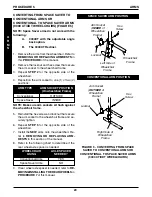
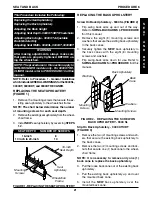
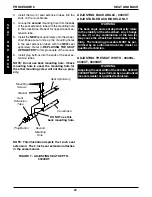
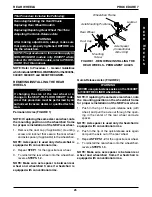
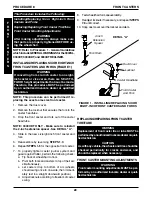
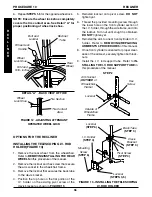
Slip On Back Upholstery - 9000 XT/XDT
(FIGURE 3)
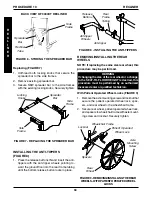
1. Remove the two (2) mounting screws and wash-
ers that secure the existing back upholstery to
the back canes.
2. Remove the two (2) mounting screws and lock-
nuts that secure one (1) back cane to the wheel-
chair frame.
NOTE: It is necessary to remove only one (1)
back cane to replace the back upholstery.
3. Pull the loose back cane out of the existing back
upholstery.
4. Pull the existing back upholstery up and over
the mounted back cane.
5. Install the
NEW
back upholstery over the
mounted back cane.
Содержание 9000 SL
Страница 42: ...42 NOTES N O T E S NOTES...


