


93902 1 01/16
GB
11
FlashEx
7
= "Lubricate cutting mechanism" pilot lamp
(Fig. 1/7)
Lights up if the machine needs to be lubricated.
NOTE!
If the safety glass for the oiling process is open,
the lamp starts
fl
ashing.
8
= "Material jam" pilot lamp (Fig. 1/8)
Lights up if the cutting mechanism is jammed.
9
= "Cutting mechanism ready" / "Cutting mecha-
nism not ready" curved pilot lamps (Fig. 1/9)
Lights up green if the cutting mechanism can be
fed. Lights up red if the cutting mechanism cannot
be fed.
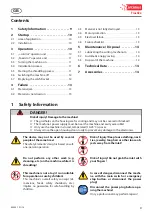
3.2 "Feed slot" operator unit
1
000087
2
1
Safety glass
2
Feed
fl
ap
Fig. 2 intimus FlashEx feed slot
1
= Safety glass (Fig. 2/1)
The machine only runs if the safety glass is closed.
2
= Feed
fl
ap (Fig. 2/2)
Feed the material through the device's feed
fl
ap.
This starts the cutting mechanism.
3.3 Turning the machine on
Brie
fl
y press the function button (Fig. 1/1).
¾
The LED display on the function button lights
up to indicate "ready for operation."
¾
You can now feed the machine.
3.4 Initialization process
NOTE!
During the initialization process, please do not
feed any material into the shredder!
Start the initialization process (when the machine
is o
ff
):
1.
Brie
fl
y press the function button Fig. 1/1.
¾
The machine turns on.
2.
Brie
fl
y press the forward button Fig. 1/2.
¾
The initialization process starts. The cutting me-
chanism switches
fi
ve times between forward
and backward operation.
¾
The cutting mechanism stands still. You can now
feed the machine.
3.5 Starting the shredding process
DANGER!
Risk of injury! Damage to the machine!
Remove batteries from the device befo-
re shredding it!
CAUTION!
Material jam! Damage to the machine!
Ì
Feed the data carriers into the machine
individually, one after another! This lets
the
intimus FlashEx
reach its best per-
formance.
Ì
If too much material has reached the
cutting mechanism, see
„Material jam“,
p.
13
.
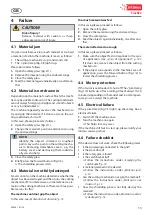
Feeding through the feed
fl
ap (Fig. 3/2)
Slip small data carriers, like USB sticks, mobile phones
or SSD disks, through the feed
fl
ap into the cutting me-
chanism.
¾
The shredding process starts automatically.
¾
After destroying the data carrier, the machine
shuts o
ff
automatically.
1
000084
2
1
Safety glass
2
Feed
fl
ap
Fig. 3 Feeding through the feed
fl
ap
Feeding through the safety glass (Fig. 3/1)
1.
For larger data carriers, e.g. mini tablets, push the
safety glass back and feed the data carrier into the
cutting mechanism.
2.
Close the safety glass again.
3.
Brie
fl
y press the forward button Fig. 1/2.
¾
The shredding process starts.
¾
After destroying the data carrier, the machine
shuts o
ff
automatically.
Содержание FlashEx
Страница 27: ...93902 1 01 16 27 FlashEx...