


INSTALLATION
16
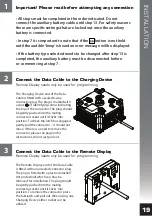
Installing the Remote Display
The DCC Remote Display is designed to be installed in the cabin of the vehicle,
on the dash or console. It should be shielded from excessive heat and located
away from direct sunlight if possible.
A user adjustable ball joint allows for the housing to swivel through a range of
positions to best suit the operator.
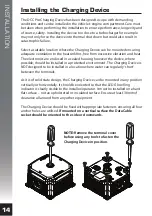
A tensioning screw in the centre of the mounting bracket can be utilised to
adjust and maintain the Remote Display in the desired position. This screw
should not be over-tightened.
There are two methods provided for fixing the mounting base to the surface,
details as follows:
Option A - Screw Fixing
:
This method utilises two suitable
fasteners (not supplied) to attach the
mounting base to the surface as per
the diagram below.
Ball Joint
Tensioning
Screw
Option B – Adhesive Fixing
:
This method utilises the self-adhesive
foam backing tape to adhere the
mounting base to the surface as per
the diagram below.
Peel off backing
film to apply
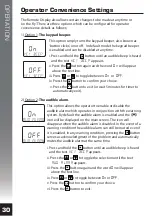
The mounting base is designed to hold
the Remote Display. Place the display
bottom first into the bracket and
pinpoint the two location tabs provided.
Tilt the display back until the top tab
locates in position with an audible ‘click’.
The display can be removed at any time
by pushing the thumb lever gently back
and releasing the housing assembly. Do
not press on the lens as this may result in
it cracking.


