background image

Communications Reference

C-13

C

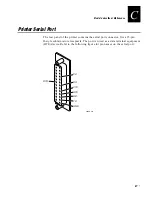
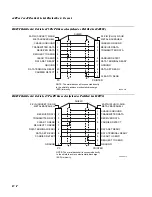
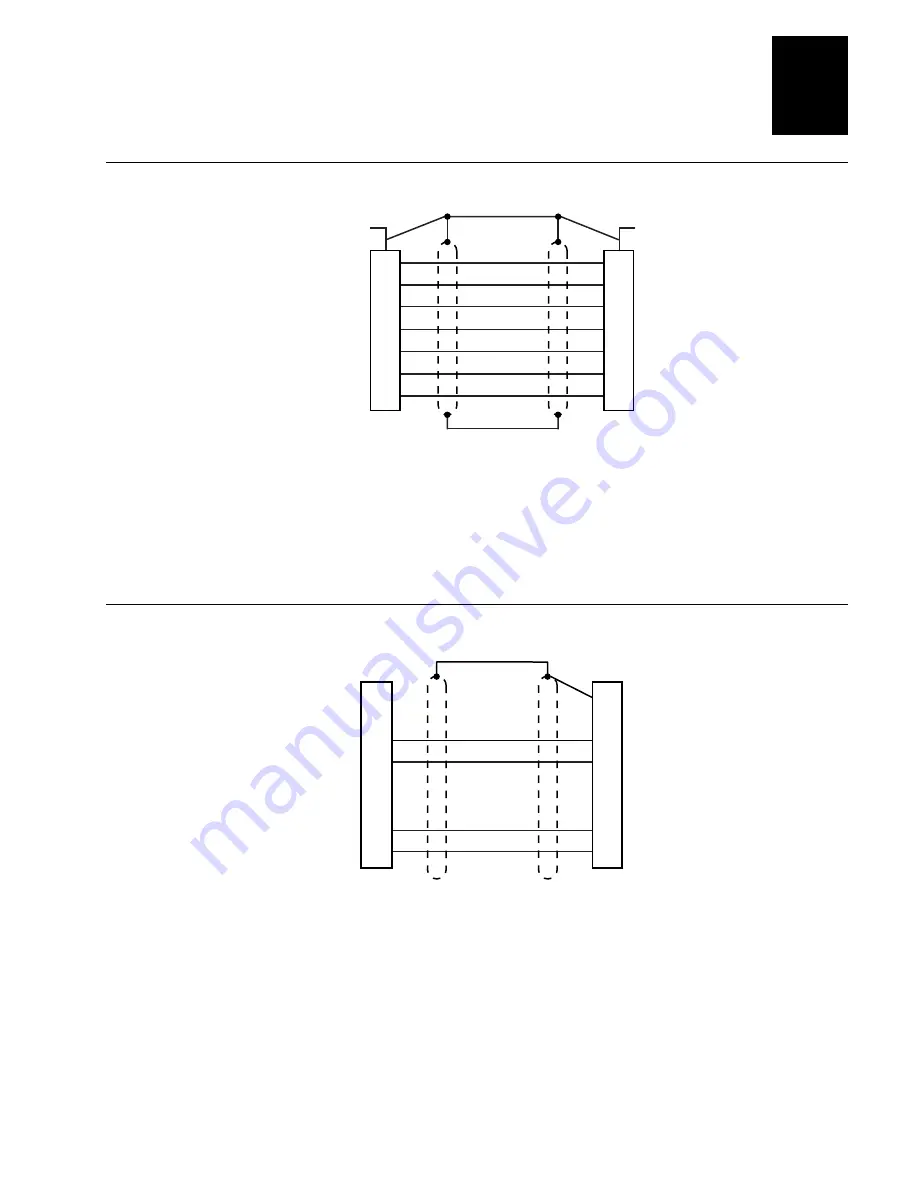
Straight Through DTE to DCE Cable for Use with a Modem (Intermec Part Number 043237S)

SHIELD

PRINTER

25-PIN (PLUG) D-SUB

METAL BACKSHELL

CHASSIS GROUND

TRANSMITTED DATA

RECEIVED DATA

REQUEST TO SEND

CLEAR TO SEND

DATA TERMINAL READY

SIGNAL GROUND

25-PIN (PLUG) D-SUB
METAL BACKSHELL

CHASSIS GROUND

TRANSMITTED DATA

RECEIVED DATA

REQUEST TO SEND

CLEAR TO SEND

DATA TERMINAL READY

SIGNAL GROUND

NOTE: The metal backshell is connected directly 
to the shield to achieve electrostatic discharge
(ESD) immunity.

MODEM

1

2

3

4

5

20

7

1

2

3

4

5

20

7

44XXU.076

Note:

 If you find that you are losing data, you may need to isolate the chassis ground

from one of the two devices by connecting it to the shield.

RS-422 Intermec Pin Assignments

44XXU.077

PRINTER

HOST

NOTE: Connect pin 1 to shield 
at one end only.

1

13

16

14

19

1

19

14

16

13

Input RxDB

Input RxDA

Output TxDA

Output TxDB

+

-

-

+

SHIELD

Note:

 The host in this case includes Intermec products that support RS-422. Non-

Intermec controllers may have different pin assignments.

Содержание EasyCoder 4420

Страница 1: ...4420and4440BarCodeLabelPrinter P N 066392 001 User s Manual ...

Страница 2: ... change without notice 1998 by Intermec Technologies Corporation All Rights Reserved The word Intermec the Intermec logo JANUS IRL TRAKKER Antares Adara Duratherm EZBuilder Precision Print PrintSet Virtual Wedge and CrossBar are either trademarks or registered trademarks of Intermec Novell is a registered trademark of Novell Inc Kimdura is a registered trademark of Kimberly Clark Kapton is a regis...

Страница 3: ...oes Not Print 1 10 Connecting the Printer to Your System 1 10 Connecting the Printer to a PC 1 11 Connecting the Printer to a PC Serial Port 1 11 Connecting the Printer to a PC Parallel Port 1 12 Connecting the Printer to a PC With a Modem 1 13 Connecting the Printer to a Network 1 14 Connecting the Printer to an AS 400 1 14 Connecting the Printer to a Mainframe 1 15 Cabling in Noisy Electrical En...

Страница 4: ...g the Printer Inspecting the Printer 3 3 Maintenance Schedule 3 3 Tools for Cleaning the Printer 3 5 Cleaning the Printhead 3 6 Cleaning the Printer Covers 3 7 Cleaning the Rollers and the Tear Bar 3 8 Cleaning the Media Guides and Media Path 3 10 Cleaning the Label Sensors 3 12 Troubleshooting Troubleshooting Checklist 4 3 Printer Operation Problems 4 3 Print Quality Problems 4 5 Communication Pr...

Страница 5: ...vice Mode Procedures 6 3 Printing Test Labels 6 5 Using Data Line Print Mode 6 5 Performing Selective Transfer 6 6 Using Memory Reset 6 7 Setting Configuration Commands in Test and Service Mode 6 8 Setting the Number of Dot Increments 6 9 Adjusting the Label Rest Point 6 10 Setting Emulation Mode 6 12 Using Forms Adjust 6 13 X Forms Adjust 6 14 Y Forms Adjust 6 15 Printer Specifications 4420 and 4...

Страница 6: ...420 and 4440 Bar Code Label Printer User s Manual 1233 FranklinGothic vi Communications Reference Communications Protocols C 3 Communications Interfaces C 9 Printer Serial Port C 11 Glossary Index C G I ...

Страница 7: ...termec equipment You can be seriously injured and equipment and data can be damaged if you do not follow the safety warnings and cautions Do not repair or adjust alone Do not repair or adjust energized equipment alone under any circumstances Someone capable of providing first aid must always be present for your safety First aid Always obtain first aid or medical attention immediately after an inju...

Страница 8: ...ent d une méthode d un état ou d un rapport qui doit être strictement respecté pour éviter l occurrence de mort ou de blessures graves aux personnes manupulant l équipement Caution A caution alerts you to an operating procedure practice condition or statement that must be strictly observed to prevent equipment damage or destruction or corruption or loss of data Conseil Une précaution vous avertit ...

Страница 9: ...inter front panel tells you how to load roll media load ribbon and print a test label Routine maintenance Chapter 3 Maintaining the Printer Shows how to maintain the printer Troubleshooting Chapter 4 Troubleshooting Instructs how to troubleshoot operation quality and communication problems Improving printer performance Chapter 5 Optimizing Printer Performance Tells you how to fine tune the printer...

Страница 10: ...front panel Downloaded commands appear in the order that you enter them into the printer with the following conventions Convention Description Angle brackets enclose mnemonic representations of ASCII control characters For example ETX represents the ASCII End of Text control character data Italic text represents variable data which you must replace with a real value For example n signifies a varia...

Страница 11: ...ditional information on understanding and communicating with your printer Manual Intermec Part Number 4420 and 4440 Bar Code Label Printer Getting Started Guide 066394 IPL Programming Reference Manual 066396 The Bar Code Book 051241 Data Communications Reference Manual 044737 ...

Страница 12: ......

Страница 13: ...Getting Started 1 ...

Страница 14: ......

Страница 15: ...ut IEEE 1284 parallel port 18 000 inch ribbon capacity Simple user interface Moveable label gap sensor Up to 8 inches per second ips print speed with selected media Direct thermal and thermal transfer printing support Precision Print technology Front View Fe ed Pause Po we r D ata Alert Em pty P ause Intermec Intermec 4420 Feed Pause button Power Data LED Alert LED Empty Pause LED Media window Med...

Страница 16: ...ry port Several options are available for use with the 4420 and 4440 printer See Appendix A Printer Specifications for a complete description of each option Note The accessory port is reserved for future use Preparing the Printer for Installation Before connecting the printer to your data collection system you need to connect the printer to a power source open the printer load media for fanfold pr...

Страница 17: ...the back of the printer are set to their factory default settings Top Bank Turn on switch 1 Turn off switches 2 through 8 Bottom Bank Turn off switches 1 through 8 44XXU 005 1 2 3 4 5 6 7 8 1 2 3 4 5 6 7 8 O I 1 2 3 4 5 6 7 8 O 1 2 3 4 5 6 7 8 I O I 3 Plug the AC power cord into the receptacle at the rear of the printer 4 Plug the other end of the power cord into a grounded wall outlet or surge pr...

Страница 18: ...er the embossed section of the media cover the media cover release and pull the bottom of the media cover away from the base of the printer 2 Grasp the front of the media cover with your left hand and lift the front of the media cover upward to release it from the printer frame 3 Lift the media cover away from the top of the printer 44XXU 006 Fe ed Pa use Po we r D ata Ale rt Em pty Pa use Interme...

Страница 19: ...over Note If you want to load rolls of media instead of fanfold see Loading Roll Media Into the Printer in Chapter 2 To load media for fanfold printing 1 Open the printer 2 Rotate the head lift lever clockwise to release the printhead 3 Turn the supply roll retainer counterclockwise and slide it to the outer end of the supply roll post 44XXU 008 1 2 3 4 5 6 7 8 1 2 3 4 5 6 7 8 O I Head lift lever ...

Страница 20: ... Release the lower media guide and adjust the edge guide to position the media firmly against the inside wall of the printer 9 Slide the supply roll retainer up to the edge of the fanfold media and turn the supply roll retainer clockwise until it locks firmly in place This action secures the media against the inside wall of the printer 10 Rotate the head lift lever counterclockwise until it locks ...

Страница 21: ...ty Pause LEDs blink during the printer self test 3 Release the Feed Pause button when the media starts moving The printer feeds out one or two blank labels and then prints the hardware configuration test label 4 Turn the printer power off and then on again 44XXU 010 4420 Hardware Configuration 128 kilobytes 517 kilobytes OKB 0 0 0 896 5 0 126 none none none 066197 0 8 Memory Installed Flash Storag...

Страница 22: ...cting the Printer to Your System You can connect your 4420 or 4440 printer to a PC a local area network an AS 400 or other midrange or a mainframe Use this section to learn how to connect your printer to any of these systems This illustration shows you where to connect your system to the printer You can use any of these three ports on the rear of the printer Serial communications port Parallel por...

Страница 23: ...er PC 44XXU 013 Connecting the Printer to a PC Serial Port To connect the 4420 or 4440 to your PC serial port you need a shielded EIA RS 232 RS 422 or RS 485 electrical interface with a 25 pin D style subminiature connector It must have pins on the printer end and an appropriate serial port connector on the other end Currently Intermec does not offer a cable for the RS 422 interface However you wi...

Страница 24: ...ations later in this chapter for more information Connecting the Printer to a PC Parallel Port If you are using a parallel port to communicate with your printer you need a parallel cable to run between the printer and the PC You can purchase the Intermec IEEE 1284 parallel cable Intermec Part No 590124 or purchase a compatible cable from your local computer store To connect your printer to a PC pa...

Страница 25: ...XXU 016 To connect your printer to a PC with a modem 1 Connect the printer serial port to a modem using a 25 pin to 25 pin RS 232 modem cable assembly Intermec Part No 043237S 2 Connect a second modem to the host computer using an appropriate cable assembly for the host and modem 3 Connect the two modems together using an acoustic coupler or a direct connection to telephone communications lines 4 ...

Страница 26: ...twork Controller User s Manual Intermec Part No 054292 Data Communications Reference Manual Intermec Part No 044737 Model 200 Controller System Manual Intermec Part No 063439 RF System User s Manual Intermec Part No 053574 If you need to change the printer s communications parameters follow the procedures in Configuring the Serial Port for Communications later in this chapter Connecting the Printe...

Страница 27: ... with your coax adapter card Cabling in Noisy Electrical Environments The items listed below create noisy electrical environments that can disrupt data communications between your host computer and the printer Large power transformers Large electrical motors Arc welders Motor controllers Switch gears If any of these items are near your printer you may want to try any of the following suggestions t...

Страница 28: ...itches For example if you want to change the media type to thermal transfer set DIP switch 8 on the bottom bank of switches to the on position 3 Turn the printer power off and then on for the configuration changes to take effect Note Make sure you set all Multi Drop switches to off if you are not using a Multi Drop network DIP Switch Settings Descriptions Parameter Description Baud rate The rate i...

Страница 29: ... 1 O O 1 1 O O O O 1 1 1 1 O O O O 1 1 1 1 O O O O 1 1 1 1 O O O O 1 1 1 1 O O O O O O O O 1 1 1 1 1 1 1 1 O O O O O O O O 1 1 1 1 1 1 1 1 O O O O O O O O O O O O O O O O 1 1 1 1 1 1 1 1 1 1 1 1 1 1 1 1 O O 1 1 O 1 O 1 O 1 Default settings are noted with an Bottom Bank Switch Number 1 2 3 4 5 6 7 8 OFF 1 2 3 4 5 6 7 8 O OFF 1 ON Baud Rate Selection 19 200 9 600 4 800 2 400 1 200 38 400 57 600 115 ...

Страница 30: ......

Страница 31: ...Operating the Printer 2 ...

Страница 32: ......

Страница 33: ...he printer The Feed Pause button performs various tasks Loading Media and Ribbon Explains how to load a roll of media thermal transfer ribbon and the procedure for using the self strip option Media Sensitivity Numbers Optimizes print quality and print speed Communications With the Printer Explains different methods for transferring information from the host to the printer and from the printer to t...

Страница 34: ...em fault 3 Empty Pause Off Flashing On Printing or idle Paused Media fault Using the Front Panel LEDs for Troubleshooting Over Temperature If the printer overheats the Alert LED flashes and the printer stops Do not try to troubleshoot or adjust the printer just allow it enough time to cool down and it will resume operation on its own You should only encounter this problem after extended print jobs...

Страница 35: ... hold the Feed Pause button When you release the button the media stops feeding Take the printer offline Press the Feed Pause button twice Press the button again to bring the printer online Printing Pause the printer Press and release the Feed Pause button Press and release the button again to resume printing Cancel the current print job Press and hold the Feed Pause button until the printer stops...

Страница 36: ...ise the printhead by rotating the head lift lever clockwise until the printhead disengages 2 Turn the supply roll retainer counterclockwise to release it and then slide it to the outer end of the supply roll post Turn it clockwise to lock it in place Note If you are replacing the empty media roll with a new roll of the same width you do not need to adjust the edge guide or the supply roll retainer...

Страница 37: ...eed to load ribbon Follow the instructions for Loading Thermal Transfer Ribbon later in this chapter before you finish performing this procedure 12 Lower the printhead by rotating the head lift lever counterclockwise until it locks 13 If you are loading continuous media or mark label stock use PrintSet your third party software or the printer command set to tell the printer what kind of media you ...

Страница 38: ...correct core locking brackets for your ribbon core The printer ships from the factory with the cardboard core locking brackets already attached Note If you do not use the correct core locking brackets you may experience printing problems or possible damage to the printer To change the cardboard core locking brackets to plastic core locking brackets 1 Pull up on the middle of the cardboard core loc...

Страница 39: ...e leader edge for guiding the ribbon through the printhead mechanism 4 Slide the roll of thermal transfer ribbon onto the ribbon supply hub with the ribbon roll winding clockwise 5 Route the ribbon leader through the printer mechanism as shown in the following illustration 6 Attach the leader from the new thermal transfer ribbon roll to the empty ribbon core using the adhesive strip on the leader ...

Страница 40: ...r 8 Engage the printhead by rotating the head lift lever counterclockwise until it locks 9 Enable thermal transfer printing by setting DIP switch 8 on the bottom bank of switches to the on position Refer to Configuring the Serial Port for Communications in Chapter 1 for DIP switch settings 10 Press the Feed Pause button to advance the ribbon through the printer The printer is now ready to print No...

Страница 41: ... Look for the three digit media sensitivity number on the side of the media roll Use the last three digits 140 in the example of the 15 digit number stamped on the roll for the media sensitivity number a small label attached to the roll of media a small label attached to the plastic bag of your ribbon roll 44XXU 032 SENSITIVITY NUMBER 5 7 120066102605140 120066102605140 Note Some ribbon rolls have...

Страница 42: ...ttom Bank Turn off switches 1 through 8 4 Hold the Feed Pause button down for 1 second The printer prints out the software configuration label 5 Return the DIP switches to their original settings 6 Turn the printer off and then on again Setting the MSN for Intermec Media and Ribbon The sensitivity number on each roll of thermal transfer media or ribbon has an asterisk in place of one of the digits...

Страница 43: ...are not using Intermec media and ribbon or you misplaced your packaging with the three digit sensitivity number label on it you can set the approximate sensitivity rating The first column of the Direct Thermal and Thermal Transfer Media Sensitivity Settings tables list the approximate sensitivity settings To achieve acceptable print quality enter the three digit media sensitivity number for exampl...

Страница 44: ...l Media Sensitivity Settings Approximate Sensitivity Ratings Sensitivity Setting Direct Thermal Media Maximum Recommended Print Speed 700 Series High Sensitivity 740 Duratherm Lightning Plus 1 8 720 Duratherm Lightning Plus 2 8 400 Series Medium Sensitivity 480 Duratherm Lightning IR Tag 5 470 Duratherm Lightning 1 5 460 European IR 5 450 Duratherm IR Lightning 1 5 440 European Thermal 5 420 Durat...

Страница 45: ...remium 7 6 647 Duratran Tyvek Premium 7 4 643 European Tyvek Premium 4 633 European Polyethelene Premium 8 627 Duratran Kimdura Premium 7 8 623 European Kimdura Premium 6 500 Series Medium Sensitivity Paper 567 Duratran II 1 Premium 7 8 565 European Premium Paper Premium 7 563 Duratran VG Standard 4 533 European Tag Premium 6 527 Duratran II Tag 7 mil Premium 7 6 513 European Coated Premium 6 300 ...

Страница 46: ...odify and download configuration files Refer to the online help for information on using PrintSet Using Third Party Software You can use third party software to set many of the printer parameters You can configure the parameters that your software does not set by using the printer command set or the configuration DIP switches Use your third party software to create label formats and convert graphi...

Страница 47: ... Test Print button 3 Select the Test Label option button 4 Select either the Text or the Bar Code option button If you select to print text you can choose a font in the Select Printer Font list box If you select to print a bar code you can choose a symbology in the Select Symbologies list box 5 Click on the Print button Your printer prints out a test label For example if you chose to print a bar c...

Страница 48: ......

Страница 49: ...FG 9pt Italic 1233 Maintaining the Printer 3 ...

Страница 50: ...FG 9pt Italic 1233 ...

Страница 51: ...r performance Check the data collection network regularly for loose wires or poorly installed connections Be sure to replace corroded wires Maintenance Schedule Clean your printer regularly to maintain the quality of your labels and extend the life of your printer This table contains suggestions for cleaning the printer Use the illustration to locate the parts you need to clean Printer Component M...

Страница 52: ...r User s Manual 3 4 Locating the Printer Parts You Need to Maintain Feed Pause Pow er Data Alert Empty Pause Intermec 4420 TTR assist roller Tear bar Drive roller Thermal printhead Edge guide Lower media guide Upper media guide 44XXU 035 ...

Страница 53: ...m cleaner Soapy water or mild detergent The following procedures explain how to access the printer parts and clean them without causing any harm to the printer or yourself Warning Switch off the printer power and remove the power cord before cleaning any part of the printer Avertissement Mettez l imprimante hors tension et débranchez le câble d alimentation avant de nettoyer une parte de l imprima...

Страница 54: ...is pour nettoyer la tête d imprimante Nettoyer avec des objets pointus endommagera la tête d imprimante Nettoyez la seulement avec de la ouate ou avec un linge propre et libre de peluches humecté avec de l alcool d isopropyl To clean the printhead 1 Turn off the printer and remove the power cord 2 Remove the media cover 3 Disengage the printhead by rotating the head lift lever clockwise until the ...

Страница 55: ... 037 Printhead Head lift lever Cleaning the Printer Covers Clean the printer covers with a general purpose cleaner soapy water or mild detergent Do not use abrasive cleansers or solvents Be sure to clean the transparent panel on the media cover so that the media supply inside the printer is visible when you close the cover ...

Страница 56: ...bbon if necessary 5 Clean the rollers by using a cloth moistened with isopropyl alcohol Move the cloth over the rollers in a side to side motion as shown Make sure to rotate the rollers so that you can clean all areas Note Rotate the TTR assist roller toward you to clean the entire drive roller surface 6 Clean both sides of the tear bar with a cloth dampened with isopropyl alcohol Remove all trace...

Страница 57: ...ng the Printer 3 9 3 Cleaning the Rollers and Tear Bar Feed Pause Power Data Alert Empty Pause Intermec 4420 Intermec A Litton Company Feed Pause TTR assist roller Tear bar Drive roller Head lift lever 44XXU 038 ...

Страница 58: ... the printer and remove the power cord 2 Remove the media cover 3 Remove the media and ribbon if necessary 4 Pull down on the lower media guide to open up the media path 5 Clean the lower media guide by using a lint free cloth moistened with isopropyl alcohol as shown in the following figure Note The lower media guide is spring loaded You must hold it open to clean 6 Use the cloth moistened with i...

Страница 59: ...Maintaining the Printer 3 11 3 Cleaning the Media Path and Media Guides Fe ed Pause Pow er Data Alert Empty Pause Intermec Intermec 4420 Media path Upper media guide Lower media guide 44XXU 039 ...

Страница 60: ...head releases 4 Remove the media and ribbon if necessary 5 Clean label mark sensor with a cotton swab moistened with isopropyl alcohol 6 Pull down on the lower media guide to expose the label gap sensor Using a cleaning brush or vacuum remove all debris and dust from the label gap sensor 7 Clean the upper and lower label gap sensor with a cotton swab and alcohol 8 Replace the media and ribbon 9 En...

Страница 61: ...Maintaining the Printer 3 13 3 Cleaning the Label Sensors 44XXU 040 Label gap sensor Label mark sensor Drive roller Cotton swab Cleaning brush Upper media guide underside Lower media guide ...

Страница 62: ......

Страница 63: ...Troubleshooting 4 ...

Страница 64: ......

Страница 65: ...ist of error messages and their solutions An electronic copy of the IPL Programming Reference Manual is available on the Internet at www intermec com manuals manuals htm If the problem persists contact your Intermec customer service representative In the U S call 1 800 755 5505 and in Canada call 1 800 688 7043 If you are an international customer contact your local Intermec representative Printer...

Страница 66: ...printhead is up Make sure the printhead is down The head lift lever should be almost straight up and down in the 1 o clock position Press the Feed Pause button to resume printing Sensor type set incorrectly Configure the printer for the correct sensor either label gap or label mark sensor Use PrintSet to configure the correct sensor You have incorrectly loaded the media Try reloading the media For...

Страница 67: ...ications in Chapter 1 Print Quality Problems If your labels are not being printed properly check the following table to locate the symptom and correct the problem Symptom Possible Causes Solution Blotches printing on labels Dirty printhead Clean the printhead For help see Cleaning the Printhead in Chapter 3 Dirty media path or rollers Clean the media path For help see Cleaning the Media Guides and...

Страница 68: ...tting correctly try changing the print darkness For help see your PrintSet online help or the IPL Programming Reference Manual Incorrect darkness control setting Adjust the darkness adjust control For help see Adjusting the Print Darkness in Chapter 5 Print speed exceeds the capability of the media Lower your print speed or use Intermec media recommended for your print speed Printhead platen rolle...

Страница 69: ...Edit the format to ensure that the text fits on the label The label gap sensor is not in the correct position Properly position the label gap sensor For help see Adjusting the Label Gap Sensor in Chapter 5 Label prints too close to front or back edge of label The top of form position is not adjusted properly Use the top of form switch to adjust the top of form position For help see Fine Tuning the...

Страница 70: ...rface to control data flow When the printer is using Intermec Standard protocol it holds pins 11 and 20 high when it is ready to receive data The printer holds the pins low when it is in one of the following conditions Buffer full Ribbon fault No label stock Label at strip pin The printer uses XON XOFF protocol for software handshaking When the input buffer is full the printer transmits an XOFF ch...

Страница 71: ...Optimizing Printer Performance 5 ...

Страница 72: ......

Страница 73: ...nually adjust the printer to perform registration tasks such as correcting uneven print quality The following sections contain information on Correcting uneven print quality Adjusting the print darkness Fine tuning the top of form position Adjusting the label gap sensor Adjusting the label mark sensor Using the printer memory efficiently Increasing throughput Correcting Uneven Print Quality You ma...

Страница 74: ...3 Bias adjust screw 2 To compensate for uneven print quality turn the bias adjust screw as shown Adjusting the bias adjust causes the printhead to rest evenly on the drive roller and results in even print quality 44XXU 044 If printing is light on the right side of label turn the bias adjust screw counterclockwise If printing is light on the left side of label turn the bias adjust screw clockwise 3...

Страница 75: ...ng the print darkness energy to the printhead perform these procedures in order 1 Set the correct sensitivity number 2 Adjust the manual darkness adjust control on the back of the printer 3 Adjust the Print Darkness setting in PrintSet To adjust the manual darkness adjust control 1 Locate the darkness adjust control on the back of the printer 2 Use a small straight slot screwdriver to adjust the p...

Страница 76: ...kness decreases the energy to the printhead and results in lighter print To adjust the print darkness with PrintSet 1 Start PrintSet on your PC 2 Click the Paper Type button 3 In the Print Quality Setup dialog box adjust the Print Darkness slider bar until the setting that you want appears underneath it You can adjust the print darkness from 10 to 10 4 Click OK 5 Download your change to the printe...

Страница 77: ...sition Do not use the TOF switch to design your label format This is important because the printer returns to the default TOF setting when you cycle printer power lift the printhead Use the TOF switch to fine tune the format position after you design the label Use PrintSet or the IPL top of form command to control the initial TOF setting For help on using the top of form command see the PrintSet h...

Страница 78: ...ur format is printing toward the front part of the label New Product Name Item code New Product Name Item code New Product Name Item code New Product Name Item code 44XXU 047 Label direction from printer 1 Remove the media cover Note Do not raise the printhead while adjusting the TOF position 2 Press on the back part of the TOF switch Each time you press the TOF switch you move the label format ba...

Страница 79: ... Name Item code New Product Name Item code 44XXU 056 Label direction from printer To move a label format forward with the TOF switch You notice that your format is printing toward the back part of the label New Product Name Item code New Product Name Item code New Product Name Item code New Product Name Item code 44XXU 057 1 Remove the media cover Note Do not raise the printhead while adjusting th...

Страница 80: ...time you press the TOF switch you move the label format forward 0 005 inch 0 127 mm 44XXU 059 3 Press the TOF switch repeatedly until your format moves forward to the correct position on the label New Product Name Item code New Product Name Item code New Product Name Item code New Product Name Item code 44XXU 060 ...

Страница 81: ...ap sensor to 0 5 inch from the inner edge of the printer at the factory You should be able to leave it in this position for most labels wider than 1 0 inch To adjust the label gap sensor 1 Remove the media cover 2 Turn the label gap sensor knob approximately 1 2 turn counterclockwise to free the sensor for adjustment 3 Slide the label gap sensor knob to the position where the label gap sensor is o...

Страница 82: ...Label gap sensor 4 Turn the label gap sensor knob clockwise to secure it in the new position 5 Try printing a label to see if the printer is detecting the start of the label top of form 6 If the printer is still not detecting the top of form slide the label gap sensor a little further toward the outer edge of the lower media guide 7 Replace the media cover ...

Страница 83: ...ition the label mark sensor no more than 2 5 inches from the inboard edge of the printer To adjust the label mark sensor 1 Remove the media cover and locate the label mark sensor 2 Use your index finger to slide the label mark sensor to the correct position for your media You can position the label mark sensor anywhere from the inboard edge of the printer to the center of the paper path 3 Print a ...

Страница 84: ...the Label Mark Sensor 44XXU 052 Label Mark Sensor Locate the label mark sensor behind the platen roller near the inboard edge of the printer Use your finger to adjust the label mark sensor Platen Roller Inboard edge of printer The platen roller is not shown for clarity only ...

Страница 85: ...al storage memory you can purchase flash SIMM for the printer The printer supports these parameters independent of the amount of memory installed or allocated by the printer Maximum number of formats 99 You can edit formats 1 to 99 You cannot edit default format 0 Fields per format 200 Maximum data buffer size for a field 3550 Maximum number of UDCs 100 Maximum number of user defined fonts 16 Maki...

Страница 86: ...rocess will be unable to keep up with the print speed decreases and throughput improves However if the number of image bands is too low the imaging process is unable to keep up with the print speed In this case the printer stops printing and starts again at the lowest print speed with the maximum number of image bands If the image band command is set too high the printer spends more time than nece...

Страница 87: ...ur print speed 1 Set the image band setting at the lowest number 2 2 Print a label at the desired speed If the label prints the image band setting is optimal You do not need to perform any more adjustments If the number of image bands is too low the printer aborts the label before printing is completed and attempts to reprint the label at the slowest speed 2 ips with the highest number of image ba...

Страница 88: ......

Страница 89: ...Using Test and Service Mode 6 ...

Страница 90: ......

Страница 91: ...1 Turn off the printer 2 Press and hold the Feed Pause button while turning on the power The printer prints out a hardware configuration label and then enters Data Line Print mode 3 Set the DIP switches to the test or service function you wish to perform See the following table for a list of the DIP switch settings 4 Hold the Feed Pause button The test begins immediately 5 If you want to perform a...

Страница 92: ...onfiguration Tables All Q OFF Batch of 1 ON Batch of 100 N Page Format UDC Font number Least significant bit is switch 8 S Source Page Format UDC Font number Least significant bit D Destination Page Format UDC Font number Least significant bit O 1 1 O O 1 O O O O 1 O 1 O 1 O 1 O 1 O 1 O 1 O O 1 1 O O O O 1 1 O O 1 1 O O O O 1 1 O O O O 1 1 1 1 Default settings are noted with an Top Bank 1 2 3 4 5 ...

Страница 93: ... the printer starts printing The printer begins printing out the test label immediately 5 Exit Test and Service mode by turning the printer off and returning all DIP switches to their original settings Using Data Line Print Mode Use Data Line Print mode to troubleshoot communications between the printer and host and to test the operation of the printer When the printer is in Data Line Print mode i...

Страница 94: ...n off the sending and receiving printers 2 Set the serial port on both the sending printer and the receiving printer to 115 200 baud even parity 1 stop bit and 8 data bits 3 Turn on the receiving printer 4 Press down and hold the Feed Pause button while turning on the printer The hardware configuration test label prints 5 Connect the serial ports of the sender and receiver ports together with an R...

Страница 95: ...off the printer 2 Set the DIP switches to reset a portion or all of the memory by using the Test and Service Mode DIP Switch Settings table on page 6 4 3 Press and hold the Feed Pause button while turning on the printer The printer prints out a hardware configuration test label 4 Hold the Feed Pause button down for 1 second The printer resets a portion or all of its memory 5 To exit Test and Servi...

Страница 96: ...t Emulation mode X forms adjust Y forms adjust The following table provides you with the Test and Service mode DIP switch settings for changing the configuration commands Configuration DIP Switch Settings 44XXU 062 1 2 3 4 5 6 7 8 Label Rest Point Adjust Forward Adjust Backward Emulation 5 0 mil Advanced mode 10 mil 86XX mode 15 mil 86XX mode X Forms Adjust Adjust Forward Adjust Backward Y Forms A...

Страница 97: ...inch per dot Note The table below shows only the settings for the bottom bank of switches See the Configuration DIP Switch Settings table on the previous page for the top bank DIP switch settings Dot Increments DIP Switch Settings 44XXU 063 1 O 1 O 1 O 1 O 1 O 1 O 1 O 1 O 1 O 1 O 1 O 1 O 1 O 1 O 1 O O 1 1 O O 1 1 O O 1 1 O O 1 1 O O 1 1 O O 1 1 O O 1 1 O O 1 O O O 1 1 1 1 O O O O 1 1 1 1 O O O O 1...

Страница 98: ...column It shows a 1 in the columns of DIP switches 2 and 4 and a O in the columns of 1 3 and 5 The 1 tells you to turn on the switch The O tells you to turn off the switch Turn on switches 2 and 4 Turn off all other switches Adjusting the Label Rest Point The Label Rest Point configuration command adjusts the point at which the printer presents each label for removal Use this command in conjunctio...

Страница 99: ...bel 1 2 3 4 Switch settings for feeding label forward Top Bank OFF ON 4 In the bottom bank of the Test and Service mode DIP switches turn on or off the appropriate DIP switches See the Dot Increments DIP Switch Settings table on page 6 9 5 Press the Feed Pause button The printer prints out the software configuration label and stops at the new location 6 Verify that the Label Rest Point number on t...

Страница 100: ...isconnect the 86XX printer and install the 4420 or 4440 printer See Chapter 1 for information on installing the 4420 or 4440 printer 4 Press and hold the Feed Pause button while turning on the printer The printer prints out a hardware configuration label 5 In the top bank of the Test and Service mode DIP switches turn on switches 1 and 3 and turn off switch 2 6 Use the table below to help you choo...

Страница 101: ... the host to the 4420 or 4440 printer Using Forms Adjust If your label prints too close to one edge you can reposition it by using the X forms adjust and Y forms adjust features The X forms adjust controls the position of the printing area along the length of the label The Y forms adjust controls the position of the printing area along the width of the label The following figure shows the default ...

Страница 102: ... the label When you move the X origin forward the printer moves the format away from the leading edge of the label When you move the X origin backward the printer moves the format closer to the leading edge of the label It is easier to use the TOF switch to move the origin forward or backward but your printer will reset itself to the default position if you lift the printhead or cycle printer powe...

Страница 103: ...e forward a number of dot increments If your label is too close to one edge of the printhead you can adjust it using this feature To set the Y forms adjust 1 Turn off the printer 2 Enter Test and Service mode by pressing down and holding the Feed Pause button while turning on the printer The printer prints out the hardware configuration label and then enters Data Line Print mode 3 In the top bank ...

Страница 104: ......

Страница 105: ...Printer Specifications A ...

Страница 106: ......

Страница 107: ...hes 41 9 cm Width 9 75 inches 24 8 cm Length 17 25 inches 43 8 cm Weight 43 pounds 19 5 kg Electrical Requirements Input Voltage 100 115 or 230 VAC 10 Frequency 47 63 Hz Current 2 or 1A Environment Operating 50 F to 104 F 10 C to 40 C Storage 4 F to 158 F 20 C to 70 C Humidity 10 to 90 with maximum wet bulb 82 F 28 C and minimum dew point 36 F 2 C Fonts and Graphics There are 21 resident bitmap fo...

Страница 108: ...3 mm C Gap between labels 0 10 inch 2 54 mm 1 0 inch 25 4 mm D Label length self strip media Label length butt cut media 1 0 inch 25 4 mm 0 5 inch 12 7 mm 24 inches 609 6 mm 24 inches 609 6 mm E Media thickness including backing 0 0059 inch 0 15 mm 0 012 inch 0 30 mm F Reflective sensor mark length 0 10 inch 2 54 mm 0 5 inch 12 7 mm G Notch diameter 0 125 inch 3 18 mm N A H Notch height depth 0 25...

Страница 109: ...l 0 13 mm in drag mode only specified media only 4440 5 mil to 500 mil 0 127 mm to 12 7 mm specified media only 2 5 mil 0 06 mm in drag mode only specified media only Printing Method The 4420 and 4440 printers are capable of direct thermal DT printing or thermal transfer TTR printing using a thermal transfer ribbon Printing Speed Maximum 8 inches per second 203 mm per second on specified media onl...

Страница 110: ...ansmit 1 Disabled Auto Transmit 2 Disabled Auto Transmit 3 Disabled Message Delay 0 milliseconds Power Up Mode 5 mil Advanced mode 4420 2 5 mil Advanced mode 4440 Cutter Disabled End of Print Skip Distance 100 dots 0 5 inches Top of Form 20 dots 0 1 inches Media Sensitivity 470 Direct Thermal 567 Thermal Transfer Number of Image Bands 3 Maximum Label Length 1000 dots 5 inches Printer Character Set...

Страница 111: ...ree Katakana fonts This option also provides increased storage capacity Memory Expansion You can install a flash SIMM module into the SIMM socket on the main PCB to hold more formats fonts or bitmap graphics You can also install a DRAM SIMM to increase the image buffering capabilities of the printer You can purchase either module in 8 or 16 MB sizes only Self Strip Batch Takeup Use the self strip ...

Страница 112: ...ndustries Code 93 Introduced in 1983 Code 93 was specially designed to complement Code 39 With the correct reading equipment the two alphanumeric codes may be interchanged throughout a system without making any changes to software Code 128 Code 128 was introduced in 1981 as a very high density alphanumeric symbology It is a variable length continuous code that employs multiple element widths EAN T...

Страница 113: ...e to an error in scanning or if the label is damaged 2D stacked symbologies can be scanned with a laser scanner or imaging device that features 2D code scanning capability Code 16K Introduced in 1988 Code 16K is an alphanumeric symbology similar to Code 49 in that it employs multiple rows from 2 to 16 Each row is fixed length and uses a mirror image of the Code 128 coding patterns Code 49 Code 49 ...

Страница 114: ... sides are solid dark lines These lines are used to define physical size orientation and symbol distortion Maxicode Maxicode is a fixed size symbology that is made up of offset rows of hexagonal elements arranged around a bullseye finder pattern Each hexagon represents one bit of information and is either black or white depending on the state of the encoded data bit United Parcel Service UPS Resea...

Страница 115: ...Character Sets B ...

Страница 116: ......

Страница 117: ...in the U S character set To use the tables find the hex code for the U S character that corresponds with the character in your language Advanced Character Table If you are running your printer in Advanced mode you are not using 86XX Emulation use this table to find the right hex codes for the international character sets 23 24 40 5E 5C 5D 5E 60 7B 7C 7D 7E U S ASCII U K ASCII Germany Ä Ö Ü ä ö ü ß...

Страница 118: ...rk Æ Ø Å æ ø å Sweden Finland É Ä Ö Å Ü é ä ö å ü Spain Pt Ñ ñ ç Switzerland à ç é ù ä ö ü è Italy ç é ù à ò è ì IBM Translation Character Table If you are running your printer with IBM Translation enabled use this table to find the right hex codes for the international character sets 21 23 24 40 5B 5C 5D 5E 60 7B 7C 7D 7E U S ASCII U K ASCII _ Germany Ä Ö Ü ä ö ü ß France à ç é ù è Norway Denmark...

Страница 119: ... 68 78 88 98 A8 B8 C8 D8 E8 F8 09 19 29 39 49 59 69 79 89 99 A9 B9 C9 D9 E9 F9 0A 1A 2A 3A 4A 5A 6A 7A 8A 9A AA BA CA DA EA FA 0B 1B 2B 3B 4B 5B 6B 7B 8B 9B AB BB CB DB EB FB 0C 1C 2C 3C 4C 5C 6C 7C 8C 9C AC BC CC DC EC FC 0D 1D 2D 3D 4D 5D 6D 7D 8D 9D AD BD CD DD ED FD 0E 1E 2E 3E 4E 5E 6E 7E 8E 9E AE BE CE DE EE FE 0F 1F 2F 3F 4F 5F 6F 7F 8F 9F AF BF CF DF EF FF 0 1 2 3 4 5 6 7 8 9 A B C D E F G...

Страница 120: ... 27 28 29 2A 2B 2C 2D 2E 2F 3Ø 31 32 33 34 35 36 37 38 39 3A 3B 3C 3D 3E 3F 4Ø 41 42 43 44 45 46 47 48 49 4A 4B 4C 4D 4E 4F 5Ø 51 52 53 54 55 56 57 58 59 5A 5B 5C 5D 5E 5F 6Ø 61 62 63 64 65 66 67 68 69 6A 6B 6C 6D 6E 6F 7Ø 71 72 73 74 75 76 77 78 79 7A 7B 7C 7D 7E 7F 8Ø 81 82 83 84 85 86 87 88 89 8A 8B 8C 8D 8E 8F 9Ø 91 92 93 94 95 96 97 98 99 9A 9B 9C 9D 9E 9F AØ A1 A2 A3 A4 A5 A6 A7 A8 A9 AA AB ...

Страница 121: ... 49 59 69 79 89 99 A9 B9 C9 D8 E9 F9 ØA 1A 2A 3A 4A 5A 6A 7A 8A 9A AA BA CA DA EA FA ØB 1B 2B 3B 4B 5B 6B 7B 8B 9B AB BB CB DB EB FB ØC 1C 2C 3C 4C 5C 6C 7C 8C 9C AC BC CC DC EC FC ØD 1D 2D 3D 4D 5D 6D 7D 8D 9D AD BD CD DD ED FD ØE 1E 2E 3E 4E 5E 6E 7E 8E 9E AE BE CE DE EE FE ØE 1F 2F 3F 4F 5F 6F 7F 8F 9F AF BF CF DF EF FF 0 1 2 3 4 5 6 7 8 9 A B C D E F G H I J K L M N O P Q R S T U V W X Y Z ˆ _...

Страница 122: ...25 35 45 55 65 75 85 95 A5 B5 C5 D5 E5 F5 Ø6 16 26 36 46 56 66 76 86 96 A6 B6 C6 D6 E6 F6 Ø7 17 27 37 47 57 67 77 87 97 A7 B7 C7 D7 E7 F7 Ø8 18 28 38 48 58 68 78 88 98 A8 B8 C8 D8 E8 F8 Ø9 19 29 39 49 59 69 79 89 99 A9 B9 C9 D8 E9 F9 ØA 1A 2A 3A 4A 5A 6A 7A 8A 9A AA BA CA DA EA FA ØB 1B 2B 3B 4B 5B 6B 7B 8B 9B AB BB CB DB EB FB ØC 1C 2C 3C 4C 5C 6C 7C 8C 9C AC BC CC DC EC FC ØD 1D 2D 3D 4D 5D 6D 7...

Страница 123: ...5 75 85 95 A5 B5 C5 D5 E5 F5 Ø6 16 26 36 46 56 66 76 86 96 A6 B6 C6 D6 E6 F6 Ø7 17 27 37 47 57 67 77 87 97 A7 B7 C7 D7 E7 F7 Ø8 18 28 38 48 58 68 78 88 98 A8 B8 C8 D8 E8 F8 Ø9 19 29 39 49 59 69 79 89 99 A9 B9 C9 D8 E9 F9 ØA 1A 2A 3A 4A 5A 6A 7A 8A 9A AA BA CA DA EA FA ØB 1B 2B 3B 4B 5B 6B 7B 8B 9B AB BB CB DB EB FB ØC 1C 2C 3C 4C 5C 6C 7C 8C 9C AC BC CC DC EC FC ØD 1D 2D 3D 4D 5D 6D 7D 8D 9D AD BD...

Страница 124: ......

Страница 125: ...Communications Reference C ...

Страница 126: ......

Страница 127: ...rd protocol is a proprietary block transfer status response protocol For each block sent the host must wait for the appropriate response before sending the next block DC1 Except for single character status commands ENQ and VT Standard protocol transmits characters in message blocks beginning with the start of text STX character and ending with the end of text ETX character Message blocks can be up...

Страница 128: ...full and it discards the entire message block XON XOFF Protocol Software and Hardware Flow Control XON XOFF protocol uses the ASCII characters DC1 XON and DC3 XOFF to start and stop the flow of data from the host to the printer The printer does not restrict the message length for XON XOFF protocol That is the printer processes information as it is being downloaded and stops when there is no more i...

Страница 129: ...ponsible for asking the printer for data it might have polling and requesting to send data to the printer selecting LRC characters frame the blocks for additional data integrity Use Polling Mode D for point to point networks that connect the printer to an Intermec port concentrator RS 232 or RS 422 are acceptable This protocol is the default setting for the 4420 and 4440 printer Return the protoco...

Страница 130: ... will not be transmitted back to the host When you set the pin to default it uses flow control if the serial port is set for XON XOFF protocol If you are using Intermec Standard protocol the printer uses Ready Busy User Defined Protocol The 4420 and 4440 printers provide the capability to change protocol characters However you cannot define your own protocol You can substitute characters to use as...

Страница 131: ...N XOFF AFF IN POL Mode D Multi Drop NEG IN POL Mode D Multi Drop DLE IN STD POL Mode D Multi Drop XON XOFF XON IN XON XOFF XOFF IN XON XOFF SELECT OUT Multi Drop POLL OUT Multi Drop RES OUT POL Mode D Multi Drop REQ OUT POL Mode D Multi Drop SOM OUT POL Mode D Multi Drop EOM OUT POL Mode D Multi Drop AFF OUT POL Mode D Multi Drop NEG OUT STD POL Mode D Multi Drop DLE OUT STD POL Mode D Multi Drop ...

Страница 132: ... of the following data communications interfaces RS 232 RS 422 RS 485 115K or IEEE compliant 1284 bi directional parallel For information on configuring the host computer port concentrator or network controller see the reference manual for the controlling device Communications Boundaries The information below applies to all protocols that the printer supports Parameter Maximum Capacity Message del...

Страница 133: ...737 for more detailed information RS 232 Serial Interface Use the RS 232 serial interface in all asynchronous point to point full or half duplex direct data communications or modem control The printer cable must have the pin assignments for an RS 232 serial interface shown in the table on the next page RS 422 Serial Interface Use the RS 422 interface in long line point to point direct connect inst...

Страница 134: ... true RS 232 422 485 7 Signal Ground SG To enable communications connect to signal ground of connected device Completes circuit for all RS 232 signals RS 232 422 485 11 Printer Status PS Output When not using software flow control XON XOFF connect to input of connected device for example CTS Indicates printer mechanical status and status of printer input buffer RS 422 485 13 Input B Input Serial d...

Страница 135: ...e serial port connector It is a 25 pin D style subminiature receptacle The port is wired as a data terminal equipment DTE device Refer to the following figure for pin names on the serial port 44XXU 073 13 12 11 10 9 8 7 6 5 4 3 2 1 25 24 23 22 21 20 19 18 17 16 15 14 PS SG CTS RTS RD TD GND DTR ...

Страница 136: ...MITTED DATA CARRIER DETECT DATA TERMINAL READY GROUND DATA SET READY CLEAR TO SEND 1 2 3 4 5 6 7 20 8 1 3 2 8 20 7 6 4 5 44XXU 074 RS 232 Null Modem Cable for 9 Pin PC Connector Intermec Part Number 048693 SHIELD PC PRINTER 9 PIN SOCKET D SUB METAL BACKSHELL 25 PIN PLUG D SUB METAL BACKSHELL NOTE The metal backshell is connected directly to the shield to achieve electrostatic discharge ESD immunit...

Страница 137: ...UND NOTE The metal backshell is connected directly to the shield to achieve electrostatic discharge ESD immunity MODEM 1 2 3 4 5 20 7 1 2 3 4 5 20 7 44XXU 076 Note If you find that you are losing data you may need to isolate the chassis ground from one of the two devices by connecting it to the shield RS 422 Intermec Pin Assignments 44XXU 077 PRINTER HOST NOTE Connect pin 1 to shield at one end on...

Страница 138: ......

Страница 139: ...Glossary G ...

Страница 140: ......

Страница 141: ...g batches of labels BEL A command character that instructs the printer to return an error status code character set The letters numerals and symbols that support a particular language such as French U S ASCII or automatic identification technology such as Code 30 Codabar cloning A procedure that copies the RAM contents configuration formats fonts pages and graphics from the memory of one printer t...

Страница 142: ... the United States Emulation mode An operating mode in which the printer has the operating characteristics of another printer The 3440 can operate in 8636 46 Emulation which emulates an Intermec 8636 or 8646 printer Feed Pause A printer control panel button that advances the media and causes the printer to pause printing field A graphic element that is the basic unit of a format The four basic typ...

Страница 143: ...ing begins This method allows printing and imaging to take place simultaneously imaging The process of generating a picture of the label in printer memory increment decrement field Bar code or text fields the printer automatically changes from one label to the next For example a batch of labels with serial number text or bar code fields that change from 001 to 002 to 003 and so on index To move fr...

Страница 144: ...her materials with adhesive backing and ribbon mnemonic code An acronym or abbreviation for a computer instruction routine or format For example STX represents the start of text Multi Drop protocol A protocol capable of controlling communications between a single controller and multiple devices nibblized A software term that refers to grouping bits into sets of four called nibbles Usually bits are...

Страница 145: ...d by the increment by which the printer platen moves 2 Rotation of a bar code symbol about an axis parallel to the direction of the bars point size A unit of measure for font height 72 points equals 1 inch as measured from slightly above the top of the uppercase letters to slightly below the bottom of the lowercase descenders Polling Mode D Polling Mode D is a protocol that allows devices and cont...

Страница 146: ...cognized protocol standard for serial binary data interchange The standard covers the physical electrical and functional characteristics of the interface RS 422 Standard for the voltage and impedance levels for serial data transmission on balanced lines Similar to RS 232 but handles larger distances and faster communication RS 485 Standard for allowing multiple devices to share a common set of ser...

Страница 147: ...ed in the printer to provide the ability to print text using fonts that are not resident in the printer Standard protocol A communications protocol capable of controlling communications between two devices connected by a single data communication line symbology A scheme for encoding data as bar code Code 39 Interleaved 2 of 5 and Codabar are examples of different symbologies thermal transfer A met...

Страница 148: ...ters UDC See graphic User Defined Fonts UDF See soft font variable data field Bar code and text fields that change from one label to the next XON XOFF A protocol that stops the host from sending data when the printer buffer fills up and starts it again when the buffer empties ...

Страница 149: ...Index I ...

Страница 150: ......

Страница 151: ... C 12 RS 232 schematics C 12 RS 422 schematic C 13 straight through schematics C 12 changing core locking brackets 2 8 serial port settings 1 17 character sets Advanced mode B 3 Code Page 850 B 5 Emulation mode B 4 extended B 6 IBM translation B 4 international B 3 list of A 3 cleaning label sensors 3 12 media guides 3 10 media path 3 10 printer 3 5 printer covers 3 7 printhead 3 6 rollers 3 8 tea...

Страница 152: ... 9 table serial port 1 17 Test and Service mode 6 4 dot increments setting the number of 6 9 downloading definition 2 16 E EAN A 8 electrical requirements A 3 Emulation mode 6 12 international character sets B 4 setting with DIP switches 6 12 entering Test and Service mode 6 3 environment specifications A 3 exiting Test and Service mode 6 3 extended character sets B 6 F factory default settings A ...

Страница 153: ...3 settings table direct thermal media 2 14 thermal transfer 2 15 media specifications A 4 memory additional storage flash SIMM 5 15 expansion option A 7 increasing amount available 5 16 increasing amount available in printer 6 7 limitations 5 15 reset using 6 7 returning printer to default settings 6 7 specifications A 5 usage limitations 5 15 problems 5 15 using efficiently 5 15 modem using to co...

Страница 154: ...speed specifications A 5 test label 2 17 too light or too dark troubleshooting 4 5 PrintSet using to communicate with the printer 2 16 using to set the media sensitivity number 2 13 problems communication 4 7 print quality 4 5 printer operation 4 3 protocols C 3 hardware protocol C 6 Multi Drop C 5 Polling Mode D C 5 Standard C 3 user defined C 6 XON XOFF C 4 Q QR Code A 10 quality correcting unev...

Страница 155: ...6 6 setting Emulation mode 6 12 using forms adjust 6 13 X forms adjust 6 14 Y forms adjust 6 15 test label printing a hardware 2 17 test labels printing 6 5 thermal transfer ribbon loading 2 8 third party software using to communicate with the printer 2 16 throughput increasing 5 16 TOF switch location 5 7 tools for cleaning the printer 3 5 top of form position fine tuning 5 7 troubleshooting 4 3 ...

Страница 156: ......

Отзывы: