background image

NX-148E-RF  LCD Touchpad w ith Receiver Installation Instructions  

Installation 

To install the touchpad, do the following: 

1.  Remove the mounting-plate screw (

Figure 1

) from the 

bottom of the touchpad and lift off the mounting plate. 

Caution: 

You must be free of static electricity before handling 

circuit boards. Wear a grounding strap of touch a bare metal 

surface to discharge static electricity. 

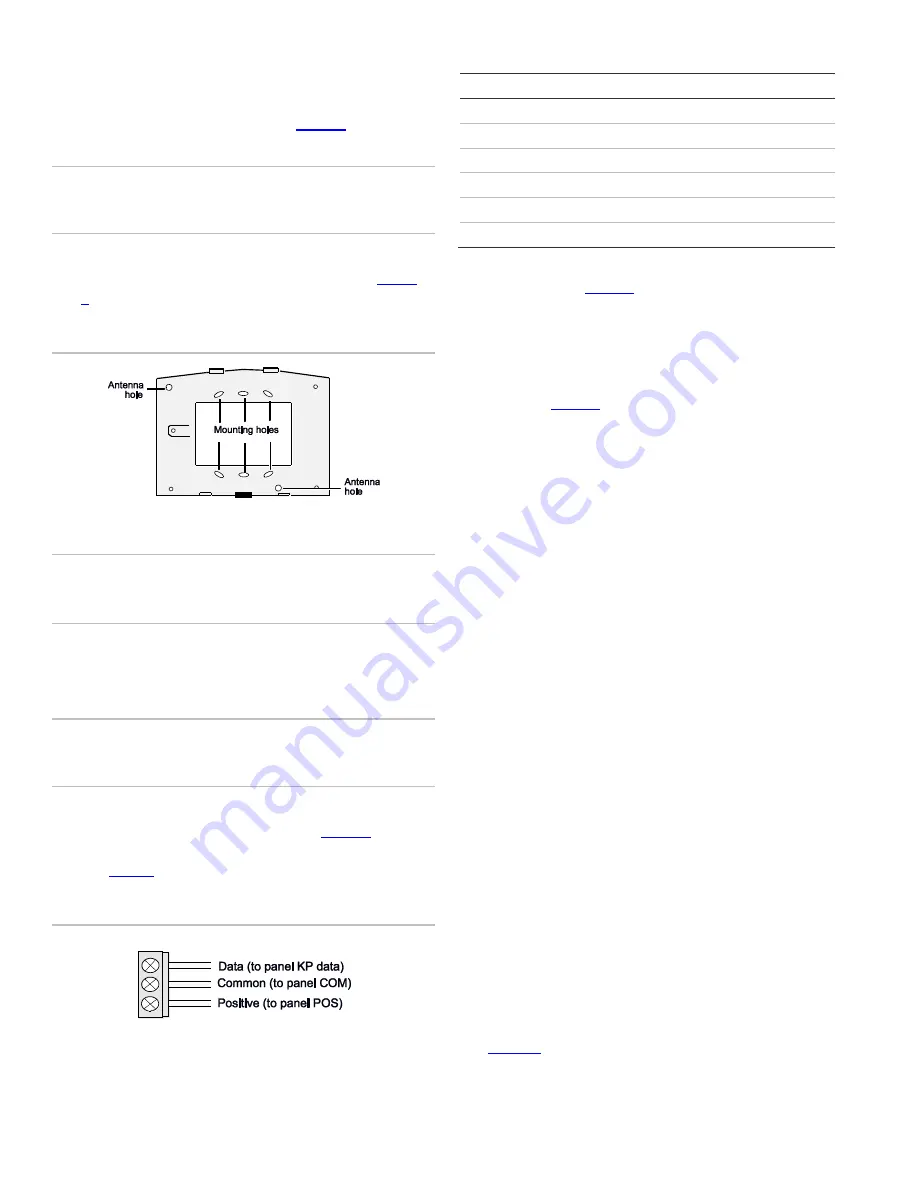
2.  At  the mounting location, use the mounting plate to mark 

the location for the antenna and mounting holes (

Figure 

2

). 

Figure 2. Antenna and m ounting holes 


3.  Drill 15/64 in. holes at the marked antenna hole locations. 

WARNING: 

Make sure the mounting location is free of 

electrical wires. Contact with electrical wires while drilling the 

antenna openings could result in serious injury or death. 

4.  Mount the mounting plate to the wall with the screws 

provided. Use wall anchors if needed. 

5.  Remove power (if applied) from the control panel. 

WARNING: 

To avoid possible equipment damage or personal 

injury, remove power from the control panel before making any 

wiring connections to the module. 

6.  Use 22-gauge or larger wire to connect the data, common, 

and positive terminals on the touchpad (

Figure 3

) to the 

data, common, and power terminals on the control panel. 

See 

Table 1

 for wiring guidelines. 

Figure 3. Touchpad w iring terminals 


Table 1: w iring guidelines 

Length 

Wire gauge  

250 ft. (76 m) 

22 

500 ft. (152 m) 

22 

1000 ft. (304 m) 

20 

1500 ft. (456 m) 

18 

2000 ft. (610 m) 

16 

2500 ft. (760 m) 

16 

7.  Run the antenna wires through the antenna holes in the 

mounting plate (

Figure 2

) and into the wall. 

8.  To mount the touchpad to the mounting plate, place the 

top of the touchpad on the clips of the mounting plate and 

push the touchpad down into place. 

9.  Replace the mounting plate screw on the bottom of the 

touchpad (

Figure 1

). 

10.  Apply power to the control panel. 

Transmitter  programming 

This section describes how to program the wireless 

transmitters used with the touchpad.  

Programming guidelines 

Use the following programming guidelines: 

• 

NX-4 and NX-6 control panels can have receivers added 

with zones that overlap those contained in the control 

panel. No hardwire expanders can be used. 

• 

NX-8 control panels can have expansion zones (hardwire 

or wireless) set the same as those contained in the control 

panel. To do this, you must disable the onboard control 

panel zones in panel location 37, segment 5, option 3. All 

zone expansion modules must not overlap any blocks of 8 

zones. 

• 

All other control panels can have wireless zones added to 

any zone. If a hardwire input (on either the control panel or 

hardwire expander) is also present on the same zone as 

an enabled wireless zone, the wireless transmitter takes 

priority. 

Program settings 

When programming wireless transmitters into the touchpad, 

there are various options and partitions you can set for each 

transmitter. Thes e settings appear in segments of each 

programming location. 

Use 

Table 11

 to record zone assignments and settings. Be 

sure to circle the module type in the location column to help 

identify where each zone resides. 

Содержание NX-148E-RF

Страница 1: ...8E NX 8V2 NX 6V2 or NX 4V2 and downloading via modem make sure the control panel version is equal to or greater than the following versions NX 8E 17 00 NX 8V2 1 04 NX 6V2 1 05 NX 4V2 1 04 Make sure yo...

Страница 2: ...18 2000 ft 610 m 16 2500 ft 760 m 16 7 Run the antenna wires through the antenna holes in the mounting plate Figure 2 and into the wall 8 To mountthe touchpad to the mounting plate place the top of t...

Страница 3: ...bank Location 594 The bank setting is based on the zone capabilities ofboth the receiver and the panel and mustbe set before you add learn transmitters 6 Enter 400 to enter the sensor transm itter le...

Страница 4: ...er will be displayed for the keyfob partitions Press the partition number to toggle the partition on and off 6 To continue programming keyfob transmitter partition settings repeatsteps 4 to 8 7 To exi...

Страница 5: ...Note Press repeatedlyto scroll through available functions Table 4 Touchpad functions Function number Function 0 Adjust touchpad tone 1 Temp master mode View zone status 2 Service menu 3 View alarmmem...

Страница 6: ...ss or to turn the selected device on or off 4 Repeatsteps 2 and 3 until all devices have been programmed 5 To exit press Unit and house codes for X10 47 To program the specific X10 unit and house code...

Страница 7: ...the central monitoring station Open 75 9 25 17 57 P3 Table 10 lists some ofthe possible eventlog messages Adjust view brightness ofLCD 91 To adjustthe view and brightness ofthe LCD display do the fol...

Страница 8: ...ge Enables custommessage display 10 Clock Enables clockdisplay 11 Custom message lock Prevents over writing the custom message during touchpad copy 12 Select an option Programs specialcharacteristics...

Страница 9: ...the tampered zone Zone low battery press A w ireless devicehas a low battery Press to identify the zone Zone lost press A w ireless or multiplexed zone device is not reporting to the control Press to...

Страница 10: ...ob Partition 8 keyfob Zone _____ Assigned to module _____ RM HE P 1 Enable sensor 2 Supervised 3 Fire supervision 4 Input option 1 5 Input option 2 _ 6 8 Not used Partition 1 keyfob Partition 2 keyfob...

Страница 11: ...Partition 2 keyfob Partition 3 keyfob Partition 4 keyfob Partition 5 keyfob Partition 6 keyfob Partition 7 keyfob Partition 8 keyfob Zone _____ Assigned to module _____ RM HE P 1 Enable sensor 2 Supe...

Страница 12: ...Partition 2 keyfob Partition 3 keyfob Partition 4 keyfob Partition 5 keyfob Partition 6 keyfob Partition 7 keyfob Partition 8 keyfob Zone _____ Assigned to module _____ RM HE P 1 Enable sensor 2 Supe...

Страница 13: ...sor 2 Supervised 3 Fire supervision 4 Input option 1 5 Input option 2 _ 6 8 Not used Partition 1 keyfob Partition 2 keyfob Partition 3 keyfob Partition 4 keyfob Partition 5 keyfob Partition 6 keyfob P...

Страница 14: ...temperature 30 to 140 F 34 to 60 C Humidity 90 relative noncondensing Dimensions 5 x 6 x 1 in 12 7 x 15 2 x 2 5 cm Regulatory information FCC compliance This device complies w ith part 15 of the FCC...

Отзывы: