background image

47

Collecting Video Clips

To collect video clips, you will use Frame Wrangler to organize the clips into playlists.  A playlist
organizes a set of video clips into a video sequence for review and processing.

To collect video clips into a playlist, do any of the following:


Go to File » New in the Main Panel or click New on the Main Panel toolbar.  This creates a
new playlist or clears an open playlist so you can add video clips to it.


Go to File » Open Video in the Main Panel.  This lets you find and open one or more video
clips.


Go to Play » Edit Playlist in the Main Panel or click Edit Playlist on the Main Panel toolbar.
This lets you find video clips and add them to an open playlist.


Click the Add button on the storyboard.  This lets you find video clips and add them to an
open playlist.


Drag video clips from Explorer or My Computer to the storyboard.


Go to File » Recent Video Files or to File » Recent Playlist Files in the Main Panel and select
a video clip or playlist from the appropriate list.  These lists give you fast access to recently
opened video clips or playlist files.

The default folder for video clips is D:\.

When collecting video clips, you cannot mix interlaced and progressive video clips in a playlist.
To switch from working on one to the other, save the open playlist using File » Save As » Playlist,
and then use File » New or the New button on the Main Panel toolbar to clear the playlist for use
with the other type of video clip.

Reviewing Video Clips

You can review video clips as you collect them in a playlist.  You can add a single video clip to a
playlist to review it, or add multiple video clips to a playlist and review the resulting video
sequence.  You can open an existing playlist and review its contents.

When you schedule a video build to occur during rendering, you can review these sources of
information about video clips produced by Frame Wrangler:


A Summary dialog displays (until you close it) for each scheduled video clip being built.
From the Summary dialog, you can display a Details dialog that provides a graphical display
of information on each frame in the video clip.

Содержание RAX HD

Страница 1: ...RAX HD Animation Recorder User s Guide March 2000 D1AA00370...

Страница 2: ...t forth in your purchase contract Nothing stated in or implied by this document or its contents shall be considered or deemed a modification or amendment of such warranties Trademarks Intergraph and t...

Страница 3: ...tem To reduce the risk of electrical shock and energy hazards do not attempt to open the equipment unless instructed and do not use a tool for purposes other than instructed Notes Changes or modificat...

Страница 4: ......

Страница 5: ...re Channel Hubs 16 Connecting a Video Device to the System 17 Connecting the Base Unit to the Storage Arrays 19 Connecting Audio Devices 21 Installing Storage Array Disk Drives 21 Connecting to AC Pow...

Страница 6: ...Clips 49 Rearranging the Video Sequence 49 Setting Start and End Points for Editing 49 Replacing Bad Frames 49 Adjusting Video Levels 49 Associating Audio with Video 50 Creating a Title Clip 50 Produc...

Страница 7: ...ting to Know Frame Wrangler describes the Frame Wrangler software and its user interface and describes how to configure the software for use Chapter 5 Using Frame Wrangler provides basic information o...

Страница 8: ...30 day warranty on the operating system Contact your authorized Intergraph Computer Systems reseller for information on warranty service Intergraph Computer Systems provides next day response support...

Страница 9: ...ty of HD formats This makes content easily available for transmission by any media outlet Existing SD broadcast content can be easily scaled to HD aspect ratios and resolutions The RAX HD Animation Re...

Страница 10: ...ve directors clients or film producers can review the same file in their dailies Multiple sequences can be assembled into a playlist using Frame Wrangler s storyboard editing functions The system s bu...

Страница 11: ...serial digital output and a composite video sync input and loop through Three QLogic Fibre Channel host bus adapters HBAs are installed in the base unit s PCI expansion slots These cards provide fibe...

Страница 12: ...rage arrays Gigabit interconnect GBIC ports plug into a Fibre Channel hub s rear panel GBIC ports provide connection points for fiber optic cables from the system s HBAs and copper cables from the Fib...

Страница 13: ...disk drive is installed in the system s base unit and eight or twelve identical Fibre Channel disk drives are installed in each Fibre Channel storage array The system disk drive is formatted with two...

Страница 14: ...ver software for the HD Animation Recorder hardware Frame Wrangler software Video File Explorer software Sample animation frames All software is installed on the system before shipment For information...

Страница 15: ...frames in the video file extract animation frames to individual image files and extract audio data to a separate audio file For more detailed information on Video File Explorer see Video File Explore...

Страница 16: ...layed back on HD video equipment and recorded to an HD videotape recorder VTR For example it may be more efficient to render a project at a lower resolution and scale up With the RAX HD Animation Reco...

Страница 17: ...3 98 24 24 25 25 29 97 29 97 30 30 23 98 29 97 or 59 94 user selectable 59 94 24 30 or 60 user selectable 60 The possible interlaced output options are Source Displayed At frames per second Video Outp...

Страница 18: ...10...

Страница 19: ...unit is shut down and that base unit power is turned off the power cord is disconnected from its AC outlet See the System Guide delivered with the system for more information Remove the Fibre Channel...

Страница 20: ...Host Bus Adapter Slot 5 PCI QLogic Host Bus Adapter Slot 6 PCI QLogic Host Bus Adapter Slot 7 PCI Right Antex StudioCard audio controller Mounting the Fibre Channel RAID Storage Arrays The system come...

Страница 21: ...wo mounting brackets to each chassis rail with flat head screws and lock nuts Leave the screws just loose enough to allow movement of the brackets on the rails See the following figures 4 On each pair...

Страница 22: ...ing figures show disk drives installed in the storage array Do not install disk drives in a storage array before you mount the storage array in a rack Doing this could lead to disk drive damage such a...

Страница 23: ...rails The upper holes in the chassis brackets should match up with the tinnerman nuts on the front rack rails 8 Fit a bracket cover onto each of the chassis brackets Insert button head screws through...

Страница 24: ...each hub anywhere within 3 meters 9 8 feet of its storage array To mount the shelves and hubs in a rack 1 Remove the shelves and their brackets from the packaging Loosely attach both brackets to each...

Страница 25: ...ge array chassis and hubs in a rack you can begin connecting the various system components together Start by connecting a video device such as an HD monitor or a videotape recorder VTR to the system s...

Страница 26: ...d provides a loop through of the reference input signal at the COMP REF OUT Composite reference output port if needed If no cable is connected to this port you must connect the supplied 75 ohm termina...

Страница 27: ...pter HBA connects to one hub Each storage array connects to one hub A 50 meter 164 foot fiber optic cable connects the base unit to each rack mounted hub A 3 meter 9 8 foot copper cable connects each...

Страница 28: ...able is keyed for proper connection 6 Route the cable to the hub you used in step 4 7 Connect the cable to a copper GBIC port The cable is keyed for proper connection 8 Insert the GBIC port into any s...

Страница 29: ...rives see the storage array documentation delivered with the system Before the system shipped from the factory Eight standard or twelve optional disk drives were installed in each storage array Each s...

Страница 30: ...rray as described in these instructions and on the installation labels Each storage array has an installation label on the top of its chassis This label Identifies the storage array by letter A B or C...

Страница 31: ...install each disk drive in a storage array Match the letter on the disk drive label with the letter on the storage array label For example install a disk drive with an A label only in the chassis with...

Страница 32: ...e shows green To unlock the carrier handle turn the key clockwise until the indicator in the handle shows black Connecting to AC Power After you have connected the system s base unit to the storage ar...

Страница 33: ...ides a single point of disconnect for each storage array 5 Connect a split AC power cord from each storage array to an AC power outlet See CAUTION at the beginning of this section This applies standby...

Страница 34: ...l power to each storage array 2 Turn on power to the video and computer monitors 3 Apply full power to the base unit To turn off power to system components 1 Shut down the operating system and apply s...

Страница 35: ...e one or both of these cards you must first disconnect the ribbon cable When both cards are in place the ribbon cable must connect them to ensure proper system operation The following figure shows the...

Страница 36: ...28...

Страница 37: ...1080 video preview region and a control surface area on the computer monitor display In the operating system s Settings program menu go to Taskbar and set the taskbar to auto hide Defragment the syste...

Страница 38: ...Explorer Frame Wrangler and Video File Explorer are both available from the operating system Start menu To find Frame Wrangler go to Frame Wrangler in the Frame Wrangler program menu To find Video Fil...

Страница 39: ...o output format so Frame Wrangler will produce video output that the HD equipment connected to the system will accept The HD Output Configuration dialog displays each time you start Frame Wrangler unt...

Страница 40: ...clips collected into an organized video sequence You can manipulate the content playback and organization of clips in a playlist and save it to or restore it from a file Playlist files are named file...

Страница 41: ...e the Main Panel to the bottom of the computer monitor if needed and lock the panel in place To do this go to Configure Skins in the Main Panel The major controls in the Main Panel are Menus that cont...

Страница 42: ...oard Storyboard controls which you use to manipulate the content of the storyboard For more information on the Storyboard Panel and its controls see the online Frame Wrangler Help VTR Control Panel Th...

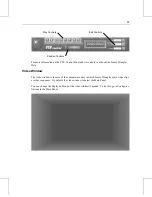
Страница 43: ...o window is the area of the computer monitor in which Frame Wrangler plays video clips or video sequences By default the video window is below the Main Panel You can change the display and look of the...

Страница 44: ...en playlist as a playlist file file SZL Save As Saves an open playlist as a playlist file a video file or a series of image files Open Video Opens a video clip Build Video Starts the Build Video wizar...

Страница 45: ...and brightness of a video clip Time Format Sets the display format for the counters and edit fields in the Main Panel and the VTR Control Panel Configure Menu The Configuration menu contains options...

Страница 46: ...utton S Go to the start point in a video sequence E Go to the end point in a video sequence SHIFT X Clear start and end points in a video sequence same as the Mark Clear button Go to the start point i...

Страница 47: ...pe E Go to the end point on a tape SHIFT X Clear start and end points on a tape same as the Mark Clear button Go to the start point on a tape same as the S key Go to the end point on a tape same as th...

Страница 48: ...ps you define the video clip you want to create including the clip s image size frame rate and even or odd field dominance to match NTSC video input with HD PAL video input If you choose to schedule a...

Страница 49: ...splay information in the Topics window To display the online Help system Click Help in Frame Wrangler s Main Panel toolbar or Go to Help Help Topics in Frame Wrangler s Main Panel or Go to Help in the...

Страница 50: ...e space to display a topic To restore the Contents window click Help Topics again Click the Index tab to display an index of words and phrases in the Help system Click the Search tab to do a full text...

Страница 51: ...ational sites as they are created This helps you arrive at prepared video sequences almost immediately after rendering is complete Collect video clips You can use Frame Wrangler to locate the video cl...

Страница 52: ...n the default disk drive for video storage disk drive D volume label Video Storage Create and store non video files only on the default disk drive for audio and project file storage disk drive E volum...

Страница 53: ...ain to the operating system If you have set up video builds do not log off from the operating system or shut down the system until those builds have completed To prevent unauthorized access to the sys...

Страница 54: ...copies per frame Define the video clip to be built This includes specifying the clip s file name defining the clip s image size height and width specifying whether to maintain the aspect ratio of the...

Страница 55: ...o clip or playlist from the appropriate list These lists give you fast access to recently opened video clips or playlist files The default folder for video clips is D When collecting video clips you c...

Страница 56: ...you get the best display possible you should also review the clips on an external High Definition HD monitor You can use the position controls in the Main Panel to move immediately to new positions i...

Страница 57: ...of the frames in the sequence for editing If start and end points are not set the entire video sequence is active for playing and editing When start and end points are set only the frames between the...

Страница 58: ...nly plays an audio file if it is associated with a video clip The default folder for audio files is E AUDIO You can select a video clip on the storyboard click the Edit button and associate an audio f...

Страница 59: ...to the tape in the VTR 4 When the Output to Tape dialog displays configure the output to tape This includes specifying if you want to preview the output on a monitor connected to the VTR specifying wh...

Страница 60: ...52...
Страница 61: ...rld Wide Web and to the Intergraph Bulletin Board Service IBBS file libraries See the Preface of this document for more information on these online services For specific details on driver software ref...

Страница 62: ...Contents C System 4 GB File Allocation Table FAT Operating system software E HDAR Remaining space on the disk NT File System NTFS Audio files project files See Disk Administrator Help for information...

Страница 63: ...README file delivered with the driver software Installing the QLogic Host Bus Adapter Driver If you are updating to a new version of the QLogic host bus adapter HBA driver you must first remove the in...

Страница 64: ...RAID storage arrays each with eight standard or twelve optional disk drives installed Each storage array has a RAID controller that manages its disk drives making that storage array a RAID disk array...

Страница 65: ...optional twelve disk arrays the system sees six logical disk drives instead of 36 individual disk drives To configure each storage array as a separate RAID disk array you will use Mylex Workstation A...

Страница 66: ...ID disk arrays as a single logical disk drive you will use the operating system s Disk Administrator tool For more detailed information on using Disk Administrator see the operating system documentati...

Страница 67: ...eges 10 Go to Disk Administrator in the Administrative Tools program menu 11 Verify that the stripe set you just created is labeled as drive D and then right click that stripe set and select Format fr...

Страница 68: ...ame Wrangler Software 1 Log on to the operating system using an account that has administrative privileges 2 Insert the RAX HD Animation Recorder software CD ROM in the system s CD ROM drive 3 In Expl...

Отзывы: