background image

19

CONFIGURATION

  The EAP Fast authentication type also displays a sub-menu for setting additional 

 parameters 


  specific to  

  this option. 

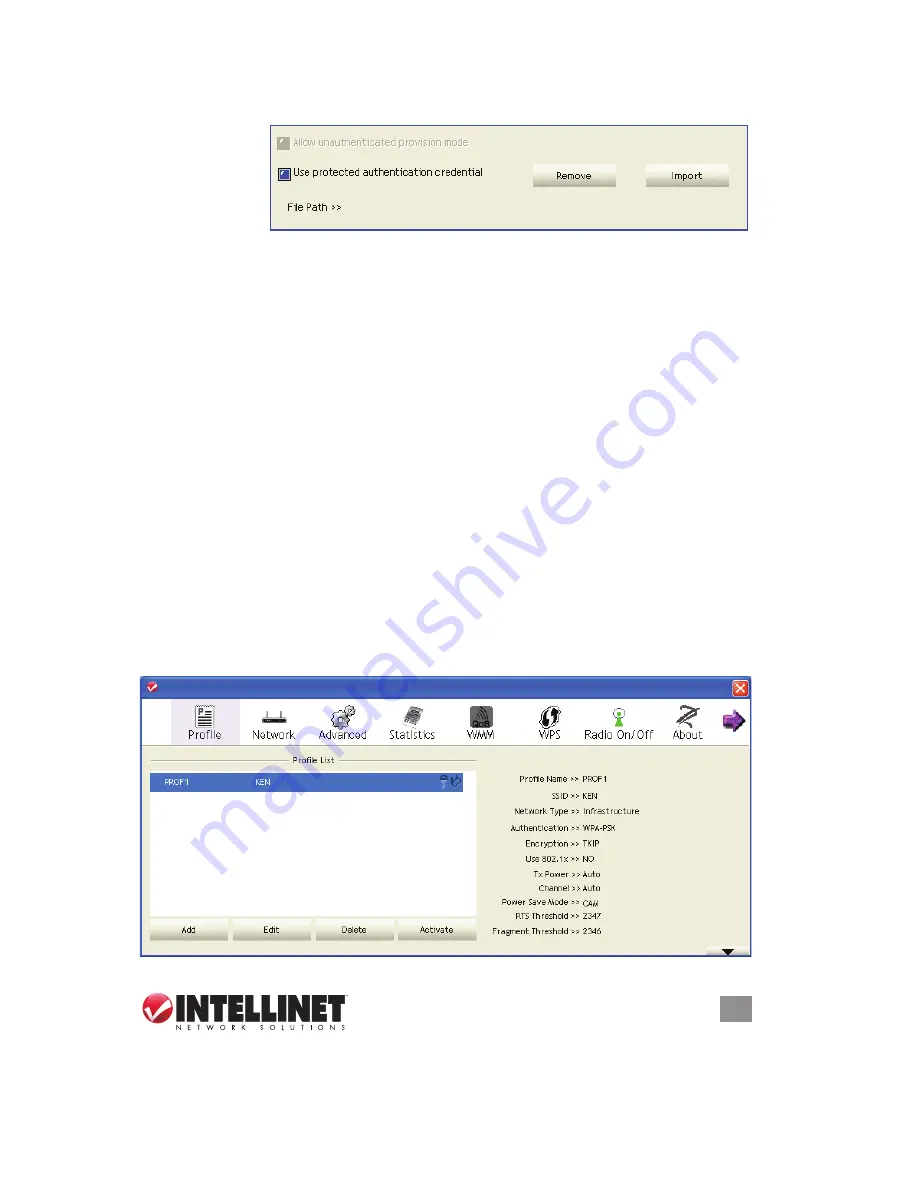
  If you need to use protected authentication credentials, select “Use protected 

  authentication credential” and click “Import” to load the .pac credential file. To 

  remove a loaded credential file, click “Remove.”

Session Resumption

 — Enable or disable session resumption. If you don’t know 

  whether or not you should, ask your 802.1x  authentication  administrator.

ID \ Password

 — Input the 802.1x username (ID), password and other information 

  (if required). Click “Show Password” to show the password you entered.

Client Certification

 — Click to select a local certificate from the drop-down menu.  

  If the AP you want to connect to requires a specific client certificate, the certificate 

  must be installed on your computer. You can select the certificate here.

Server Certification

 — Click to use server-based certification. Select a CA (certificate 

  authority) from the drop-down menu. If intermediate certificates are allowed,  

  select “Allow intermediate certificates.” Also, if you need to specify the CA 

  server’s name, you can specify it in the “Server name” field. If you select “Server  

  name must match,” the CA server’s name must be the same as the value you  

  entered in the “Server name” field. If you prefer that only the domain name part 

  of the full server name match the value you set in the “Server name” field, select 

  “Domain name must end in specified name.”
Once you’ve finished entering all the information related to the access point, click 

“Activate.” The profile will display in the Profile List.

19

CONFIGURATION

  The EAP Fast authentication type also displays a sub-menu for setting additional

  parameters 

  specifi c to 

  this option. 

  If you need to use protected authentication credentials, select “Use protected

  authentication credential” and click “Import” to load the .pac credential fi le. To

  remove a loaded credential fi le, click “Remove.”

Session Resumption

 — Enable or disable session resumption. If you don’t know

  whether or not you should, ask your 802.1x  authentication administrator.

ID \ Password

 — Input the 802.1x username (ID), password and other information

  (if required). Click “Show Password” to show the password you entered.

Client Certifi cation

 — Click to select a local certifi cate from the drop-down menu. 

  If the AP you want to connect to requires a specifi c client certifi cate, the certifi cate

  must be installed on your computer. You can select the certifi cate here.

Server Certifi cation

 — Click to use server-based certifi cation. Select a CA (certifi cate

  authority) from the drop-down menu. If intermediate certifi cates are allowed, 

  select “Allow intermediate certifi cates.” Also, if you need to specify the CA

  server’s name, you can specify it in the “Server name” fi eld. If you select “Server 

  name must match,” the CA server’s name must be the same as the value you 

  entered in the “Server name” fi eld. If you prefer that only the domain name part

  of the full server name match the value you set in the “Server name” fi eld, select

  “Domain name must end in specifi ed name.”
Once you’ve fi nished entering all the information related to the access point, click 

“Activate.” The profi le will display in the Profi le List.

 INTELLINET_UI

 INTELLINET_UI

Содержание 524810

Страница 1: ...WIRELESS 150N PCI CARD USER MANUAL MODEL 524810 INT 524810 UM 0110 04 ...

Страница 2: ...instructions in this user manual make installation reasonably quick and simple so you ll soon be enjoying the benefits of all these additonal features Detachable 3 dBi antenna with reverse SMA connector Supports WMM Wi Fi Multimedia for increased multimedia data throughput Supports the most popular operating systems Windows 2000 XP Vista and 7 Supports Software AP function turns your wireless clie...

Страница 3: ...nt from the receiver Consult the dealer or an experienced radio TV technician for help FCC Caution This device and its antenna must not be co located or operated in conjunction with any other antenna or transmitter This device complies with Part 15 of the FCC Rules Operation is subject to the following two conditions 1 this device may not cause harmful interference and 2 this device must accept an...

Страница 4: ...on of this device is also authorized for use in EFTA member states Iceland Liechtenstein Norway and Switzerland EU Countries Not Intended for Use None Safe Operating Guidelines The Wireless 150N PCI Card is designed for indoor use only Do not expose this card to direct sunlight rain or snow Do not place or use this card in or near excessively hot or humid places such as kitchens or bathrooms This ...

Страница 5: ... 20 3 2 Profile Management 23 3 2 1 Add a Profile 24 3 2 2 Edit an Existing Profile 24 3 2 3 Delete an Existing Profile 24 3 2 4 Activate a Profile 24 3 3 Advanced Settings 24 3 4 View Network Statistics 26 3 5 WMM Settings 26 3 6 WPS Configuration 27 3 6 1 PBC 28 3 6 2 PIN 30 3 7 Radio On Off 31 3 8 About 31 4 SoftAP 32 4 1 SoftAP Configuration 32 4 2 Security Settings 34 4 3 Access Control 36 4 ...

Страница 6: ...he Link and Tx Rx LEDs will light The Tx Rx LED is yellow and blinks when data is being transferred or received When it s off there is no wireless activity When WPS is enabled this LED remains on The Link LED is green It lights when a link has been established to a wireless access point it goes off when the radio is switched off When WPS is enabled this LED remains on 1 2 Installing the Card 1 Tur...

Страница 7: ...the Welcome to the Found New Hardware Wizard screen will display Click Cancel and proceed with the driver installation procedure below 1 Insert the included setup CD and run the Setup exe program 2 When the License Agreement screen displays read the agreement select I accept the terms of the license agreement and click Next ...

Страница 8: ...commended that you select INTELLINET Configuration Tool as it provides full access to all the functions of this card If you prefer to use the wireless configuration tool provided by Windows XP or Vista select Microsoft Zero Configuration Tool Click Next INTELLINET INTELLINET Install driver and INTELLINET WLAN Utility INTELLINET INTELLINET INTELLINET Configuration Tool 8 DRIVER INSTALLATION 3 It s ...

Страница 9: ... update then continue After you click Install wait for the program to run 6 When the final utility screen displays click Finish to complete the driver installation process INTELLINET INTELLINET INTELLINET INTELLINET the INTELLINET WLAN Utility Click Finish to exit the wizard 9 DRIVER INSTALLATION 5 When the Ready to Install the Program screen displays click Install If another Found New Hardware sc...

Страница 10: ...tility option as shown below INTELLINET Wireless Utility INTELLINET Wireless 10 DRIVER INSTALLATION Once installation is complete the wireless configuration utility displays on the computer desktop and as an INTELLINET icon in the systems tray Mouse over the icon to learn the card status To configure your wireless connection right click on the icon to display the popup menu Click Launch Config Uti...

Страница 11: ...ing Windows built in Microsoft Zero Configuration Tool Both options are detailed below 11 CONFIGURATION 3 CONFIGURATION Once the driver is installed it will automatically try to connect to any unencrypted wireless access point If you want to connect to a specific wireless access point or if the access point you want to connect to uses encryption you need to configure the Wireless 150N PCI Card and...

Страница 12: ... icon will appear when the access point supports WPS a key icon will appear if the access point uses 12 CONFIGURATION 3 1 1 INTELLINET Configuration Utility All utility screens present a menu of function options Profile Network etc across the top The Network screens feature a setup window below the menu section which expands in depth automatically to accommodate information that corresponds to the...

Страница 13: ... dBm Check this box to show the signal strength in decibels instead of as a percentage 13 CONFIGURATION encryption NOTE When the access point supports WPS and the WPS icon appears you won t see the key icon here even through the access point uses encryption The signal strength of the access point as a percentage 100 full strength The signal strength of the access point as a bar graph as a visual c...

Страница 14: ... If this access point complies with the 802 11n draft related information is displayed here 3 1 1 2 Connecting to an Access Point 1 Select the wireless access point or network device you want to connect to and click Connect If the access point you selected doesn t use encryption you ll be connected to it within a minute If it does use encryption go to Step 3 2 If the wireless access point doesn t ...

Страница 15: ...tion utility icon to display a popup that tells you the connection quality status and you can click the More Less button to expand the screen and see more detailed information 3 1 1 3 Adding an Access Point to the Profile List If you expect to connect to a specific wireless access point frequently you can add its information to the Profile List and recall it whenever you want to establish the conn...

Страница 16: ...ID manually Network Type Select Ad Hoc or Infrastructure If you re connecting to an access point select Infrastructure for point to point wireless connection i e you re connecting to another computer that s using Ad Hoc mode select Ad Hoc NOTE If you selected an AP from the Profile List keep this field unchanged Tx Power This is the wireless output power If you re not too far from an access point ...

Страница 17: ...mmended that you not change this setting unless you know the effect of changing it Fragment Threshold Check this box to set the packet fragment threshold manually either by moving the slider to set the value or by entering the value in the box at right NOTE It s recommended that you not change this setting unless you know the effect of changing it To enter authentication encryption information for...

Страница 18: ... not be changed You also need to select Soft Token or Static Password as the password in ID Password 18 CONFIGURATION Encryption Select the encryption type of the device you want to connect to When you re adding a profile from an existing access point or wireless device this will be selected automatically Don t change it WPA Preshared Key Enter the key here If encryption isn t enabled or if you se...

Страница 19: ... to connect to requires a specific client certificate the certificate must be installed on your computer You can select the certificate here Server Certification Click to use server based certification Select a CA certificate authority from the drop down menu If intermediate certificates are allowed select Allow intermediate certificates Also if you need to specify the CA server s name you can spe...

Страница 20: ... for configuring your wireless network parameters 1 Right click the INTELLINET configuration utility icon and select Use Zero Configuration as Configuration utility 2 Right click the Windows Zero Configuration icon and select View Available Wireless Networks If you can t find the icon follow Steps 3 through 5 below 3 Click Start on your desktop then click Control Panel then click Network and Inter...

Страница 21: ...rk Connections 5 Right click Wireless Network Connection it may have a number as a suffix if you have more than one wireless network card so be sure to select this Wireless 150N PCI Card then select View Available Wireless Networks ...

Страница 22: ...nt to use if it s shown then click Connect 7 If the access point is protected by encryption you need to input its security key or passphrase here then click Connect Remember the key you enter must match the encryption setting on the access point NOTE If the access point you selected doesn t use encryption you won t see this prompt 8 If Connected displays the connection between your computer and wi...

Страница 23: ...n the image below and when you select a profile from the list all information about it will be shown 23 CONFIGURATION 3 2 Profile Management If you need to connect to different wireless APs at different times such as when you re at a cybercafe or using a public wireless service you can store the connection parameters encryption security passphrase etc as a profile for every access point so you don...

Страница 24: ...can delete it simply by selecting it in the Profile List and clicking Delete as shown above 3 2 4 Activate a Profile To connect to a specific wireless device in the Profile List select it and click Activate as shown above When you click to activate a selected profile and a gray arrow displays in front of the profile it means that the connection attempt failed When the connection is successfully es...

Страница 25: ...box to enable the radio measurement function in order to improve wireless connectivity 25 CONFIGURATION 2 Click Advanced to display the Advanced Settings screen Wireless mode Click to display the wireless operation mode of the card Enable Tx Burst Check this box to accelerate the data transmit rate NOTE It may not work with all wireless access points and wireless devices Enable TCP Window Size Che...

Страница 26: ...nfiguration utility icon and click Launch Config Utility 2 Click Statistics to display the screen and connection related statistics Transmit Receive Click either to view the corresponding statistics of any packets Reset Counter Click to reset the statistics of all items back to 0 zero 3 5 WMM Settings This Wireless 150N PCI Card features a WMM Wi Fi Multimedia function which can improve the perfor...

Страница 27: ...y you also need to select one of the four modes AC_BE best performance AC_BK worst performance AC_VI video data has priority AC_VO voice data has priority Direct Link Setup Enable If you have another WMM enabled wireless device you can enter its MAC address here Click Apply and this card will establish a direct link to the wireless device you ve specified NOTE You also need to specify the timeout ...

Страница 28: ... Since older devices may not have a button to press for WPS setup you can use an alternative WPS setup method entering the PIN code Every WPS compatible wireless network card supports the PIN code configuration method You just enter the code and the wireless access point and wireless card will do the rest for you Though this Wireless 150N PCI Card is compatible with WPS the wireless access point y...

Страница 29: ...on the list Delete Click to remove a device from the WPS AP List 29 CONFIGURATION You can also set Config Mode to Registrar In this mode this card will wait for other WPS enabled access points to send WPS pairing requests Again refer to each device s user manual to understand how to send WPS requests 4 Before you begin to establish the wireless connection by using WPS you can click Rescan to searc...

Страница 30: ...OTE If you experience a problem with the PIN code provided you can click Renew to obtain a new PIN code 4 Click PIN and wait for a few seconds to one minute If a wireless access point with the correct PIN code is found you ll be connected to it You may need to click PIN a few times If you still can t connect this way check that the PIN code you provided to the access point is correct WPS Associate...

Страница 31: ...ireless radio on off simply click Radio On Off When the icon is green as shown below the radio is on when it s red the radio is off 3 8 About The About screen lists version numbers and other information about the card 1 From whichever section you re currently viewing in the utility you ll see the About icon in the menu bar of the screen Otherwise right click the configuration utility icon and clic...

Страница 32: ...ing mode of the Wireless 150N PCI Card is Station mode acting as a client of other wireless access points To switch to AP mode right click the configuration utility icon and click Switch to AP Mode The utility icon will change to an AP icon right to indicate that the card is now operating in AP mode To switch the wireless card back to Station mode act as a client of other wireless access points cl...

Страница 33: ...s data encryption Refer to Section 4 2 Security Settings for details 33 SOFTAP If your computer has another network card connected to the Internet select it from the Name drop down menu and click Enable ICS If your computer doesn t have another network card with Internet connection click Not enable ICS The Config Basic Configuration screen for the AP function will display providing you with labele...

Страница 34: ...sent The default value is 100 NOTE Do not modify this value unless you know what will be affected Tx Power Select a proper output power setting according to your actual needs For example you may not need 100 of output power if other wireless clients are not far from you Idle Time Select the idle time for the wireless access point The default value is 300 NOTE Do not modify this value unless you kn...

Страница 35: ...ransfer speed will be slightly reduced Show Password When selected the key you entered will be shown 35 SOFTAP depending on the authentication type you select If you select Not Use data will not be encrypted and people with some networking knowledge and the proper tools will be able to read the data you transfer WPA Pre shared Key Only clients with the same pre shared key you enter here will be ab...

Страница 36: ...ck to delete all MAC addresses in the list Click Apply to save changes 36 SOFTAP To save changes click OK click Cancel to discard the changes 4 3 Access Control If you re not going to open your computer and wireless resources to the public you can usethe MAC address filtering function to enforce your access control policy so only wireless clients with the MAC address you define using this function...

Страница 37: ...tatus Displays additional information about this wireless connection such as the current wireless operating mode and data transfer rate 4 5 Event Log The SoftAP function will log all wireless related activities as a log Click Event Log to display it Clear Click to remove all entries in the log INTELLINET Wireless Utility INTELLINET Wireless Utility MAC INTELLINET Wireless Utility INTELLINET Wirele...

Страница 38: ...display the event log Reset Counters Click to reset all counters to zero 38 SOFTAP 4 6 Statistics To view detailed information about how your software access point works click Statistics to display the event log Reset Counters Click to reset all counters to zero INTELLINET Wireless Utility INTELLINET Wireless Utility ...

Страница 39: ...ists version numbers and other information about the card 39 SOFTAP 4 7 About The About screen lists version numbers and other information about the card INTELLINET Wireless Utility INTELLINET Wireless Utility MAC www intellinet network com ...

Страница 40: ...configuration utility s icon is black the ard isn t detected by your computer Switch the computer off and insert the card again 2 Reboot the computer and try again 3 Remove the driver and re install 4 Contact your place of purchase for help Problem Can t establish a connection with a certain wireless AP Possible Solutions 1 Click Connect a few more times 2 If the SSID of the access point you want ...

Страница 41: ...fines the use of the same OFDM modulation technique specified in IEEE 802 11a for the 5 GHz frequency band and applies it in the same 2 4 GHz frequency band as IEEE 802 11b The 802 11g standard requires backward compatibility with 802 11b The standard specifically calls for A new physical layer for the 802 11 Medium Access Control MAC in the 2 4 GHz frequency band known as the extended rate PHY ER...

Страница 42: ...d protection in security On the hardware side as with Direct Sequence Spread Spectrum technology it has the inherent security feature of scrambling On the software side WLAN series offer the encryption function WEP to enhance security and Access Control Users can set it up depending upon their needs What is DSSS What is FHSS And what are their differences Frequency hopping spread spectrum FHSS use...

Страница 43: ...fferent latency and throughput requirements compete for network resources By using WMM end user satisfaction is maintained in a wider variety of environments and traffic conditions WMM makes it possible for home network users and enterprise network managers to decide which data streams are most important and assign them a higher traffic priority What is WMM Power Save WMM Power Save is a set of fe...

Страница 44: ...PSK 16QAM 64QAM 802 11n Orthogonal Frequency Division Multiplexing OFDM BPSK QPSK 16QAM 64QAM Security 64 128 bit WEP data encryption WPA and WPA2 Cisco CCX Transmit power 150 Mbps OFDM 15 dBm 1 5 dBm 54 Mbps OFDM 15 dBm 1 5 dBm 11 Mbps CCK 17 dBm 1 5 dBm Receive sensitivity 150 Mbps OFDM 68 dBm 1 5 dBm 54 Mbps OFDM 72 dBm 1 5 dBm 11 Mbps CCK 90 dBm 1 5 dBm Antenna detachable dipole antenna with R...

Страница 45: ...op PC with Pentium 300 MHz compatible processor or higher Windows 2000 XP 2003 Vista and Windows 7 Available 32 bit PCI slot Package Contents Wireless 150N PCI Card 1 antenna Quick install guide Low profile 8 cm bracket Setup CD with user manual ...

Страница 46: ... active and passive networking products Ask your local computer dealer for more information or visit www intellinet network com Copyright INTELLINET NETWORK SOLUTIONS All products mentioned are trademarks or registered trademarks of their respective owners ...

Отзывы: