background image


10 

2.  A Home Internet Network with Multiple IP Addresses 


(Network administrators with Static IPs can also follow these instructions.) 

If you have two or more computers (laptops or desktops) and want to share files, printers, and 
Internet access using multiple IP addresses that you have purchased from your Internet Service 
Provider 

-or-

 you want to connect to an Ethernet network that uses Static IP Addresses, then 

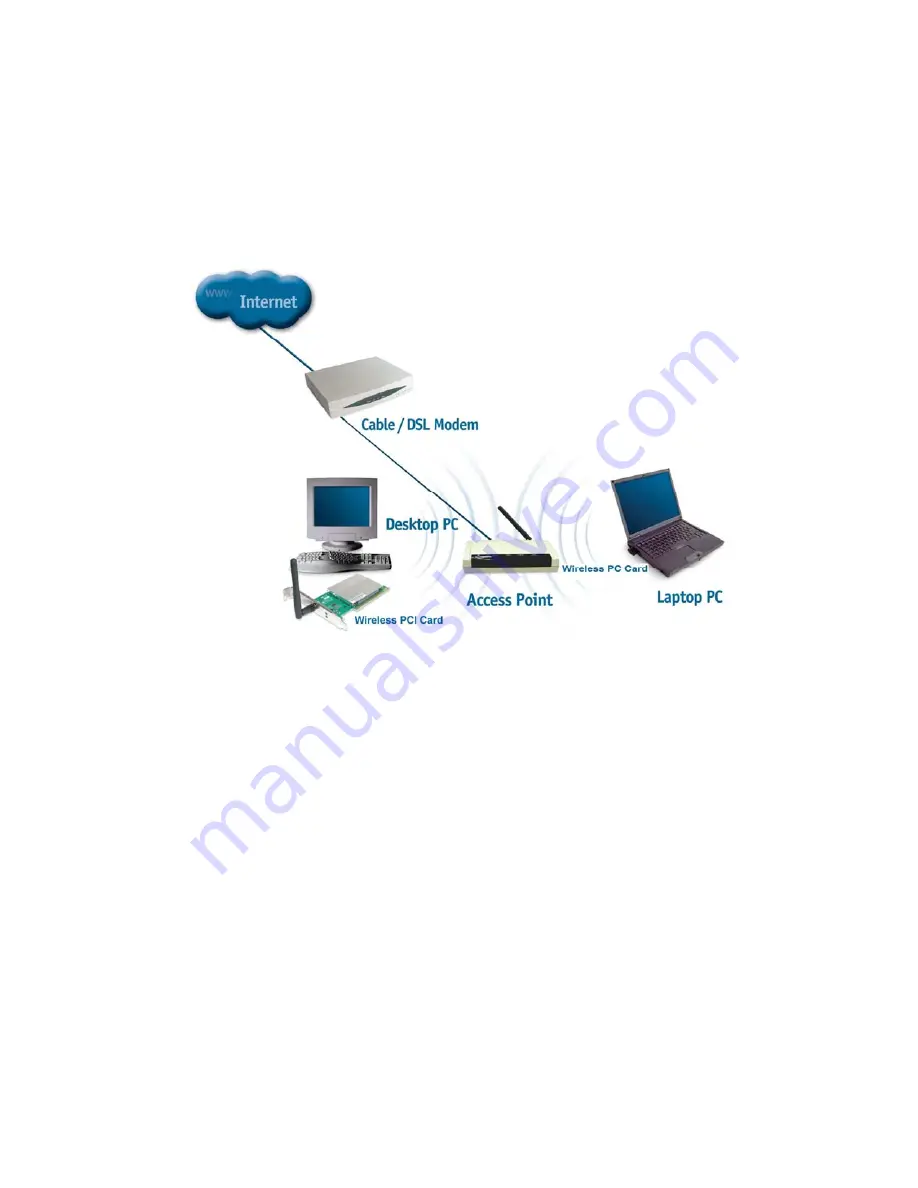
follow the instructions on the next page. When you have completed your network, it should look 
similar to this: 


Please note that this type of installation requires that your ISP (Internet Service Provider) provides 
you a static IP address for each computer and the Access Point on your network.  Please refer to 
the manual that came with your Access Point to determine its configuration.  
 
Please follow these steps to complete the installation: 


1. Connect 

the 

Wireless Access Point

 to a Broadband connection. 

2. Install 

the

 802.11g Intellinet Wireless PCI Card 

into the computer(s) on your wireless 

network. 

3. Check 

the 

Device Manager 

to confirm that the 

wireless card

 is installed correctly.  

4. Set 

the 

Static


IP Address

 of the 

wireless cards

.  

Note:    The IP Address for all computers must be in the same IP Address range, and the Subnet Mask must be the 

same for all the computers on the network. For example: If the first computer is assigned an IP Address of 
192.168.0.2 with a Subnet Mask of 255.255.255.0, then the second computer can be assigned an IP Address 
of 192.168.0.3 with a Subnet Mask of 255.255.255.0, etc.


If you are using a PPPoE client (Point to Point Protocol over Ethernet) please contact your ISP 
(Internet Service Provider) for further instructions regarding connecting to the Internet.


Содержание 522748

Страница 1: ...1 2 4 GHz IEEE 802 11g PCI Super G 108Mb Wireless Network Adapter User s Guide...

Страница 2: ...Contents 3 Introduction 4 Getting Started 8 Installation 13 Using the Configuration Utility for Windows 2000 98 or ME 24 Using the Configuration Utility for Windows XP 30 Troubleshooting 38 Technical...

Страница 3: ...ual and Drivers Utility on CD Note If any of the above items are missing please contact your reseller System Requirements A computer with an available 32 bit PCI slot Windows XP Windows 2000 Windows M...

Страница 4: ...hnology Product Features Compatible with IEEE 802 11b standard to provide wireless Ethernet data rates of up to 11 Mbps data rate Compatible with IEEE 802 11g high rate standard to provide wireless 54...

Страница 5: ...ting Diode 802 11g Intellinet Wireless PCI Card has two LEDs POWER and ACTIVITY LED LED Activity Power A steady light indicates a connection to a power source Activity A solid light indicates that the...

Страница 6: ...N technology for many different purposes Mobility Productivity increases when people have access to data in any location within the operating range of the WLAN Low Implementation Costs WLANs are easy...

Страница 7: ...apping coverage 2 Be aware of the direct line between Access Points and computers with wireless cards A wall that is 1 5 feet thick 5 meters at a 45 degree angle appears to be almost 3 feet 1 meter th...

Страница 8: ...e Internet Network with A Residential Gateway Router 2 A Home Internet Network with Multiple IP Addresses 3 An Ad Hoc Network 4 An Ad Hoc Network with Internet Sharing Please select from the four type...

Страница 9: ...quires that you provide a dynamic IP address for each computer on your network You will need a DHCP capable Residential Gateway Router for your network To complete the installation please follow these...

Страница 10: ...Access Point to determine its configuration Please follow these steps to complete the installation 1 Connect the Wireless Access Point to a Broadband connection 2 Install the 802 11g Intellinet Wirele...

Страница 11: ...tellinet Wireless PCI Card into your desktop computers 2 Set the Static IP Address of the wireless cards Note The IP Address for all computers must be in the same IP Address range and the Subnet Mask...

Страница 12: ...install your wireless network card follow the below instructions If the Internet Sharing Software will be installed on the same computer into which you are installing this wireless network card then f...

Страница 13: ...s XP 2000 ME 98SE of the Windows operating system during the installation process Windows 2000 is used in this version System Requirements A computer with an available 32 bit PCI slot At least a 300 M...

Страница 14: ...14 Continue with the installation and the screen below should appear Click on Yes to proceed with the installation Note This window may not appear...

Страница 15: ...t the Driver CD into the CD ROM drive If you have not inserted the Driver CD into the CD Rom a prompt such as the one below will appear Click OK Otherwise the installation will continue with the follo...

Страница 16: ...stalling the Configuration Utility Look for the file named Setup exe on the installation CD ROM Double click on it to start the installation for the configuration utility When this screen appears clic...

Страница 17: ...click Next Otherwise click on Browse to choose an alternate location Click Next to proceed with the utility installation The Select Program Folder will then appear You may add a new folder you wish to...

Страница 18: ...n process as seen below This same screen will then alert you that all backup files have been removed After WLAN Utility has been successfully installed InstallShield Wizard will prompt you to restart...

Страница 19: ...802 11g Wireless PCI Card 19 4 Uninstalling the Configuration Utility To uninstall the configuration utility simply click Uninstall under Programs WLAN Monitor Uninstall...

Страница 20: ...20 5 Uninstalling the Driver To uninstall the driver right click on My Computer Left click on Properties to bring up the System Properties screen Click on the Hardware tab...

Страница 21: ...802 11g Wireless PCI Card 21 Click on Device Manager Double click on Network adapters...

Страница 22: ...22 Right click on the 802 11g Wireless PCI Card icon...

Страница 23: ...802 11g Wireless PCI Card 23 Click on Uninstall You will then receive a Confirm Device Removal screen Click OK to complete the uninstall procedure...

Страница 24: ...n have been taken in Windows 2000 There are four tabs in the WLAN MonitorConfiguration Utility program In this section we will describe the uses for each tab in the Configuration Utility window To acc...

Страница 25: ...network no access points are used You may check the box This is a computer to computer ad hoc network no access points are used to enable this option On the Configuration Tab click on Refresh to call...

Страница 26: ...so automatically connect to non preferred networks by checking the option When you are done entering the settings and options for the wireless network click on OK Cancel or Apply OK places the setting...

Страница 27: ...d Signal Strength a colored bar shows the intensity of the radio signals in the network are the types of information given under the Connected State heading Under Hardware Information the Media Access...

Страница 28: ...when Windows starts up Check Enable IP Setting in Profile to enable the IP settings made under IP Config in the Wireless Network Properties screen of Configuration Tab If checked the current IP settin...

Страница 29: ...802 11g Wireless PCI Card 29 The About Tab gives the utility version number of the WLAN utility About Tab...

Страница 30: ...onfiguration Utility supports Windows XP however Windows XP has its own utility for wireless devices In order to use the WLAN Monitor Configuration Utility as described in the last section you must di...

Страница 31: ...ave the Use Windows to configure my wireless network settings box checked you will use the Windows XP utility for wireless devices The following demonstrates how to manage wireless network connections...

Страница 32: ...My Network Places to obtain a drop down menu with Properties listed Left click on Properties to obtain the Network Connections screen Right click on the Wireless Network Connection icon to produce ano...

Страница 33: ...802 11g Wireless PCI Card 33 Left click on Properties to bring up the screen below...

Страница 34: ...34 Click on the Wireless Networks tab...

Страница 35: ...ess Point under Available Networks with which you wish to establish a connection Click on Configure to establish a connection with the chosen access point tsd11g A screen such as the following called...

Страница 36: ...36 Enter the appropriate settings on the screen below and click OK The access point tsd11g has been added to the network under Preferred networks Click OK...

Страница 37: ...802 11g Wireless PCI Card 37 The Network Connections window now shows the wireless network connection as Enabled...

Страница 38: ...he installation and operation of 802 11g Wireless PCI Card Read the following descriptions if you are having problems 1 Checking the Installation of the Drivers for the Wireless Adapter Go to Start Ri...

Страница 39: ...the Adapter make sure to completely remove drivers that were previously installed To remove the drivers do the following A Under Tools select Folder Options select View under Hidden files and folders...

Страница 40: ...amation mark is displayed then there is probably a resource conflict In this case make sure the computer system has a free IRQ and if necessary uninstall the drivers restart the system and repeat the...

Страница 41: ...the taskbar select the Support tab and the IP Address will be displayed If you are entering a DNS Server Address you must also enter the Default Gateway Address Remember that if you have a DHCP capabl...

Страница 42: ...472MHz Ism band IEEE 802 11g Data Rates 1 2 5 5 11 Mbps IEEE 802 11b 6 9 12 18 24 36 48 54Mbps IEEE 802 11g Modulation Techniques IEEE 802 11g BPSK QPSK 16 QAM 64 QAM OFDM IEEE 802 11b DQPSK DBPSK DSS...

Страница 43: ...tworks via Access Points with Roaming MTBF Mean Time Between Failure 30 000 hours Physical Dimensions L 6 6 inches W 4 2 inches H 5 4 inches Temperature Operating 0 C to 55 C 32 F to 140 F Storing 20...

Отзывы: