Intellian MIM Скачать руководство пользователя страница 10

10

Intellian MIM - Installation and Operation User Guide

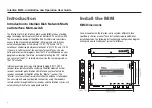
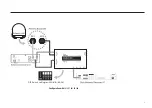
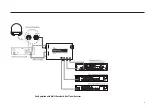
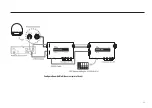
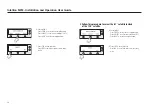
Multi-Receivers (more than 4) Installation

1. You must have two or more MIM units to start with this installation. 

2. Connect the RF cable from the “RF1” connector on the antenna to the
    “ANT.RF” connector on the rear panel of the Antenna Control Unit (ACU).

3. Connect the RF cable from the “RECEIVER” connector on the rear 
    panel of the ACU to the “RF INPUT-RF1” connector on the first MIM.

4. Connect the RF cable from the “RF2” connector on the antenna to the 
    “RF INPUT-RF2” connector on the first MIM.

5. Connect with the RS-232C cable from the “PC Interface” connector 
    on the rear panel of ACU to the “ACU-RS-232C” connector on the first 
    MIM. 

6. Connect the RF cable from the “RF OUTPUT-RF1” connector on the 
    right side of the first MIM to the “RF INPUT-RF1” connector on the left 
    side of the secondary MIM.

7. Connect the RF cable from the “RF OUTPUT-RF2” connector on the 
    right side of the first MIM to the “RF INPUT-RF2” connector on the left 
    side of the secondary MIM.

8. Connect the RS-232C cable between “To additional Multi-Switch” 
    connector on the first MIM and “RS-232C” connector on the
    secondary MIM.

9. If you have more than two MIM units, repeat steps 6 to 8.

10. Connect the RF cable from any “TO RECEIVER SATELLITE IN” on the 
      rear of first MIM to the “Satellite In” on the rear panel of the receiver.

11. For each additional receiver, repeat step 10 and connect RF cables 
      between the other receivers and the MIM connectors. 

12. If you have more than four receivers, repeat step 10 to connect 
      RF cables between the other receivers and the secondary MIM con
      nectors. 

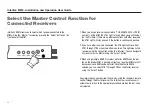
13. After all connections are completed, select one as “Master” by push
      ing the button on the front panel of any MIM (Refer to Page 12). 

Содержание MIM

Страница 1: ...Doc No UM MM 170331 V1 3 Multi satellite Interface Module MIM Installation and Operation User Guide...

Страница 2: ...es Inc and should not be appropriated without permission by Intellian Technologies Inc and the information contained in this manual is the property of Intellian Technologies Inc Any and all parts of t...

Страница 3: ...ALL THE MIM CONNECT THE CABLES TO THE MIM SELECT THE MASTER CONTROL FUNCTION FOR CONNECTED RECEIVERS SETUP THE ANTENNA CONTROL UNIT SETUP THE RECEIVER AND TEST CHECK SWITCH TECHNICAL SPECIFICATIONS WA...

Страница 4: ...9 satellite you can select the 61 5 satellite which carries the same programs as the 129 satellite Intellian recommends using a Dish Network model ViP211 HDTV receiver for automatic satellite switchin...

Страница 5: ...rce from the i Series ACU The DC out port is supported on the B4 XXX i Series ACU AC DC Adaptor Connect the AC Adaptor if using an AC power source Input 100 240V AC 50 60Hz Output 12V DC 3 33A Power R...

Страница 6: ...ctor on the MIM 4 Connect the RS 232C cable from the PC interface connector on the rear panel of the ACU to the ACU RS 232C connector on the MIM 5 Connect the RF cable from any TO RECEIVER SATELLITE I...

Страница 7: ...7 Configuration with i2 i3 i4 i5 i6 DIP Switch setting for i2 i3 i4 i5 i6 ACU...

Страница 8: ...tarted Multi Receivers up to 4 Installation 1 Connect the RF cable from the RF1 connector on the antenna to the ANT RF connector on the rear panel of the Antenna Control Unit ACU 2 Connect the RF cabl...

Страница 9: ...9 Configuration with Multi Receiver Dual Tuner Receiver...

Страница 10: ...first MIM to the RF INPUT RF1 connector on the left side of the secondary MIM 7 Connect the RF cable from the RF OUTPUT RF2 connector on the right side of the first MIM to the RF INPUT RF2 connector o...

Страница 11: ...11 Configuration with Multi Receiver more than 4...

Страница 12: ...have other receivers connected the STB light will move from STB1 through STB4 when the button is pushed This light means the receiver using this connection will be the Master You can designate any re...

Страница 13: ...A Press NEXT to show next satellite name 5 Set satellite B Press PREV to show previous satellite name Press SELECT to set chosen satellite to SAT B Press NEXT to show next satellite name Setup the An...

Страница 14: ...te name 8 Set satellite C Press PREV to show previous satellite name Press SELECT to set chosen satellite to SAT C Press NEXT to show next satellite name 7 Press YES to save selections Press NO to can...

Страница 15: ...satellite turn on the satellite receiver You will initially see this message on the TV screen as below In order to load the information from the Intellian MIM into the receiver you will need to comple...

Страница 16: ...t until the message Currently doing test 3 of 3 appears This indicates the test is completely done If the message is different check your connections again Make sure the receiver you are run ning the...

Страница 17: ...age with OK for all three satellites dishes 110 119 and 129 or 61 With dual tuner receivers you will see the same results for Satellite Input 2 Select the Done button to go to the Point Dish Signal sc...

Страница 18: ...receiver until the TV displays video 7 If you have other receivers connected to the MIM set each receiver as a Master Refer to Page 10 and repeat these procedures from 1 to 6 Note When AC power has b...

Страница 19: ...e range Approvals Warranty 5 F 130 F 15 C 55 C 13 F 158 F 25 C 70 C CE FCC 3 Years Interface RF Port PC Interface ACU Interface Control Key Display Power Input 2 x 4 Multi S W and Expansion 2RF Ports...

Страница 20: ...ervice under the warranty period In case of failure to present the purchase receipt the warranty period will begin 30 days after the manufacturing production date of the product purchased Any product...

Страница 21: ......

Отзывы: