background image


 45

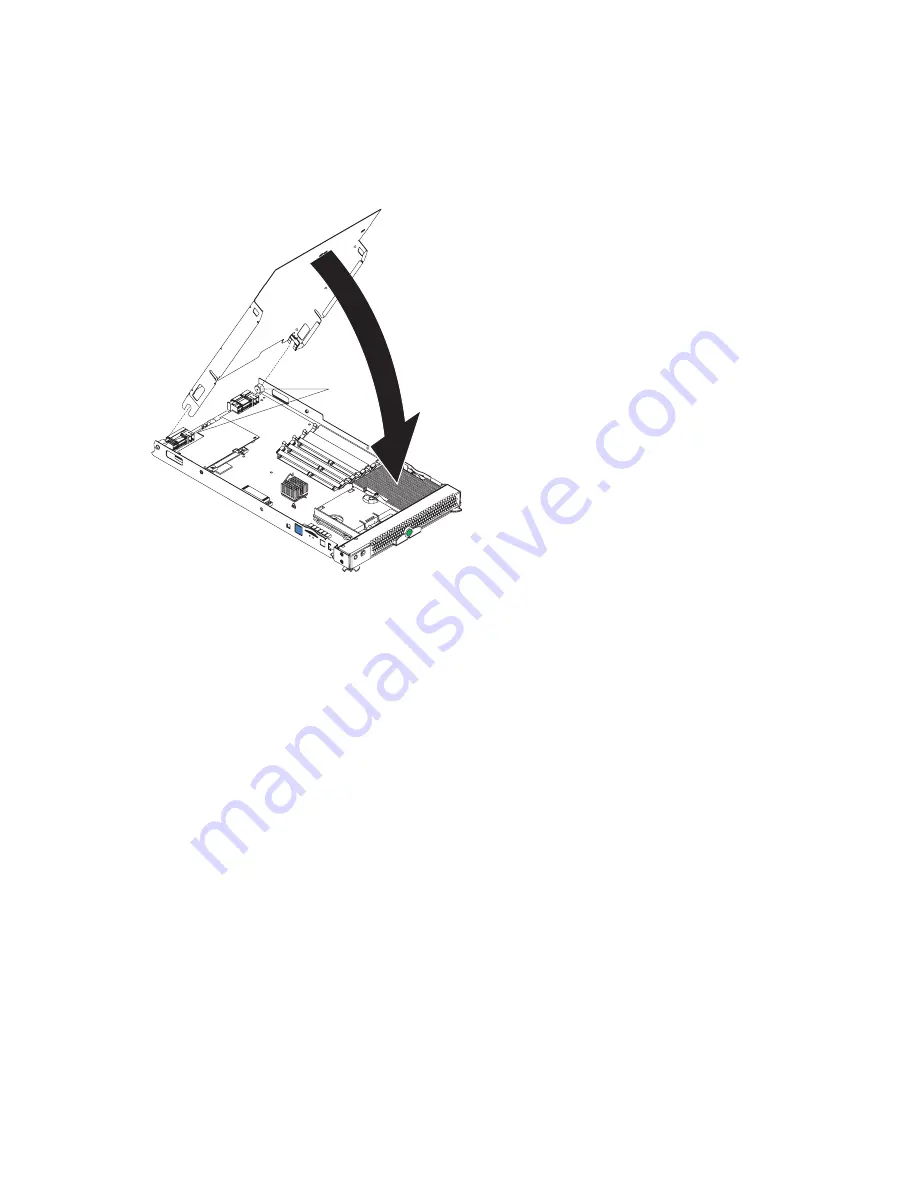
Closing the blade server cover 

Important:

 The blade server cannot be inserted into the SBCE unit until the cover is installed and 

closed or an expansion unit is installed. Do not attempt to override this protection.

The following illustration shows how to close the blade server cover.

Complete the following steps to close the blade server cover:

1. Read the safety information beginning on page “Safety” on page vii and “Installation 

guidelines” on page 19.

2. If you removed the blade bezel assembly, replace it now (see “Installing the blade server bezel 

assembly” on page 44 for instructions).

3. Lower the cover so that the slots at the rear slide down onto the pins at the rear of the blade 

server, as shown in the illustration. Before closing the cover, check that all components are 
installed and seated correctly and that you have not left loose tools or parts inside the blade 
server.

4. Pivot the cover to the closed position, as shown in the illustration, until it clicks into place.

Cover
pins

Содержание SBX82 - Server Compute Blade

Страница 1: ...Intel Server Compute Blade SBX82 Installation and User s Guide A Guide for Technically Qualified Assemblers of Intel Identified Subassemblies Products Order Number C90879 001...

Страница 2: ...iability or warranties relating to fitness for a particular purpose merchantability or infringement of any patent copyright or other intellectual property right Intel products are not designed intende...

Страница 3: ...tration 15 Using system board switches 15 Using switch block 2 SW2 16 Using Light Path Diagnostics to troubleshoot the system board 17 3 Installing options 19 Installation guidelines 19 System reliabi...

Страница 4: ...er Ethernet controller enumeration 55 Configuring a SCSI RAID array 55 Using the LSI Logic Configuration Utility program 56 5 Solving problems 57 Diagnostic tools overview 57 POST beep code descriptio...

Страница 5: ...t bevor Sie eine der Anweisungen ausf hren Beachten Sie hierzu auch die Sicherheitshinweise zu Intel Serverplatinen und Servergeh usen auf der Ressourcen CD oder unter http support intel com Resource...

Страница 6: ...scarf inside clothing or fasten it with a nonconductive clip approximately 8 centimeters 3 inches from the end Do not wear jewelry chains metal frame eyeglasses or metal fasteners for your clothing R...

Страница 7: ...g testers set controls correctly and use the approved probe leads and accessories for that tester Stand on suitable rubber mats obtained locally if necessary to insulate you from grounds such as metal...

Страница 8: ...in the following list to provide protection that meets the specific service requirement Attach the ESD ground clip to any frame ground ground braid or green wire ground Use an ESD common ground or re...

Страница 9: ...ed or disposed of Do not Throw or immerse into water Heat to more than 100 degrees C 212 degrees F Repair or disassemble Dispose of the battery as required by local ordinances or regulations xx CAUTIO...

Страница 10: ...upply do not turn off the electrical current supplied to the device The device also might have more than one power cord To remove all electrical current from the device ensure that all power cords are...

Страница 11: ...e installing the blade Safety compliance USA UL 60950 3rd Edition CSA 22 2 No 60950 Canada cUL certified 3rd Edition CSA 22 2 No 60950 for Canada product bears the single cUL mark for U S and Canada E...

Страница 12: ...system then the system is to be considered a Class A system In this configuration operation of this equipment in a residential area is likely to cause harmful interference NOTE This product is intende...

Страница 13: ...When such trouble occurs the user may be required to take corrective actions ICES 003 Canada Cet appareil num rique respecte les limites bruits radio lectriques applicables aux appareils num riques de...

Страница 14: ...onment so that distributors or users pay attention to this point If this product is sold or purchased improperly please exchange this product to one that can be used at home Class B device This device...

Страница 15: ...rver Record information about your Intel Server Compute Blade SBX82 in the following table NOTE The model number and serial number are on the ID label that is behind the control panel door on the fron...

Страница 16: ...ser labels comes with the Intel Server Compute Blade SBX82 When you install the blade server in the SBCE unit write identifying information on a label and place the label on the SBX82 unit bezel Figur...

Страница 17: ...3 Figure 2 Label placement on the SBCE unit Important Do not place the label on the blade server itself or in any way block the ventilation holes on the blade server...

Страница 18: ...ures Advanced Configuration and Power Interface ACPI Automatic error retry or recovery Automatic server restart Built in monitoring for temperature voltage hard disk drives and flash drives Chipkill m...

Страница 19: ...on the Ethernet local area network LAN The controllers support Wake on LAN technology I O expansion The blade server comes with two connectors on the system board for an optional expansion card such a...

Страница 20: ...Redundant with performance impact Non redundant You can configure and monitor the power environment using the management module For more information about configuring and using power throttling refer...

Страница 21: ...14 inches Maximum weight 5 4 kg 12 lb Integrated functions Dual Gigabit Ethernet controllers Expansion card interface BMC with IPMI firmware ATI 7000M video controller LSI 1020 SCSI controller Light P...

Страница 22: ...Document Format PDF on the Intel Server Compute Blade SBX82 Resource CD that came with your blade server Intel Server Compute Blade SBX82 Hardware Maintenance Manual and Troubleshooting Guide This do...

Страница 23: ...devices or data An attention notice is placed just before the instruction or situation in which damage could occur Caution These statements indicate situations that can be potentially hazardous to you...

Страница 24: ...10 Intel Server Compute Blade SBX82 Installation and User s Guide...

Страница 25: ...his time the service processor in the management module is initializing therefore the power control button on the blade server does not respond NOTE While the blade server is powering up the power on...

Страница 26: ...n any of the following ways You can press the power control button on the blade server behind the control panel door See Understanding the control panel and LEDs on page 13 This starts an orderly shut...

Страница 27: ...ttached to the SBCE unit is a PS 2 style keyboard communication with it is through the USB The operating system in the blade server must provide USB support for the blade server to recognize and use t...

Страница 28: ...work activity Location LED When this blue LED is lit it has been turned on remotely by the system administrator to aid in visually locating the blade server The location LED on the SBCE unit will be l...

Страница 29: ...er the blade server is removed from the SBCE unit During that period of time you can relight the Light Path Diagnostics LEDs for a maximum of 25 seconds or less depending on the number of LEDs that ar...

Страница 30: ...ocation and the settings for SW2 Figure 5 System board switch block SW2 location Table 1 Switch block 2 SW2 and settings Switch number Description SW2 Switch block Eight switches 1 BIOS backup page ju...

Страница 31: ...rror LEDs Table 2 SW4 Light Path Diagnostics LED locations LED name and location Description DIMM 1 CR6 DIMM 2 CR5 DIMM 3 CR4 DIMM 4 CR201 error There is a problem with the corresponding DIMM BMC faul...

Страница 32: ...If the error still exists replace the system board MIS Check the processors to make sure they are at the same speed SBRD Reboot the blade server If the error still exists replace the system board TEMP...

Страница 33: ...ing Orange can also indicate touch points on hot swap components See the instructions for removing or installing a specific hot swap component for any additional procedures that you might have to perf...

Страница 34: ...and install it directly into the blade server without setting it down If it is necessary to set the device down place it back into its non conductive package Do not place the device on your blade serv...

Страница 35: ...e blade server bezel assembly To install certain options you must first remove the blade server bezel assembly The following illustration shows how to remove the bezel assembly from the blade server C...

Страница 36: ...ng illustration shows how to install a SCSI hard disk drive and tray in the blade server Figure 8 Installing a SCSI drive Note Do not install a SCSI hard disk drive in SCSI connector 1 SCSI ID 1 if yo...

Страница 37: ...er at the back of the hard disk drive tray to disengage the drive from its tray 6 From the rear edge of the drive slide the drive out of the SCSI connector Attention To maintain proper system cooling...

Страница 38: ...you restart the blade server it displays a message indicating that the memory configuration has changed Start the Configuration Setup Utility program and select Save Settings See Configuration Setup U...

Страница 39: ...metric multiprocessing SMP server With SMP certain operating systems and application programs can distribute the processing load between the processors If your blade server comes with one processor yo...

Страница 40: ...g and removing the blade server from the SBCE unit on page 20 for instructions 3 Carefully lay the blade server on a flat non conductive surface 4 Open the blade server cover see Opening the blade ser...

Страница 41: ...amage to the processor processor socket and system board d Center the processor over the processor socket Align the triangle on the corner of the processor with the triangle on the corner of the socke...

Страница 42: ...her options to install or remove do so now otherwise go to Completing the installation on page 43 Installing an I O expansion card You can add I O optional expansion cards to your blade server to give...

Страница 43: ...bit Ethernet and Fibre Channel expansion cards are available as a small form factor card and a standard form factor card The following sections describe how to install an I O expansion card in the bla...

Страница 44: ...arrow end of the card into the raised hook on the tray then gently pivot the card into the expansion card connectors as shown by number 2 the illustration For device driver and configuration informati...

Страница 45: ...l a standard form factor I O expansion card 1 Read the safety information beginning on page Safety on page vii and Installation guidelines on page 19 2 Shut down the operating system turn off the blad...

Страница 46: ...Server SCSI Expansion Module SBESCSI The Intel Blade Server SCSI Expansion Module SBESCSI supports up to two hot swap SCSI hard disk drives and up to two standard form factor I O cards or two small f...

Страница 47: ...humidity and increases static electricity Installing a SCSI storage expansion unit To use SCSI hard disk drives with your blade server you must install the Intel Blade Server SCSI Expansion Module SBE...

Страница 48: ...blade server cover a Open the blade server cover and lift it from the blade server b Store the cover in a safe place 5 Locate the SCSI expansion connector J132 on the system board and lift the protect...

Страница 49: ...blade bay 7 through 14 power modules must be present in power bays 1 2 3 and 4 8 Turn on the blade server 9 If you have not already done so install the LSI device drivers for your operating system Wi...

Страница 50: ...s when compared to a single large drive Embedded mirroring which is also known as RAID level 1 is used when you have two hot swap SCSI hard disk drives installed Each drive is an exact copy of the oth...

Страница 51: ...rting your finger into the depression at the top of the filler panel and pulling it away from the expansion unit 3 Install the hard disk drive a Ensure that the tray handle is open that is perpendicul...

Страница 52: ...n page 19 2 Carefully lay the expansion unit down on a flat non conductive surface with the cover side up 3 Press the unit cover release on each side of the expansion unit and lift the cover open as s...

Страница 53: ...small form factor card The Fibre Channel expansion card and the Gigabit Ethernet expansion card are available as small form factor and standard form factor I O expansion cards Complete the following s...

Страница 54: ...ide the notch in the narrow end of the card into the raised hook on the tray then gently pivot the wide end of the card into the I O expansion card connectors as shown in the illustration NOTE For dev...

Страница 55: ...tery use only an equivalent type battery recommended by the manufacturer If your system has a module containing a lithium battery replace it only with the same module type made by the same manufacture...

Страница 56: ...use your finger to press down on one side of the battery Then slide the battery from the socket The spring mechanism will push the battery out towards you as you slide it from the socket 7 Insert the...

Страница 57: ...ssembly if you removed it see Installing the blade server bezel assembly 2 Close the blade server cover unless you installed an expansion unit option see Closing the blade server cover on page 45 Stat...

Страница 58: ...all the blade server bezel assembly 1 Read the safety information beginning on page Safety on page vii and Installation guidelines on page 19 2 Connect the control panel cable to the control panel con...

Страница 59: ...e Safety on page vii and Installation guidelines on page 19 2 If you removed the blade bezel assembly replace it now see Installing the blade server bezel assembly on page 44 for instructions 3 Lower...

Страница 60: ...ions that you want such as SCSI drives or memory in the blade server 3 Select the bay for the blade server Notes a If the blade server has an expansion unit installed on it the blade server and expans...

Страница 61: ...nd you might have to reconfigure the blade server If this is the initial installation for a blade server in the SBCE unit you must configure the blade server with the Configuration Setup Utility and i...

Страница 62: ...ction buttons on the control panel the CD diskette USB select button and the keyboard mouse video select button See Understanding the control panel and LEDs on page 13 for information about these butt...

Страница 63: ...rogram This section provides the instructions for starting the Configuration Setup Utility program and descriptions of the menu choices Starting the Configuration Setup Utility program Complete the fo...

Страница 64: ...ideo Select this choice to view information about the integrated video controller System MAC Addresses Select this choice to set and view the MAC addresses for the Ethernet controllers on the blade se...

Страница 65: ...nfiguration and activtes a Hot Spare Memory pair of DIMMs to replace the failed pair of DIMMs Before you can enable memory mirroring or sparing at least two pairs of DIMMs must be installed in the bla...

Страница 66: ...s or exit without saving them Using passwords From the System Security choice you can set change and delete a power on password If you set a power on password you must type the power on password to co...

Страница 67: ...ect a choice from the menu Press Esc to return to the previous menu Press the F4 key to exit 4 Follow the instructions on the screen to change the settings of the selected items then press Enter Firmw...

Страница 68: ...net controller to I O module bay will vary based on blade server type and the operating system that is installed See Blade server Ethernet controller enumeration on page 55 for information about how t...

Страница 69: ...odule bay 1 The other Ethernet controller in the blade server is associated with the switch module in I O module bay 2 If you have installed an expansion card on a blade server communications from the...

Страница 70: ...n on the blade server make sure the blade server is the owner of the keyboard video and mouse and watch the monitor screen 2 When the Press Ctrl C to start LSI Configuration Logic Utility prompt appea...

Страница 71: ...T detects a hardware configuration problem See POST beep code descriptions on page 58 and the blade server Hardware Maintenance Manual and Troubleshooting Guide on the Intel Server Compute Blade SBX82...

Страница 72: ...d Make sure that all DIMMs are correctly installed One long beep and two small beeps Indicates that a video error has occurred and the BIOS cannot initialize the monitor screen to display additional i...

Страница 73: ...ct button LED on the front of the blade server is lit indicating that the blade server is connected to the shared keyboard Make sure that the keyboard cable is connected to the SBCE unit and nothing i...

Страница 74: ...95085 The blade server failed the ECC checking hardware test Have the system board serviced 012980xx 012981xx Data for processor x Download and install the latest level of BIOS code 01298200 processor...

Страница 75: ...sage 289 If the DIMM was disabled by a system management interrupt SMI replace the DIMM If the DIMMs are not installed in pairs install DIMMs starting with DIMM 1 and DIMM 2 Make sure there is not an...

Страница 76: ...T followed by a blank display screen If this occurs and the Boot Fail Count feature in the Start Options of the Configuration Setup Utility program is enabled its default setting you must restart the...

Страница 77: ...ting system Select USB Symptom Suggested action One or more blade servers are unable to communicate with the network Make sure that The switch modules for the network interface that you are using are...

Страница 78: ...ttached storage expansion unit is in blade bay 7 through 14 in the SBCE unit Ensure power modules are installed in all four power bays d The power on LED on the blade server control panel is flashing...

Страница 79: ...re lit before you removed the blade server from the SBCE unit The LEDs will remain lit for as long as you press the button to a maximum of 25 seconds See Understanding the control panel and LEDs on pa...

Страница 80: ...Diagnostics LEDs for a small period of time after the blade server is removed from the SBCE unit During that period of time you can relight the Light Path Diagnostics LEDs for a maximum of 25 seconds...

Страница 81: ...installed correctly see Installing an additional processor on page 25 for installation instructions Temperature error The system temperature has exceeded a threshold level Determine whether a blower o...

Страница 82: ...68 Intel Server Compute Blade SBX82 Installation and User s Guide...

Страница 83: ...ons that are provided with your system and software The information that comes with your system also describes the diagnostic tests that you can perform Most Intel systems and programs come with infor...

Страница 84: ...70 Intel Server Compute Blade SBX82 Installation and User s Guide...

Страница 85: ...ut 48 memory 15 processor 15 SCSI 15 SCSI expansion 15 system board 15 controller enable or disable Ethernet 50 enable or disable SCSI 50 Ethernet 54 memory 5 SCSI 33 35 controller enumeration 55 cove...

Страница 86: ...I storage expansion unit 33 small form factor expansion card 29 standard form factor expansion card 31 installing a blade server SBCE unit 20 installing a processor notes 25 integrated functions 7 J j...

Страница 87: ...drive 23 S SCSI IDs 35 SCSI disk drives support 5 SCSI hard disk drive removing 23 SCSI RAID configure an array 55 Server Compute Blade specifications 6 service processor features 54 setting password...

Страница 88: ...Intel Server Compute Blade SBX82 Installation and User s Guide turning on the blade server 11 U using jumpers 15 switches 15 utility Configuration Setup Utility program 49 PXE boot agent program using...

Отзывы: