background image

88

Listening to the Radio

—Continued

Displaying SIRIUS Satellite Radio 
Information

The following information can be displayed:

Note:

If the category, artist/composer, or song title is not avail-
able, “- - -” will be displayed instead.

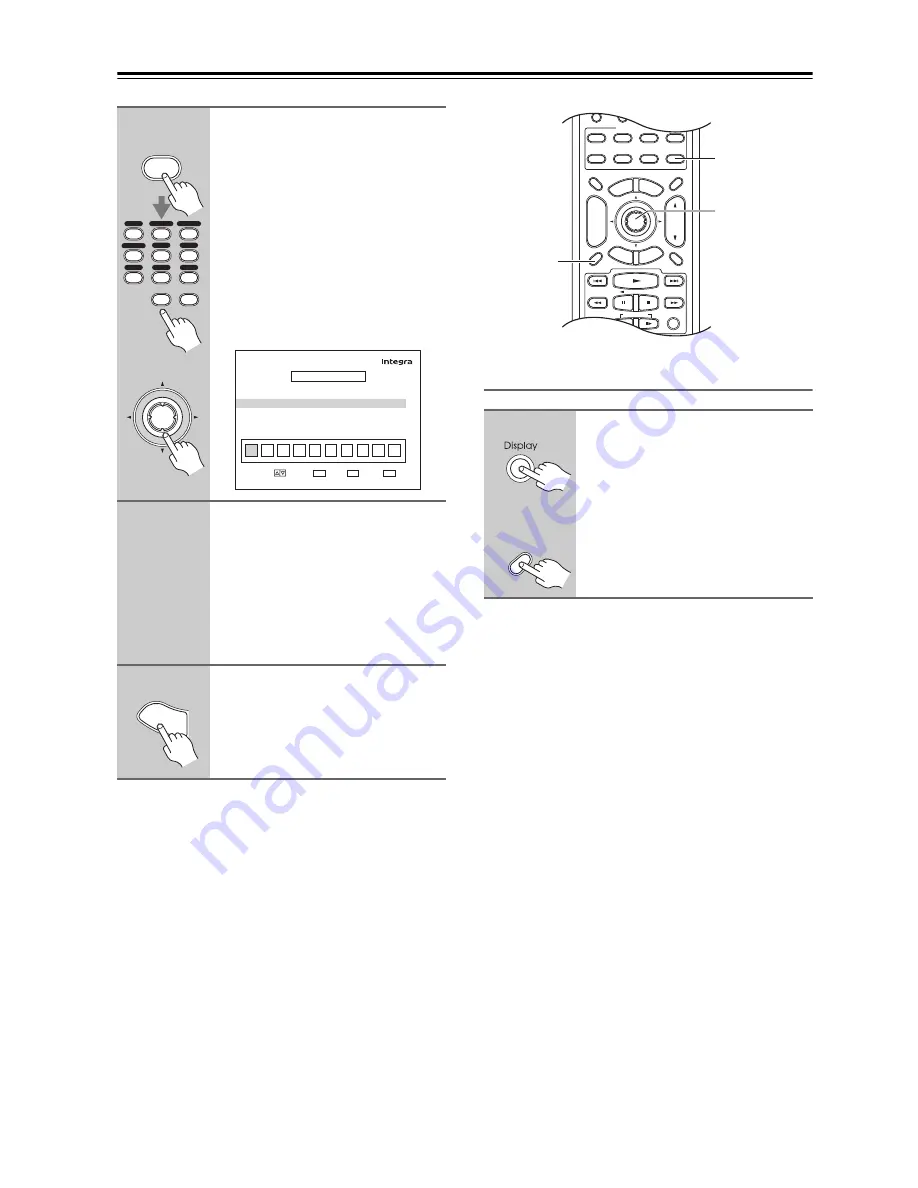
6

Press the [D.TUN] button, and 
then use the number buttons to 
enter the new 4-digit PIN number.

Or

Use the Left and Right [

e

]/[

r

buttons to select a number on the 
screen, and then press [Enter]. 
Repeat this for each of the four 
digits in the new PIN number.

The Confirm screen appears.

7

Confirm the new PIN number by 
entering it again.

If you confirm the PIN number cor-
rectly, the new PIN is saved and the 
message “Complete” appears.
If you confirm the PIN number incor-
rectly, “Wrong Code!” appears, and 
you’ll be returned to step 5 to try again.

8

Press the [Setup] button.

Setup closes.

Enter

or

D.TUN

Clear

12

D.TUN

0

Clear

1

2

3

4

5

6

7

8

9

VCR

/

DVR

CBL

/

SAT

DVD

Tape

Tuner

CD

Game

/

TV

AUX 1

AUX 2

Edit Code
   New Code
   Confirm

1

2

3

4

5

6

7

8

9

MOVE

RETURN

ENTER

RETURN

EXIT

SETUP

TUNER

4–6.  SIRIUS Parental Lock

INPUT

0

****

**  

Setu

p

Press the [Display] button 
repeatedly to cycle through the 
available information.

/

Input Selector

Macro

1

2

3

VCR

DVD

CDR/MD/Dock

CD

Zone

2

Remote Mode

Dimmer

Tape/AMP

Sleep

Receiver

TV

Net/USB

Cable

VOL

CH

Disc

Album

+

-

Enter

Top

Men

u

Men

u

Display

Muting

Exi

t

Gu

ide

Prev

CH

Ret

urn

Setu

p

Listening Mode

Playlist

Random

Rec

SAT

Zone

3

Display

Receiver

Enter

Display

Remote

controller

AV receiver

Channel name

Channel number & preset number

Category

Artist/composer

Song title

Listening mode

Содержание DTR-8.9

Страница 1: ...DTR 8 9 Instruction Manual AV Receiver DTR 9 9...

Страница 2: ...r adjustment of other controls may result in damage and will often require extensive work by a qualified technician to restore the apparatus to its normal operation E If the apparatus has been dropped...

Страница 3: ...t it Do not leave rubber or plastic items on this unit for a long time because they may leave marks on the case This unit s top and rear panels may get warm after prolonged use This is normal If you d...

Страница 4: ...Zone 2 Left SP B Zone 2 Left Surround Right Surround Right Surround Back Right Surround Back Right Zone 2 Right Zone 2 Right Front Left Front Left SP B Zone 2 Left SP B Zone 2 Left Front Right Front R...

Страница 5: ...t Source 66 Setting the Display Brightness 67 Adjusting Speaker Levels 67 Muting the AV Receiver 67 Using the Sleep Timer 68 Using Headphones 68 Adjusting the Bass Treble 68 Displaying Source Informat...

Страница 6: ...opean and Asian models Audyssey MultEQ XT 12 to Correct Room Acoustic Problems Audyssey Dynamic EQ 12 Loudness Correction Audyssey Dynamic Volume 12 Indepedent Crossover Adjustment 40 45 50 55 60 70 8...

Страница 7: ...h Corporation Niles is a registered trademark of Niles Audio Corporation Apple and iPod are trademarks of Apple Inc registered in the U S and other countries x v Color is a trademark of Sony Corporati...

Страница 8: ...92 102 While Powered Zone 2 is being used playback is reduced to 5 1 channels see page 140 Zone 2 In your Zone 2 room you can enjoy 2 channel stereo playback and video playback see page 140 The liste...

Страница 9: ...cator 47 Lights up when the AV receiver is on Standby and flashes while a signal is being received from the remote controller c Zone 2 indicator 144 This indicator lights up when Zone 2 is selected d...

Страница 10: ...as an abso lute value See Volume Setup on page 125 p Zone 2 Zone 3 Level q w and Off buttons 144 145 The Zone 2 button is used when setting Zone 2 The Zone 3 button is used when setting Zone 3 The Lev...

Страница 11: ...DS Radio Data System AUTO 69 Lights up when Auto Tuning mode is selected for AM or FM radio Goes off when Man ual Tuning mode is selected TUNED 69 Lights up when tuned to a radio sta tion FM STEREO 69...

Страница 12: ...12 Front Rear Panels Continued Rear Panel ck cl bk 8 5 4 9 br bq do 2 1 bs bt 3 6 7 bl bo bp cn co cp cr cs dl dm dn ct dk cq cm North American model bm bn Other models...

Страница 13: ...posite video output can be connected to a video input on a TV in Zone 2 l AM ANTENNA not North American model These push terminals are for connecting an AM antenna m FM ANTENNA not North American mode...

Страница 14: ...ecting the front center surround and surround back speakers The FRONT L R and SURR BACK L R terminal posts can be used with front speakers and surround back speakers respectively or used to bi amp or...

Страница 15: ...the same type is used in the same room or the AV receiver is installed close to equipment that uses infrared rays the remote control ler may not work reliably Don t put anything on top of the remote c...

Страница 16: ...e TV receiver You must enter the appropriate remote con trol code first see page 148 Zone 2 Zone 3 Modes These modes are for controlling Zone 2 and Zone 3 see page 143 Receiver Tape mode is used to co...

Страница 17: ...e remote controller modes When you press a button the Remote Mode button for the currently selected mode lights up o Sleep button 68 Used with the Sleep function p VOL q w button 66 Adjusts the volume...

Страница 18: ...Dolby Digital or DTS l Open Close 0 button Opens and closes the disc tray m Clear button Cancels functions and clears entered numbers n Menu button Displays a DVD s menu o Return button Exits the DVD...

Страница 19: ...lay Next Fast Reverse Pause Stop and Fast Forward h Rec y button Starts recording i Repeat button Used with the repeat playback function j Open Close 0 button Opens or closes the disc tray or ejects t...

Страница 20: ...select the previous or next playlist on the iPod k Repeat button Used with the repeat function l Menu button Used to access menus m Play 1 button Starts playback If the component is off it will turn...

Страница 21: ...puter media server or USB mass storage device h Return button Returns to the previous display i Play 1 button Starts playback j Next 6 button Selects the next song k Stop 2 button Stops playback l Ran...

Страница 22: ...m the listener Center speaker This speaker enhances the front left and right speakers making sound movements distinct and providing a full sound image For movies it s used mainly for dialog Position i...

Страница 23: ...red sub woofer If your subwoofer is unpowered and you re using an external amplifier connect the PRE OUT SUBWOOFER to the amp s input Attaching the Speaker Labels The AV receiver s positive speaker te...

Страница 24: ...get them the wrong way around the sound will be out of phase and will sound unnatural Unnecessarily long or very thin speaker cables may affect the sound quality and should be avoided Be careful not t...

Страница 25: ...i amping can only be used with speakers that support bi amping Refer to your speaker manual Bi amping Speaker Hookup Bi amping Front Speakers 1 Connect the AV receiver s FRONT R positive terminal to t...

Страница 26: ...you must set the Speaker Type setting to BTL to enable bridging see page 57 Notes Use only front speakers with an impedance of 8 ohms or higher for bridging Failure to do so may seriously damage the...

Страница 27: ...North American Model Other Models Once your AV receiver is ready for use you ll need to tune into an FM radio station and adjust the position of the FM antenna to achieve the best possible reception A...

Страница 28: ...tter It s best not to use the same antenna for both FM and TV reception as this can cause interference problems If cir cumstances demand it use a TV FM antenna splitter as shown Connecting an Outdoor...

Страница 29: ...ble Jack Description HDMI HDMI connections can carry uncompressed stan dard or high definition digital video and audio and offer the best picture and sound quality Component video cable Component vide...

Страница 30: ...puts For optimal video performance THX recommends that video signals pass through the system without upconver sion e g component video input through to component video output It s also recommended tha...

Страница 31: ...eo sources being upconverted for the component video output The composite video S Video and component video outputs pass through their respective analog input signals as they are HDMI input signals ar...

Страница 32: ...V or Projector Connection AV receiver Signal flow TV COMPONENT VIDEO MONITOR OUT 1 Component video input MONITOR OUT S S Video input MONITOR OUT V Composite video input GAME TV IN L R Analog audio L R...

Страница 33: ...R Analog audio L R output DIGITAL COAXIAL IN 1 DVD Digital coaxial output DIGITAL OPTICAL IN 1 GAME TV Digital optical output Step 1 Video Connection Choose a video connection that matches your DVD pl...

Страница 34: ...FER jacks to the 7 1 channel analog audio output on your DVD player If your DVD player has a 5 1 channel analog audio output don t connect anything to the AV receiver s SURR BACK L R jacks Before usin...

Страница 35: ...site video output VCR DVR IN L R Analog audio L R output DIGITAL COAXIAL IN 2 VCR DVR Digital coaxial output DIGITAL OPTICAL IN 1 GAME TV Digital optical output Hint Step 1 Video Connection Choose a v...

Страница 36: ...kewise video signals connected to S Video inputs can only be recorded via the VCR DVR OUT S jack So if your source TV or VCR is connected to an S Video input the recording VCR DVD recorder must be con...

Страница 37: ...o output CBL SAT IN S S Video output CBL SAT IN V Composite video output CBL SAT IN L R Analog audio L R output DIGITAL COAXIAL IN 3 CBL SAT Digital coaxial output DIGITAL OPTICAL IN 2 CD Digital opti...

Страница 38: ...HD Mas ter Audio Your DVD player must be able to output these formats from its HDMI OUT About Copyright Protection The AV receiver supports HDCP High bandwidth Digital Content Protection 2 a copy prot...

Страница 39: ...ition video signals from a PC are not supported When listening to an HDMI component through the AV receiver set the HDMI component so that its video can be seen on the TV screen on the TV select the i...

Страница 40: ...site video output GAME TV IN L R Analog audio L R output DIGITAL OPTICAL IN 1 GAME TV Digital coaxial output Step 1 Video Connection Choose a video connection that matches your game console or and the...

Страница 41: ...output AUX 2 Input Digital Digital optical output Step 1 Video Connection Choose a video connection that matches your camcorder or and then make the connection A B Step 2 Audio Connection Choose an a...

Страница 42: ...ng coil MC type car tridge you ll need a commercially available MC head amp or MC transformer Connect your turntable to the head amp or transformer and connect that to the AV receiver s PHONO IN L R j...

Страница 43: ...ecorder TAPE IN L R TAPE OUT L R Analog audio L R output Analog audio L R input DIGITAL COAXIAL IN 2 VCR DVR Digital coaxial output DIGITAL OPTICAL IN 2 CD Digital optical output DIGITAL OPTICAL OUT D...

Страница 44: ...ubwoofer connect it to the AV receiver s PRE OUT SUBWOOFER jack Connecting a Power Amplifier 2 3 4 5 6 7 1 FRONT CENTER SURR SURR BACK SUBWOOFER FRONT CENTER SURR PRE OUT SURR BACK SUBWOOFER 1 Front l...

Страница 45: ...128 the AC outlet are on all the time regardless of whether the AV receiver is set to On or Standby or Ready mode in this case so any components connected to them cannot be turned on or off automat ic...

Страница 46: ...nnections u cables are supplied with Integra Onkyo players DVD CD etc Some components have two u jacks You can con nect either one to the AV receiver The other jack is for connecting additional u capa...

Страница 47: ...revent any loud surprises the next time you turn on the AV receiver turn down the volume before you turn it off Remote controller Receiver On AV receiver or Up and Running in a Few Easy Steps To get y...

Страница 48: ...ecify the output resolution for the HDMI OUT MAIN or HDMI OUT SUB and COMPONENT VIDEO MONITOR OUT and have the AV receiver upconvert the picture resolution as necessary to match the resolution support...

Страница 49: ...menu doesn t appear make sure the appropriate external input is selected on your TV 2 Use the Up and Down q w but tons to select 6 Miscella neous and then press Enter The Miscellaneous menu appears 3...

Страница 50: ...er Setup MENU 1 Input Output Assign 2 Speaker Setup 3 Audio Adjust 4 Source Setup 5 Listening Mode Preset 6 Miscellaneous 7 Hardware Setup 8 Lock Setup MOVE ENTER RETURN ENTER RETURN EXIT SETUP Enter...

Страница 51: ...r TV Net USB Cable VOL CH Disc Album Enter Top Menu Menu Display Muting Exit Guide Prev CH Return Setup Audio Repeat Play Mode Listening Mode Playlist Random Rec Direct Stereo THX All ST Subtitle Surr...

Страница 52: ...conversion as necessary 720p Select this for 720p output and video conversion as necessary 1080i Select this for 1080i output and video conversion as necessary 1080p Select this for 1080p output and v...

Страница 53: ...Up and Down q w but tons to select 2 HDMI Input and then press Enter The HDMI Input menu appears 4 Use the Up and Down q w but tons to select an input selector and use the Left and Right e r buttons t...

Страница 54: ...L SAT GAME TV AUX1 AUX2 TAPE TUNER Fixed CD PHONO 1 Press the Receiver button fol lowed by the Setup button The main menu appears onscreen If the main menu doesn t appear make sure the appropriate ext...

Страница 55: ...I Input 3 Component Video Input 4 Digital Audio Input 5 Analog Audio Input Enter Enter 1 4 Digital Audio Input DVD VCR DVR CBL SAT GAME TV AUX AUX2 TAPE TUNER CD PHONO COAX1 COAX2 COAX3 OPT1 FRONT OPT...

Страница 56: ...tandby TV Input TV CH TV VOL 10 11 12 D TUN 10 0 Clear 1 2 3 4 5 6 7 8 9 Input Selector VCR DVR CBL SAT DVD Tape Tuner CD Phono Net USB Game TV Macro 1 2 3 VCR DVD CDR MD Dock CD Zone2 Remote Mode Dim...

Страница 57: ...r Tape AMP Sleep Receiver TV Net USB Cable VOL CH Disc Album Enter Top Menu Menu Display Muting Exit Guide Prev CH Return Setup Playlist Random Rec SAT Zone3 2 3 1 1 6 2 5 If you change these settings...

Страница 58: ...ect 2 OSD Setup and then press Enter The OSD Setup menu appears Note The TV Format setting is not available on the North American mod els Receiver Setup Enter Enter 6 Miscellaneous 1 Volume Setup 2 OS...

Страница 59: ...select 7 Hardware Setup and then press Enter The Hardware Setup menu appears 3 Use the Up and Down q w but tons to select 3 Tuner and then press Enter The Tuner menu appears 4 Use the Up and Down q w...

Страница 60: ...sey Dynamic Volume Audyssey Dynamic Volume solves the problem of large variations in volume level between television programs commercials and between the soft and loud passages of movies Dynamic Volum...

Страница 61: ...our TV 1 Turn on the AV receiver and the connected TV On the TV select the input to which the AV receiver is connected 2 Place the speaker setup micro phone at measurement point 1 page 60 and connect...

Страница 62: ...creen appears Place the setup microphone at the next position see page 60 and then press Enter Audyssey MultEQ XT performs more measurements This takes a few minutes 6 When prompted place the setup mi...

Страница 63: ...d settings and exit the automatic speaker setup Review SP Config Review the speaker configuration settings see Reviewing the Results on page 65 Review SP Distance Review the speaker distance set tings...

Страница 64: ...loud The number of speakers detected on the second or third measurement was different to the number detected on the first measurement Make sure speakers that cannot be detected are con nected propert...

Страница 65: ...t set it to its highest crossover frequency and then try running the automatic speaker setup again Note that if the volume is set too high and the sound dis torts detection issues may occur so use an...

Страница 66: ...e component When you select DVD or another video component on your TV you ll need to select the video input that s connected to the AV receiver s COMPONENT VIDEO MONI TOR OUT 1 COMPONENT VIDEO MONITOR...

Страница 67: ...r You can also use the AV receiver s Dimmer button not Australian mod els TV VOL 10 11 12 D TUN 10 0 Clear 4 5 6 7 8 9 Input Selector Tape Tuner CD Phono Net USB Macro 1 2 3 VCR DVD CDR MD Dock CD Zon...

Страница 68: ...equency sounds output by the front speakers from 10 dB to 10 dB in 1 dB steps Notes This setting is not available when the multichannel Analog input is selected The tone control settings do not apply...

Страница 69: ...nto Weak FM Stereo Stations If the signal from a stereo FM station is weak it may be impossible to get good reception In this case switch to Manual Tuning mode and listen to the station in mono Listen...

Страница 70: ...radio station For example to tune to 87 5 FM press 8 7 5 Note While the Receiver button is flashing you cannot select another input source with the remote controller On Standby TV Input TV CH TV VOL...

Страница 71: ...is stored and the preset number stops flashing Repeat this procedure for all of your favorite stations 2 4 3 To select a preset use the Preset e r buttons or the remote controller s CH button 1 Select...

Страница 72: ...received the DIGITAL indicator lights up While an analog HD Radio transmission is being received the ANALOG indicator lights up If the current AM or FM station supports HD Radio technology the statio...

Страница 73: ...Information Press the Display button repeatedly to cycle through the available information 1 Press Enter The SPS indicator flashes 2 Use the Up and Down Arrow q w buttons to select a multi cast channe...

Страница 74: ...am Type This allows you to search RDS radio stations by type see page 75 TP Traffic Program This allows you to search for RDS radio stations that broadcast traffic information see page 75 Notes In som...

Страница 75: ...Use the Preset e r buttons to select the type of program you want See the table on page 74 4 To start the search press Enter The AV receiver searches until it finds a station of the type you specifie...

Страница 76: ...d Canada 2007 XM Satellite Radio Inc All rights reserved XM Ready Subscription Once you have installed the XM Mini Tuner Home Dock inserted the XM Mini Tuner connected the XM Mini Tuner Home Dock to y...

Страница 77: ...4 Analog Multich 5 HDMI 6 Network MOVE ENTER RETURN ENTER RETURN EXIT SETUP Enter Enter 7 3 Tuner Satellite Radio None VALUE RETURN RETURN EXIT SETUP 4 Use the Left and Right e r buttons to select XM...

Страница 78: ...t Channel Search mode or Category Search mode while the Tuning Arrow indicators are flashing as tuning is in progress Channel Search Mode 1 AV receiver Use the Tuning Up and Down q w buttons to select...

Страница 79: ...use the num ber buttons to enter the channel number For example to select channel 20 press 0 2 0 or 2 0 Enter Note While the Receiver button is flashing you cannot select another input source with the...

Страница 80: ...e Listening mode 1 Press the Receiver Remote Mode button followed by the Setup button The main menu appears onscreen 2 Use the Up and Down q w but tons to select 4 Source Setup and then press Enter Th...

Страница 81: ...eiver s model name and CNP 1000 XM ID num ber ready beforehand and explain that your AV receiver is displaying the message Upgrade XM Tuner If you already have an XM Mini Tuner con nected and you see...

Страница 82: ...n mini DIN connector cable and an AC power adapter See the SiriusConnect Home tuner s instructions for more information Use the 8 pin mini DIN connector cable to connect the SiriusConnect receiver to...

Страница 83: ...ut Selector VCR DVR CBL SAT DVD Tape Tuner CD Phono Net USB Game TV Macro 1 2 3 VCR DVD CDR MD Dock CD Zone2 Remote Mode Dimmer Tape AMP Sleep Receiver TV Net USB Cable VOL CH Disc Album Enter Top Men...

Страница 84: ...y make sure the SiriusCon nect receiver is connected properly If ANTENNA ERROR appears make sure the antenna is connected properly 1 AV receiver Use the Tuning Up and Down q w buttons to select channe...

Страница 85: ...ut tons to select a channel in that category 1 Remote controller Press the Receiver Remote Mode button followed by the D TUN button The Receiver button flashes 2 Within 8 seconds use the num ber butto...

Страница 86: ...Up and Down q w but tons to select 6 SIRIUS Parental Lock and then press Enter The SIRIUS Parental Lock screen appears 4 Press the D TUN button and then use the number buttons to enter the 4 digit PIN...

Страница 87: ...telliVolume 2 A V Sync 3 Name Edit 4 Picture Adjust 5 Satellite Radio 6 SIRIUS Parental Lock MOVE ENTER RETURN ENTER RETURN EXIT SETUP DVD 3 Use the Up and Down q w but tons to select 6 SIRIUS Parenta...

Страница 88: ...irm the PIN number incor rectly Wrong Code appears and you ll be returned to step 5 to try again 8 Press the Setup button Setup closes Enter or D TUN Clear 12 D TUN 0 Clear 1 2 3 4 5 6 7 8 9 VCR DVR C...

Страница 89: ...one see page 83 the 5 Satellite Radio item is not available 10 11 12 10 0 Clear Input Selector Macro 1 2 3 VCR DVD CDR MD Dock CD Zone2 Remote Mode Dimmer Tape AMP Sleep Receiver TV Net USB Cable VOL...

Страница 90: ...ur subscription is being updated No operations can be performed until this message has cleared UPDATING XXX Displayed while the channel map is being updated Wait until the updating is complete UPDATIN...

Страница 91: ...two sep arate sources This is possible because only the audio source is switched when an audio only input source such as TAPE Tuner or CD is selected the video source remains the same In the followin...

Страница 92: ...listening mode THX button This button selects the THX listening modes All ST button This button selects the All Channel Stereo listening mode Selecting the Listening Modes The Dolby Digital and DTS li...

Страница 93: ...II Music Dolby PLIIx Music 3 4 Dolby PLII Game Dolby PLIIx Game 3 Dolby EX 4 Neo 6 Cinema Neo 6 Music THX Cinema Music Games 5 5 Available only when using surround speakers Dolby PLII Dolby PLIIx Movi...

Страница 94: ...red Zone 2 is being used Dolby Pro Logic II is used 3 3 Cannot be selected with some source formats 3 Dolby PLII Music Dolby PLIIx Music 2 3 3 Dolby PLII Game Dolby PLIIx Game 2 Dolby EX 3 3 Neo 6 Cin...

Страница 95: ...LIIx Game 2 Dolby EX 3 Neo 6 Cinema Neo 6 Music THX Cinema Music Games 4 4 Available only when using surround speakers DTS ES Discrete Matrix 4 THX Cinema Music Games 1 Dolby PLII Dolby PLIIx Movie TH...

Страница 96: ...Dolby PLII Music Dolby PLIIx Music 1 2 Dolby PLII Game Dolby PLIIx Game 1 Dolby EX 2 Neo 6 Cinema Neo 6 Music THX Cinema Music Games 3 3 Available only when using surround speakers 4 It is possible to...

Страница 97: ...Cannot be selected with some source formats 2 Dolby PLII Music Dolby PLIIx Music 1 2 2 Dolby PLII Game Dolby PLIIx Game 1 Dolby EX 2 2 Neo 6 Cinema Neo 6 Music THX Cinema Music Games 3 3 Available onl...

Страница 98: ...wered Zone 2 is being used Dolby Pro Logic II is used 3 3 Cannot be selected with some source formats Dolby PLII Music Dolby PLIIx Music 2 3 Dolby PLII Game Dolby PLIIx Game 2 Dolby EX 3 Neo 6 Cinema...

Страница 99: ...olby PLIIx Movie Use this mode with any stereo or Dolby Surround Pro Logic movie e g TV DVD VHS Dolby PLIIx Music Use this mode with any stereo or Dolby Surround Pro Logic music source e g CD radio ca...

Страница 100: ...logo especially those with a DTS ES Dis crete soundtrack DTS ES Matrix This mode is for use with DTS ES Matrix soundtracks which use a matrix encoded back channel for 6 1 7 1 channel playback Use it w...

Страница 101: ...multichannel sources Surround back speaker output depends on the source material and the selected listening mode THX Cinema THX Cinema mode corrects theatrical soundtracks for playback in a home theat...

Страница 102: ...is mode creates a lively sound field with a powerful acous tic image like being at a club or rock concert TV Logic This mode adds realistic acoustics to TV shows pro duced in a TV studio surround effe...

Страница 103: ...reset 6 Miscellaneous 7 Hardware Setup 8 Lock Setup 6 Miscellaneous 1 Volume Setup 2 OSD Setup 7 Hardware Setup 1 Remote Control 2 Zone2 Zone3 3 Tuner 4 Analog Multich 5 HDMI 6 Network 1 Input Output...

Страница 104: ...4 5 6 7 8 9 Input Selector VCR DVR CBL SAT DVD Tape Tuner CD Phono Net USB Game TV Macro 1 2 3 VCR DVD CDR MD Dock CD Zone2 Remote Mode Dimmer Tape AMP Sleep Receiver TV Net USB Cable VOL CH Disc Albu...

Страница 105: ...in steps of 1 default is 0 50 is the darkest 50 is the brightest G Contrast With this setting you can adjust green Contrast Can be adjusted from 50 to 50 in steps of 1 default is 0 50 is the least 50...

Страница 106: ...0 11 12 D TUN 10 0 Clear 7 8 9 Input Selector Tape Tuner CD Phono Net USB Macro 1 2 3 VCR DVD CDR MD Dock CD Zone2 Remote Mode Dimmer Tape AMP Sleep Receiver TV Net USB Cable VOL CH Disc Album Enter T...

Страница 107: ...right speakers are connected select None Note Cannot select Full Band if Front step 5 is set to anything other than Full Band Enter Enter Enter Enter Enter Enter Enter Enter 8 Use the Up and Down q w...

Страница 108: ...rmed on the AV receiver by using its Setup button arrow buttons and Enter button 10 Use the Up and Down q w but tons to select LPF of LFE and then use the Left and Right e r buttons to select a low pa...

Страница 109: ...Enter Top Menu Menu Display Muting Exit Guide Prev CH Return Setup Playlist Random Rec SAT Zone3 3 7 2 2 8 Receiver Setup Enter Enter 2 Speaker Setup 1 Speaker Settings 2 Speaker Config 3 Speaker Dis...

Страница 110: ...ter is set to None page 106 The SurrRight and SurrLeft dis tances cannot be set if the Sur round is set to None page 106 The SurrBack R and SurrBack L distances cannot be set if Speaker Type is set to...

Страница 111: ...12 dB in 0 5 dB steps 15 to 12 dB for the subwoofer Notes The Center level cannot be set if the Center is set to None page 106 The SurrRight and SurrLeft lev els cannot be set if the Surround is set...

Страница 112: ...p Enter Enter 2 Speaker Setup 1 Speaker Settings 2 Speaker Config 3 Speaker Distance 4 Level Calibration 5 Equalizer Settings 6 THX Audio Setup MOVE ENTER RETURN ENTER RETURN EXIT SETUP Enter Enter RE...

Страница 113: ...se the Down w button to select Channel and then use the Left and Right e r buttons to select a speaker You can select Front Center Surround SurrBack or Sub woofer Enter Enter RETURN RETURN EXIT SETUP...

Страница 114: ...nter Enter 2 Speaker Setup 1 Speaker Settings 2 Speaker Config 3 Speaker Distance 4 Level Calibration 5 Equalizer Settings 6 THX Audio Setup MOVE ENTER RETURN ENTER RETURN EXIT SETUP Enter Enter RETUR...

Страница 115: ...quence of turning the volume below Reference Level is that certain sound elements can be lost or perceived differently by the listener THX Loudness Plus compensates for the tonal and spatial shifts th...

Страница 116: ...termines which channel of a stereo multi plex source is output Use it to select audio channels or languages with multiplex sources multilingual TV broadcasts and so on Main The main channel is output...

Страница 117: ...rably off center When set to 5 the front left and right channels are not attenu ated maintaining the original stereo balance Dolby EX Settings Dolby EX This setting determines how Dolby EX signals are...

Страница 118: ...a Neural THX DSD and Multichannel Using the Music Optimizer 1 Remote controller Press the Receiver Remote Mode button press and hold down the Direct button The setting item appears on the display 2 Us...

Страница 119: ...dly For Dolby Digital and Dolby Digital Plus sources the options are Off Late Night function off default Low Small reduction in dynamic range High Large reduction in dynamic range For Dolby TrueHD sou...

Страница 120: ...w e r buttons to select a character and then press Enter Repeat this step to enter up to 10 characters 2 When you ve finished to store a name be sure to use the arrow q w e r buttons to select OK and...

Страница 121: ...r 1 Press and hold the Display button until the setting item appears on the display 2 Use the Up and Down q w buttons to select Zoom Mode and use the Left and Right e r buttons to change the setting I...

Страница 122: ...ncement With Edge Enhancement you can make the picture appear sharper Off Edge enhancement off default Low Low edge enhancement Medium Medium edge enhancement High High edge enhancement Mosquito NR Wi...

Страница 123: ...justed from 50 to 50 in steps of 1 default is 0 50 is the least 50 is the greatest B Brightness With this setting you can adjust the picture blue bright ness Can be adjusted from 50 to 50 in steps of...

Страница 124: ...et DVD Analog PCM Dolby Digital DTS D F 2ch D F Mono Last Valid Last Valid Last Valid Last Valid Last Valid 5 x Listening Mode Preset DVD Multich PCM 192k 176 4k DolbyTrueHD DTS HD Master Audio DSD La...

Страница 125: ...button followed by the Setup button The main menu appears onscreen If the main menu doesn t appear make sure the appropriate external input is selected on your TV 2 Use the Up and Down q w but tons t...

Страница 126: ...maximum volume for Zone 3 When the Volume Display setting is set to Absolute the Maximum Volume range is Off 99 to 50 When it s set to Relative the range is Off 17 dB to 32 dB To disable this setting...

Страница 127: ...ter The Hardware Setup menu appears 3 Use the Up and Down q w but tons to select an item and then press Enter The screen for that item appears On Standby TV Input TV CH TV VOL 10 11 12 D TUN 10 0 Clea...

Страница 128: ...speakers To stop the AV receiver s speakers producing sound change the set tings change your TV s settings or turn down the AV receiver s volume Lip Sync The Lip Sync function can automatically synch...

Страница 129: ...be set only when the above Control and Power Control settings are both set to Enable Refer to the connected component s instruction man ual for details Network DTR 8 9 These settings are for use with...

Страница 130: ...IGITAL IN must already be assigned to the current input selector See page 55 If there is no digital signal the analog input is used instead Multich Selects the multichannel input and the ANALOG indica...

Страница 131: ...o vtuner com portal To verify your MAC Address please see Network Settings page 138 Supported Audio File Formats For server and USB mass storage device playback the AV receiver supports the following...

Страница 132: ...t Configuration Protocol DHCP supplies IP addresses to network devices allowing them to configure themselves automatically A router with a 100Base TX switch built in is recom mended Some routers have...

Страница 133: ...r computer or media server 2 Press the Net USB Input Selec tor button to select the Server screen The NETWORK indicator lights up if the AV receiver is able to establish a connection to the server It...

Страница 134: ...ur server network and AV receiver connec tions This section explains how to configure Windows Media Player 11 so that the AV receiver can play the music files stored on your computer Note Windows Medi...

Страница 135: ...1 AUX 2 Net USB Receiver Enter 0 Net USB NET USB REFRESH RETURN 1 1 USB USB Storage Net USB 4 Use the Up and Down q w but tons to select a USB mass stor age device and then press Enter A list of the d...

Страница 136: ...r s USB port we recommend that you use its AC adapter to power it Do not connect the AV receiver s USB port to a USB port on your computer Music on your computer can not be played through the AV recei...

Страница 137: ...Dimmer Tape AMP Sleep Receiver TV Net USB Cable VOL CH Disc Album Enter Top Menu Menu Display Muting Exit Guide Prev CH Return Setup Listening Mode Playlist Random Rec Stereo Surround SAT Zone3 AUX 1...

Страница 138: ...case a knowledge of Ethernet networking is essential What s DHCP DHCP Dynamic Host Configuration Protocol is used by routers computers the AV receiver and other devices to automatically configure the...

Страница 139: ...the subnet mask address provided by your ISP typically 255 255 255 0 Gateway If you set the DHCP setting to Disable you must specify a gateway address Enter the gateway address provided by your ISP D...

Страница 140: ...the Zone 2 volume is controlled by the AV receiver Connecting Your Zone 2 Speakers to an Amp in Zone 2 This setup allows 7 1 channel playback in your main lis tening room and 2 channel stereo playback...

Страница 141: ...see page 52 The ZONE 2 OUT outputs video only from components connected to component video inputs Zone 3 speakers must be connected to an amp in Zone 3 Connecting Your Zone 3 Speakers You can enjoy 2...

Страница 142: ...iate external input is selected on your TV 2 Use the Up and Down q w but tons to select 7 Hardware Setup and then press Enter The Hardware Setup menu appears On Standby TV Input TV CH TV VOL 10 11 12...

Страница 143: ...q w but tons to select Zone2 Out or Zone3 Out and use the Left and Right e r buttons to select Fixed The Zone 2 or Zone 3 volume must be set on the amp in that zone Variable The Zone 2 or Zone 3 volum...

Страница 144: ...for Zone 3 Turning Off Zones 1 Remote controller AV receiver On the remote controller press the Zone2 or Zone 3 Remote Mode button On the AV receiver press the Zone 2 or Zone 3 button The Zone 2 or Zo...

Страница 145: ...e 3 button The Zone 2 or Zone 3 indicator flashes 2 Remote controller AV receiver On the remote controller press the Level and Level button On the AV receiver press Up q and Down w button On the remot...

Страница 146: ...t appear make sure the appropriate external input is selected on your TV 2 Use the Up and Down q w but tons to select 6 Miscellaneous and then press Enter The Miscellaneous menu appears A B 12V TRIGG...

Страница 147: ...als from the remote controller and feeds them to the AV receiver located in the cabinet via the connecting block Using a Multiroom Kit with Other Components In this setup an IR emitter is connected to...

Страница 148: ...D Phono Net USB Game TV Macro 1 2 3 VCR DVD CDR MD Dock CD Zone2 Remote Mode Dimmer Tape AMP Sleep Receiver TV Net USB Cable VOL CH Disc Album Enter Top Menu Menu Display Muting Exit Guide Prev CH Ret...

Страница 149: ...controller to its default settings 1 Make sure the Integra Onkyo component is connected with an u cable and an ana log audio cable RCA See page 46 for details 2 Enter the appropriate remote control c...

Страница 150: ...Input TV CH TV VOL 10 11 12 D TUN 10 0 Clear 1 2 3 4 5 6 7 8 9 Input Selector VCR DVR CBL SAT DVD Tape Tuner CD Phono Net USB Game TV Macro 1 2 3 VCR DVD CDR MD Dock CD Zone2 Remote Mode Dimmer Tape A...

Страница 151: ...by resetting the remote controller see page 149 To overwrite a previously learned command repeat this procedure Only commands from infrared remote controllers can be learned When the remote controlle...

Страница 152: ...ights up For the CD example in the left column you d press and hold the Receiver Remote Mode button and then press Macro button 1 2 or 3 On Standby TV Input TV CH TV VOL 10 11 12 D TUN 10 0 Clear 1 2...

Страница 153: ...t format from a menu If your turntable uses an MC cartridge you must use an MC head amp or MC transformer page 42 Check the speaker settings pages 106 112 The input signal format is set to PCM or DTS...

Страница 154: ...may be picking up interference Try repositioning your cables The Late Night function doesn t work Make sure the source material is Dolby Digital Dolby Digital Plus and Dolby TrueHD page 119 The DVD an...

Страница 155: ...n in mono page 69 When listening to an AM station operating the remote controller may cause noise Passing cars and airplanes can cause interference Concrete walls weaken radio signals If nothing impro...

Страница 156: ...ning and compatible with the AV receiver page 132 Check the Network Settings page 138 Playback stops while listening to music files on the server Make sure your server is compatible with the AV receiv...

Страница 157: ...Power On Standby and Direct Change don t work for components con nected via u These functions don t work when Zone 2 is turned on When performing Automatic Speaker Setup the measurement fails showing...

Страница 158: ...0i 1080i 720p 480p 480i 480i 480i HDMI 1080p 1080i 720p 480p 480i COMPONENT 1080i 720p 480p 2 2 480i 2 2 S VIDEO 480i 2 2 COMPOSITE 480i 2 2 PAL HDMI 1 COMPONENT S VIDEO COMPOSITE 1080p 1080i 720p 576...

Страница 159: ...ance 1 Vp p 75 Component and S Video Y 0 7 Vp p 75 Component Pb Cb Pr Cr 0 28 Vp p 75 S Video C 1 Vp p 75 Composite Component Video Frequency Response 5 Hz 100 MHz 3 dB FM Tuning Frequency Range North...

Страница 160: ...Vp p 75 Component and S Video Y 0 7 Vp p 75 Component Pb Cb Pr Cr 0 28 Vp p 75 S Video C 1 Vp p 75 Composite Component Video Frequency Response 5 Hz 100 MHz 3 dB FM Tuning Frequency Range North Ameri...

Страница 161: ...161 Memo...

Страница 162: ...gra Division of ONKYO U S A CORPORATION 18 park Way Upper Saddle River N J 07458 U S A Tel 201 818 9200 Fax 201 785 2650 http www integrahometheater com Integra Division of ONKYO CORPORATION Sales Pro...

Отзывы: