background image

26

> Before Start

> Part Names

> Install

> Initial Setup

> Playback

Supplementary information | Advanced Setup | Others

Music Server

It is possible to stream music files stored 
on PCs or NAS devices connected to the 
same network as this unit.

0

The network servers compatible with the 
Music Server feature are those PCs with 
players installed that have the server 
functionality of Windows Media

®

 Player 

11 or 12, or NAS that are compatible 
with home network functionality. Note 
that with PCs, only music files registered 
in the library of Windows Media

®

 Player 

can be played.

0

You may need to make some settings on 
the PC in advance to use Windows 
Media

®

 Player 11 or 12 with the Music 

Server feature.

Windows Media

®

 Player 

settings

On Windows Media

®

 Player 11

1. Turn on your PC and start Windows 

Media

®

 Player 11.

2. In the "Library" menu, select "Media 

Sharing" to display a dialog box.

3. Select the "Share my media" check box, 

and then click "OK" to display the 
compatible devices.

4. Select this unit, click "Allow" and put a 

check mark next to the icon for this unit.

5. Click "OK" to close the dialog.

0

Depending of the version of Windows 
Media

®

 Player, there may be differences 

in the names of items you can select.

On Windows Media

®

 Player 12

1. Turn on your PC and start Windows 

Media

®

 Player 12.

2. In the "Stream" menu, select "Turn on 

media streaming" to display a dialog 
box.

Music Server

3

1

2

0

If media streaming is already turned on, 
select "More streaming options..." in the 
"Stream" menu to list players in the 
network, and then go to step 4.

3. Click "Turn on media streaming" to list 

players in the network.

4. Select this unit in "Media streaming 

options" and check that it is set to 
"Allow".

5. Click "OK" to close the dialog.

0

Depending of the version of Windows 
Media

®

 Player, there may be differences 

in the names of items you can select.

Playing Back

Before performing the operations below, 
start the server (Windows Media

®

 Player 

11, Windows Media

®

 Player 12, or NAS 

device) containing the music files to play, 
and make sure that the PCs and/or NASs 
are properly connected to the same 
network as this unit.

Perform the following procedure when the 
unit is on.
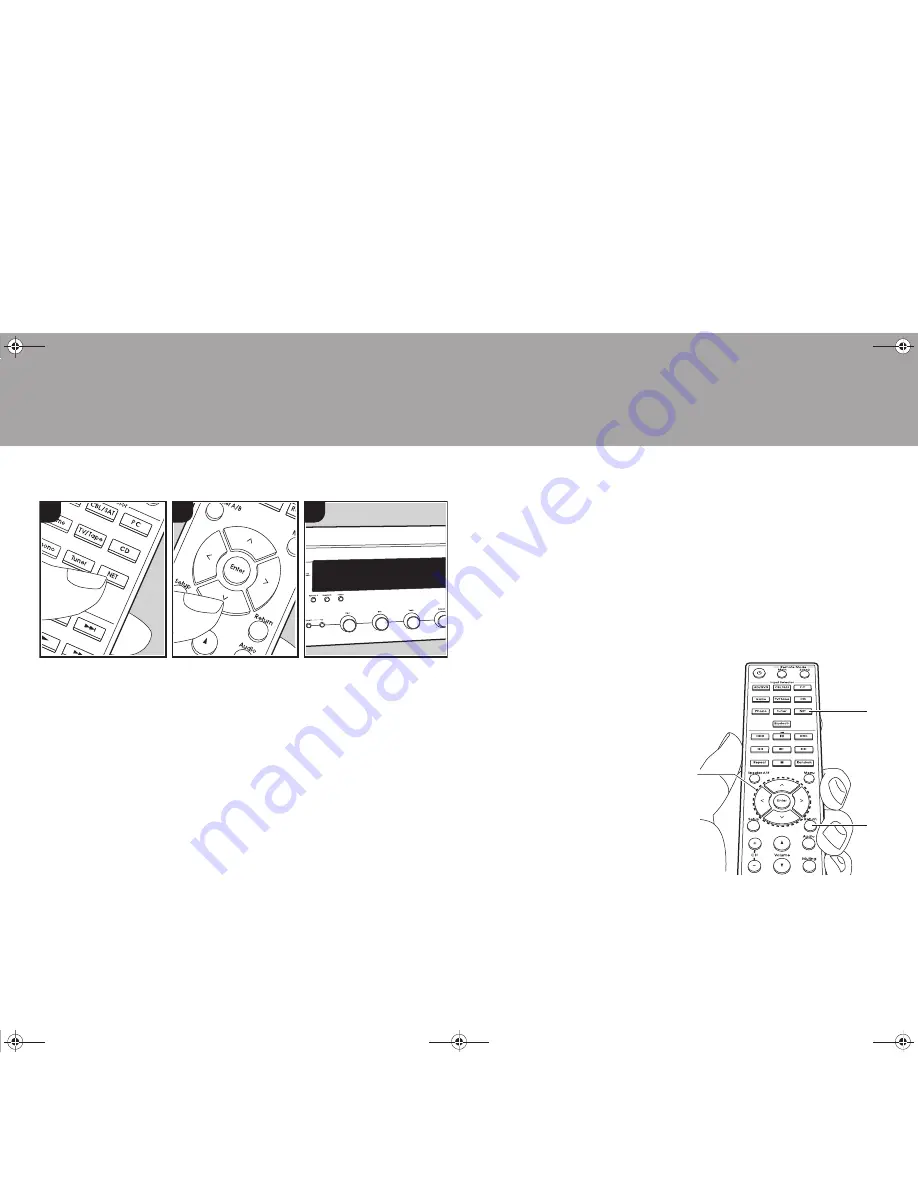
1. Press NET (a) on the remote controller.
2. Select "Music Server" with the Up/Down 

cursors (b) on the remote controller and 
press Enter (b) to confirm your selection.

3. With the Up/Down cursors (b) on the 

remote controller, select the server you 
want and then press Enter (b).

4. With the Up/Down cursors (b) on the 

remote controller, select the music file to 
play, and then start playback with Enter 
(b).

0

To return to the previous display, press 
Return (c).

0

If "No Item." is displayed, check whether 
the network is properly connected.

0

Depending on the server and share 
settings, the unit may not recognize it, or 
may not be able to play its music files. 
Furthermore, the unit cannot access 
pictures and videos stored on servers.

0

For music files on a server, there can be 
up to 20,000 tracks per folder, and 
folders may be nested up to 16 levels 
deep.

b

c

a

SN29403237_DTM-6_En_1707XX.book  26 ページ  2017年7月27日 木曜日 午後1時39分

Содержание DTM-6

Страница 1: ...DTM 6 Network Stereo Receiver En Instruction Manual SN29403237_DTM 6_En_1707XX book 1...

Страница 2: ...onnected device 17 BLUETOOTH Playback 17 Internet Radio 18 Spotify 19 AirPlay 20 USB Storage Device 21 Listening to the AM FM Radio 23 Registering a station 25 Music Server 26 Multi zone 28 AUDIO Menu...

Страница 3: ...pleted 0 We will not accept responsibility for damage arising from the connection of equipment manufactured by other companies 0 Functionality may be introduced by firmware updates and service provide...

Страница 4: ...ring play 6 Display P5 7 Setup button You can show advanced setting items on the display to provide you with an even better experience P32 8 Cursors D C B A Enter button Select the item with the curso...

Страница 5: ...nnecting a HDD that requires more than 5 V 0 5 A connect to the USB port maximum 5 V 1 A on the rear of the unit Display 1 The currently selected speaker system lights 2 Lights in the following condit...

Страница 6: ...igger input jack to enable link operation between the device and the unit P36 37 39 8 RS232 port For connection to the home control system Special devices or cable connections are necessary to use the...

Страница 7: ...multi zone playback in a separate room 17 SPEAKERS terminals Connect speakers with speaker cables You can connect a set of left and right speakers to each of the A B terminals North American models ar...

Страница 8: ...ou can adjust the brightness of the display in three steps It cannot be turned off completely 12 Remote Mode Main Zone2 buttons Controls the multi zone function P28 13 Random button Used for random pl...

Страница 9: ...cable for connection When only Speaker B is outputting audio there will be no audio output from the powered subwoofer Before Start Part Names Install Initial Setup Playback Supplementary information A...

Страница 10: ...ng for Opt1Wkup feature is Off To enable this function please press Setup on the remote controller and set 3 Hardware Opt1Wkup P34 0 The Opt1Wkup feature does not work when the unit is in the mode for...

Страница 11: ...g audio cable you can link the unit s power and input selection and enable operation with this unit s remote controller For details refer to the instruction manual of the component with the RI jack 0...

Страница 12: ...room with an analog audio cable You can also connect a subwoofer with built in amplifier to the ZONE 2 PRE OUT SUBWOOFER jack 0 Settings are required in the Setup menu to adjust the volume and sound q...

Страница 13: ...radio to find the position with the best reception Use a thumb tack or similar to attach the FM Indoor antenna to a wall FM Indoor antenna 3 Power Cord Hookup This model includes a removable power co...

Страница 14: ...cursors on the remote controller and press Enter to confirm 0 To return to the previous display press Return 1 Press Enter when Network Setup is displayed 2 To make Wi Fi settings select Wi Fi If you...

Страница 15: ...ress the Right button on the remote controller to select Other then press Enter Set by entering the SSID of the access point you want to connect 1 Enter the SSID For details on how to enter text refer...

Страница 16: ...acters to be enter for example to switch between upper and lower case 0 Press CLR c to delete all the input characters 3 After completing input select OK with Up Down Left Right a and press Enter a Ch...

Страница 17: ...abled 2 Enable turn on the BLUETOOTH function of the BLUETOOTH wireless technology enabled device then select this unit from amongst the devices displayed If a password is requested enter 0000 0 This...

Страница 18: ...er Pandora Pandora TuneIn Radio Deezer TIDAL Internet Radio Service Menus You can register certain stations as your favorites or delete stations you have registered from your favorites The menu displa...

Страница 19: ...the bottom of the screen 4 Select this unit 5 This unit turns on automatically and the input selector changes to NET and streaming of Spotify starts 0 If 3 Hardware NET Stby is set to Off in the Setu...

Страница 20: ...u do steps 3 and 4 above this unit automatically comes on and input switches to NET To reduce the amount of power consumed in standby mode press the Setup button on the remote controller then in the S...

Страница 21: ...t the folder and music file and then press Enter b to start playback 0 To return to the previous display press Return c 0 The USB port of this unit conforms with the USB 2 0 standard The transfer spee...

Страница 22: ...wing conditions When playing WAV FLAC and Apple Lossless and the same format sampling frequency channels and quantization bit rate are played continuously Device Requirements 0 Note that operation is...

Страница 23: ...he following section Note that if you tune manually the reception for FM broadcasts will be monaural rather than stereo irrespective of the sensitivity of the reception Tuning Manually If you tune man...

Страница 24: ...the main unit once Text information broadcast by the station Radio Text is displayed scrolling across the display No Text Data is displayed when no text information is available Search for Stations by...

Страница 25: ...flashing Repeat this procedure for all of your favorite radio stations Selecting a Preset Radio Station 1 Press Tuner a on the remote controller 2 Press the cursor Left Right buttons b on the remote...

Страница 26: ...ady turned on select More streaming options in the Stream menu to list players in the network and then go to step 4 3 Click Turn on media streaming to list players in the network 4 Select this unit in...

Страница 27: ...may be differences in the names of items you can select Supported Audio Formats This unit supports the following music file formats Remote play of FLAC and DSD is not supported MP3 mp3 MP3 0 Supported...

Страница 28: ...r 0 The remote controller switches to the mode for controlling ZONE 2 2 Face the remote controller at this unit and press c The Z2 indicator on the display lights 3 Press the input selector d of the i...

Страница 29: ...for controlling ZONE 2 Alternatively press Off on the main unit Playing in ZONE 2 only If you turn the unit to standby during multi zone playback the Z2 indicator is dimmed and the playback mode is s...

Страница 30: ...rect Enable or disable the Direct feature which outputs pure sound as it was intended by bypassing the tone control circuits during play Bass Enhance or moderate the bass range of the speakers Select...

Страница 31: ...ay be additions or changes to the features available compared to what is in the instruction manual For information about player functions that have been added or changed or the operation of FireConnec...

Страница 32: ...ttons a on the remote controller and press Enter a to confirm your selection 0 To return to the previous display press Return c 5 To exit the settings press Setup b 1 DigitalAudio You can change input...

Страница 33: ...oth of the SPEAKERS A B terminals 6 default value When the connected speakers all have 6 or more impedance 0 Note that when connecting to both SPEAKERS A and B terminals connect speakers with 8 to 16...

Страница 34: ...controlling ZONE 2 P28 AM FM North American Models Select a frequency step depending on your area of residence Select 9k 0 05M or 10k 0 2M default value 0 When this setting is changed all radio prese...

Страница 35: ...name for this unit which is shown on other devices connected to the network to an easily recognized name This is set to Integra DTM 6 at the time of purchase stand for alphanumeric characters identify...

Страница 36: ...ted to the unit Ready Not paired Pairing Pairing Connected Successfully connected Notice Availability of a firmware update will be notified via network Enable default value Notify updates Disable Disa...

Страница 37: ...n room Zone2 Output when TV TAPE is selected as input for ZONE 2 M Z2 Output when TV TAPE is selected as input for main room or ZONE 2 PHONO Set the 12V trigger output setting to each input Off No out...

Страница 38: ...lt value Output when CD is selected as input for ZONE 2 M Z2 Output when CD is selected as input for main room or ZONE 2 TV TAPE Set the 12V trigger output setting to each input Off No output Main Out...

Страница 39: ...r main room Zone2 Output when PC is selected as input for ZONE 2 M Z2 default value Output when PC is selected as input for main room or ZONE 2 CD Set the 12V trigger output setting to each input Off...

Страница 40: ...browser 5 After changing the settings select Save to save the settings Device Information You can change the Friendly Name set an AirPlay PW etc Control4 Register this unit if you are using a Control...

Страница 41: ...party for any special indirect incidental or consequential damages of any kind including but not limited to compensation reimbursement or damages on account of the loss of present or prospective prof...

Страница 42: ...USB storage device to the USB port on the main unit 0 If you connect a USB hard disk drive to the USB port of the unit we recommend that you use its AC adapter to power it 0 If the USB storage device...

Страница 43: ...em Your settings will also be initialized when you reset so note down your settings before doing the following 1 While holding down Tuning Mode on the main unit press On Standby 2 The unit switches to...

Страница 44: ...etallic object near the unit BLUETOOTH connection may not be possible as the metal can effect on the radio waves Cannot connect with this unit 0 Check that the BLUETOOTH function of the BLUETOOTH wire...

Страница 45: ...is correct Make sure the network settings of the unit is properly set 0 Connection to an SSID that includes multi byte characters is not supported Name the SSID of the wireless LAN router using single...

Страница 46: ...noises can be heard from the unit 0 If you have connected another unit to the same wall outlet as this unit this noise may be an effect from the other unit If the symptoms improve by unplugging the po...

Страница 47: ...0 kHz 1611 1710 kHz European Preset Channel 40 Network Section Ethernet LAN 10BASE T 100BASE TX Wireless LAN IEEE 802 11 a b g n standard Wi Fi standard 2 4 GHz 5 GHz band BLUETOOTH Section Communicat...

Страница 48: ...tputs SPEAKERS A FRONT L R SPEAKERS B FRONT L R North American models are banana plug ready Phones PHONES Front 1 4z 6 3 mm Others USB 2 Front Ver 2 0 5 V 0 5 A Rear Ver 2 0 5 V 1 A Ethernet 1 RI REMO...

Страница 49: ...pri t de leurs d tenteurs respectifs El resto de marcas comerciales son propiedad de sus respectivos propietarios Tutti gli altri marchi di fabbrica sono di propriet dei rispettivi proprietari Alle an...

Страница 50: ...50 SN29403237_DTM 6_En_1707XX book 50...

Страница 51: ...51 En SN29403237_DTM 6_En_1707XX book 51...

Страница 52: ...Germany Tel 49 8142 4401 0 Fax 49 8142 4208 213 http www integra eu PRC 302 Building 1 20 North Chaling Rd Xuhui District Shanghai China 200032 Tel 86 21 52131366 Fax 86 21 52130396 http www integra...

Отзывы: