background image

SECTION 8 

-

 Maintenance instructions  


Notes on the Plate Heat exchangers


Zilmet UK Plate Heat Exchanger Maintenance Recommendations (as per Zilmet Documentation)


Please, note that only qualified and licensed personnel may perform service and maintenance.


Should the pressure loss through the heat exchanger increase and/or to reach the design temperature be not possible, replace the heat exchanger or clean up 
the heat exchange plates. To perform service and control, make sure that the system is off, cooled down and not pressurized, all the electric parts are not 
energised and the heat exchanger is completely empty.


In some applications encrustations and/or deposits are likely to build up on the heat exchange plates (e.g. applications with hard water at high operating 


temperature). In order to reduce the quantity of encrustations and deposits in the heat exchanger, use oxalic acid solution (HOOCCOOH · 2H2O) at 20° C as a 
cleaning fluid: the concentration of the acid must be 5% and the cleaning with acid solution must last 15 minutes at maximum.


Before cleaning, completely empty the heat exchanger: the compatibility of the cleaning fluid with the residues of the operating fluids must be taken into 
account in relation with the emanation of toxic or dangerous substances. After the cleaning with acid solution, use sodium bicarbonate (NaHCO3) solution at 
20°C to neutralize the acid solution: the concentration of the basic solution must be 2%. The flow rate of both the acid solution and the basic solution through 
the heat exchanger must be at least 1.5 times greater than the operating flow rate: the flow rate direction both for the acid solution and the basic solution 
must be opposite to the operating flow rate direction. Finally wash the heat exchanger with clean soft water to completely remove every residue of acid and 
basic solution.


Any residue of the acid or basic solution in the heat exchanger may cause serious damages to things/properties and persons: after the cleaning, completely 
remove every residue of acid and basic solution from the heat exchange plates. In cleaning the heat exchanger as above described, all the technical and 
organizing means must be adopted according to the laws and local regulations referring to the occupational health and safety; use the individual protection 
devices prescribed in the safety data sheet of each chemical products. All the technical and organizing means must be adopted to treat the waste water 
according to environmental laws and local regulations.


Should the fouling factor of the operating fluids be high, completely empty the heat exchanger in case of extended time of not use.


Zilmet S.p.A. shall not be responsible for any damage to things and to properties and/or injuries to persons due 
to not observing all the above instructions and, particularly, to improper calculation and choice, installation and 
maintenance of this heat exchanger and/or of the connected system.


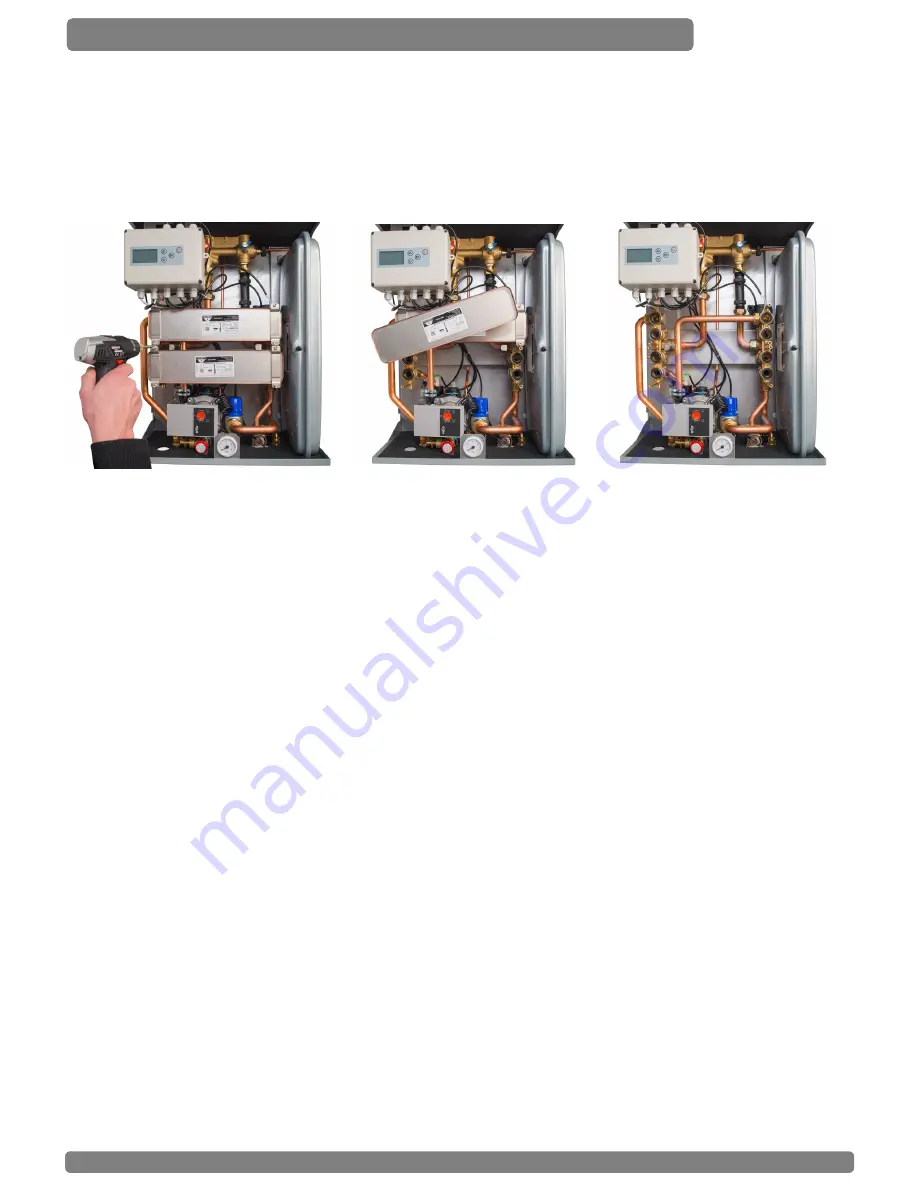
Plate Heat Exchangers are designed for easy access and simple removal for servicing.


Four Fixing bolts and seals, all available as spares if required. Service engineers are advised to keep a stock of 
these spares in case during works one or more gets lost or damaged.


09/17 E & OE 


Содержание Hiper Xi45 INDIRECT HIU 45DHW/10HTG

Страница 1: ...parate document Installer level Settings is available for programming the electronic controller should the factory settings need to be altered This covers temperature settings example for UFH Prepayment etc Phone 01889 272199 to request copy These should not be left with the home owner ...

Страница 2: ...er IMPORTANT information critical to the user NOTE useful information regarding the operation or installation of the HIU Do not start installation until you have thoroughly read and understood these Assembly and Operating Instructions and the safety provisions Comply with all safety provisions Installation can only be carried out by a qualified and competent plumbing installer and a qualified and ...

Страница 3: ...f hot water for the end user by enabling the use of larger area PHE plate heat exchangers while maintaining very low return temperatures giving substantial energy savings PID Electronic Controller Proportional Integral Derivative with temperature and flow sensor input maintains the efficiency of the HIU Switches to priority DHW on demand and maintains stable temperatures under varying load conditi...

Страница 4: ...ic limiting valve on the DHW exit This is locked and factory set to 57C Being non electric this still maintains the safety feature even when electric supply to the HIU is cut Low Pressure protection for the HIU Low pressure switch will stop the circulating pump should the secondary system drop below 0 7bar The HIU is fitted with a Safety Relief valve set at 3 bar for high pressure protection Under...

Страница 5: ...mit 13 Expansion Vessel 14 Diverting valve 15 Spacer for installation of Heat Meter 16 Bypass valve LOCATION OF TEMPERATURE SENSORS A CH flow temperature sensor B CH return temperature sensor C DHW temperature sensor 2 3 4 5 9 11 15 6 7 8 10 14 16 1 13 12 FLOW RETURN Central Heating HOT COLD DHWS FILLING LOOP CONNECTION 553 465 262 85 130 83 SECTION 3 Dimensions and components A B c SAFETY VALVE D...

Страница 6: ... The Installers Responsibility in accordance with Part L of the Building Regulations all hot and cold water pipes should be labelled and insulated to the current standards Installation can only be carried out by a qualified and competent plumbing installer and a qualified and competent electrical installer in accordance with the current document Building Regulations Legislation and Standards It is...

Страница 7: ...l times either by an automatic bypass valve or a manual bypass 9 Fit Secondary pipe work noting carefully the correct system connection points on the HIU As shown in Section 4 Stage 6 10 Connect discharge pipe to the safety valve discharge connection as per Building Regulations pipework to comply with current Building regulations or refer to BS6798 11 Ensure all drain valves are closed before open...

Страница 8: ...t Fix JIG see accessories Stage 4 1 of Section 4 Fitting the Wall mounting BRACKET Align the bracket for level VERTICAL installation of the HIU Fix the Bracket SECURELY to the wall using appropriate fixings supplied and selected by the installer Remove the FRONT COVER and store carefully until installation is complete FRONT COVER is removed by removing the screws and sliding the FRONT COVER forwar...

Страница 9: ...lves can be fixed to the JIG then the JIG removed leaving the pipe work ready and in place for the 2nd Fix when the HIU is then installed You will need Part Number HIACPFFKIT This can be provide in advance of the Hiper HIU Contents 1 pair Isolation Valves for the Primary connections to the Hiper HIU And 1 x Wall Bracket Note wall fixings not included and are selected and provided by the installer ...

Страница 10: ... made properly and sealed Ensure all valves are in the closed position Remove the jig by the union connection nuts safely store the gaskets for later use If required fit temporary plugs to the union nuts of the isolation valves Then take the Jig to the next installation and re use as many times as required A temporary Flushing Pipe can be connected between the valves to enable Flushing before fixi...

Страница 11: ...ction A DISTRICT FLOW BLUE handle isolation valve to B District Return 1 See step 8 for accessory option 2 Connect District and isolate the HIU Allows pipework to run behind the HIU These Brackets are available as an accessory and are ordered separately Fix a Stand Off Bracket to the back of the HIU using the fixing points and screws provided Once secure hang the HIU by the Stand Off Brackets onto...

Страница 12: ...the HIU HIAC06SSPACK HIU Panel Insulation Set Insulation set for the back of the HIPER HIU HIAC07SSPACK Link Pipe Accessory Pack for flushing the pri mary pipework without the HIU installed HIAC08SSPACK HIU Accessory Pack HIU Isolation Valves 22mm x union nut ANGLE Female Ball Valves 4 alternate secondary side connections HIAC09BVPACK HIU Accessory Pack HIU Isolation Valves male x union nut ANGLE ...

Страница 13: ...ree connection to the room thermostat Three cable ENTRY points Mains electricity supply Room thermostat External sensor wire and or Pre Payment Billing connection SECTION 5 Electrical Wiring instructions FUSE T1 T2 L N Note that the Room thermostat switching must be VOLT FREE Programmable room thermostats battery powered are recommended but some version of thermostatic control must be used Any con...

Страница 14: ...es this option The billing system working in conjunction with the heat meter selected by the consultant or energy provider may send a 230v signal to the relay provided in the Accessory Kit while the tenant is in credit IMPORTANT CHECK THIS WITH THE SUPPLIER OF THE BILLING SYSTEM IF THE SIGNAL FROM THE BILLING SIGNAL IS VOLT FREE IT CAN BE CONNECTED DIRECTLY TO THE AUX TERMINALS WITHIN THE CONTROLL...

Страница 15: ...ected to the relay on terminals 5 and 9 If the billing system is VOLT FREE then the relay is not required check with the billing provider Replace the cover Installation complete PUMP DIVERTER PROGRAMMABLE ROOM THERMOSTAT LP SWITCH PICV RELAY 240V signal from Prepayment monitor AUX SWITCH Hiper HIU Controller RELAY NOT REQUIRED WHEN THE BILLING SYSTEM IS VOLT FREE 09 17 E OE Now programme the contr...

Страница 16: ...SED The bypass is only opened under authorised design conditions and is supplied LOCKED in the closed position 8 Check all pipes for insulation and are to the requirement of current building regulation Check all pipes are secured and fastened with adequate pipe clips 9 Check wiring and earth connections are correct 10 Power supply is available Casing is secure all electrical connections are safe a...

Страница 17: ...se the and to change the value To confirm the new temperature set point press the OK button After a few seconds the screen will revert back to operational mode Heating Flow Temperature Room temperature is controlled by the room thermostat The temperature flow to the radiators is factory set at 60 C For underfloor heating this needs to have been changed by the installer during commissioning to a lo...

Страница 18: ... flushing twist the cap on the safety valve 6 Central Heating side of the HIU check the safety valve discharges by twisting the cap Check the safety valve re seats and seals 7 Central Heating side of the HIU check the expansion vessel pressure and adjust or recharge to 0 75 bar 8 PLATE HEAT EXCHANGERS MAINTENANCE Special attention should be given to the plate heat exchangers recent reported loss o...

Страница 19: ...rough the heat exchanger must be at least 1 5 times greater than the operating flow rate the flow rate direction both for the acid solution and the basic solution must be opposite to the operating flow rate direction Finally wash the heat exchanger with clean soft water to completely remove every residue of acid and basic solution Any residue of the acid or basic solution in the heat exchanger may...

Страница 20: ...f it is not secure the FO symbol will appear DHW NTC TEMPERATURE SENSOR Spare Part Ref H10011SP The sensor is to be found on the DHW supply pipe between the PHE and the high temperature safety mixing valve un clip remove disconnect The HIU PID Controller will automatically reset to normal opera tion once the cause of the fault has been corrected A fault has been detected in the central heating flo...

Страница 21: ...he power supply and disconnect all connection plugs on the main board as shown Unclip the board care fully and then install the new board Plug in all the connec tions exactly as they come out Replace the cover and test check Turn on the power and all will reset HIU CONTROLLER PCB Power Board Spare Part Ref H10002SP The HIU PID Controller has registered an anomaly in the power consumption as compar...

Страница 22: ...e refill check for leaks EO warning then goes off Check cable and connectors Check pressure switch functionality Replace the pressure switch if found to be faulty PRESSURE SWITCH Spare Part Ref H10016SP Other Trouble shooting checklists where there is NO ERROR warning which may be useful to check through Ref REPORTED PROBLEM Trouble Shooting Checklist 1 Reported problem The water from the hot taps...

Страница 23: ... up if necessary Check the Circulating Pump see LED lights on the pump which can warn of a problem or a fault Is the pump fully operational Is the controller set up correctly See Installer settings Is the Room thermostat wired correctly Is it working Check that the communal heating is supplying heat to the unit Check then that the isolation valves to the unit are open Is the Bypass Valve open on t...

Страница 24: ...P Pump Head Wilo Yonos Para 7 0 RKC 14 H10014SP Complete Pump Block with Wilo Yonos Para 7 0 RKC Pump 15 H10015SP Honeywell Flow Sensor 16 H10016SP Pressure switch 17 H10017SP Inta HIU High Temperature TMV 18 H10018SP HIU Automatic Air Vent 19 H10019SP GASKET SEALS for Plate Heat Exchanger 4 20 H10020SP Fixing Bolts for 18 Plate Heat Exchanger 4 21 H10021SP Fixing Bolts for 23 Plate Heat Exchanger...

Страница 25: ...entral heating TEMPERATURE ADJUSTMENT 20 C to 85 C 20 C to 85 C 20 C to 85 C SECONDARY central heating HEATING OUTPUT 10 kW Xi6010 10 kW Xi6015 15kW 15 kW DOMESTIC HOT WATER including cold water supply main MAXIMUM PRESSURE 10 bar 10 bar 10 bar DOMESTIC HOT WATER MAXIMUM TEMPERATURE LIMITED by TMV Temperature setting update 19 06 17 57 C 57 C 57 C DOMESTIC HOT WATER TEMPERATURE ADJUSTMENT 30 C to ...

Страница 26: ...ed at 60C Diverting Valve 3VP SAT stroke 10 mm 100 N Honeywell Flow Sensor C7195A B Safety Valve Secondary Room Heating 3 bar 3 bar 3 bar Specification information Xi45 Xi60 Xi70 HIU installation weight 25Kg 25 4Kg 25 4Kg Connections M M M Room Thermostat NOT SUPPLIED NOT SUPPLIED NOT SUPPLIED Technical for Electrical Xi45 Xi60 Xi70 Power supply 230V 50Hz 1PH Maximum power consumption 53W Heat Met...

Страница 27: ...pares Any changes made to the original design and construction of the HIU at the factory Any faults caused by poor or bad system design System design is not the responsibility of the manufacturer Any HIU which has not been maintained and serviced in regular 12 month periods and that maintenance procedure does not comply with the instructions as listed in this Installation Guide Regular service mai...

Страница 28: ...09 17 E OE ...

Отзывы: