Le logo Emerson est une marque de commerce et une marque de service de Emerson Electric Co.
Imprimé aux É.-U. © 2015 InSinkErator, une unité commerciale d'Emerson Electric Co. Tous droits réservés.
Le logo Emerson est une marque de commerce et une marque de service de Emerson Electric Co.
Imprimé aux É.-U. © 2015 InSinkErator, une unité commerciale d'Emerson Electric Co. Tous droits réservés.
CLEANING DISPOSER
Over time, food particles may accumulate in the grind chamber and baffle. An odor from the disposer is usually a sign of food buildup. To clean
disposer:
1. Place stopper in sink opening and fill sink halfway with warm water.
2. Mix 1/4 cup baking soda with water. Turn disposer on and remove stopper from sink at same time to wash away loose particles.
3. Remove Quiet Collar® Sink Baffle and clean by hand or in dishwasher. Do not operate disposer without Quiet Collar® Sink Baffle in place.
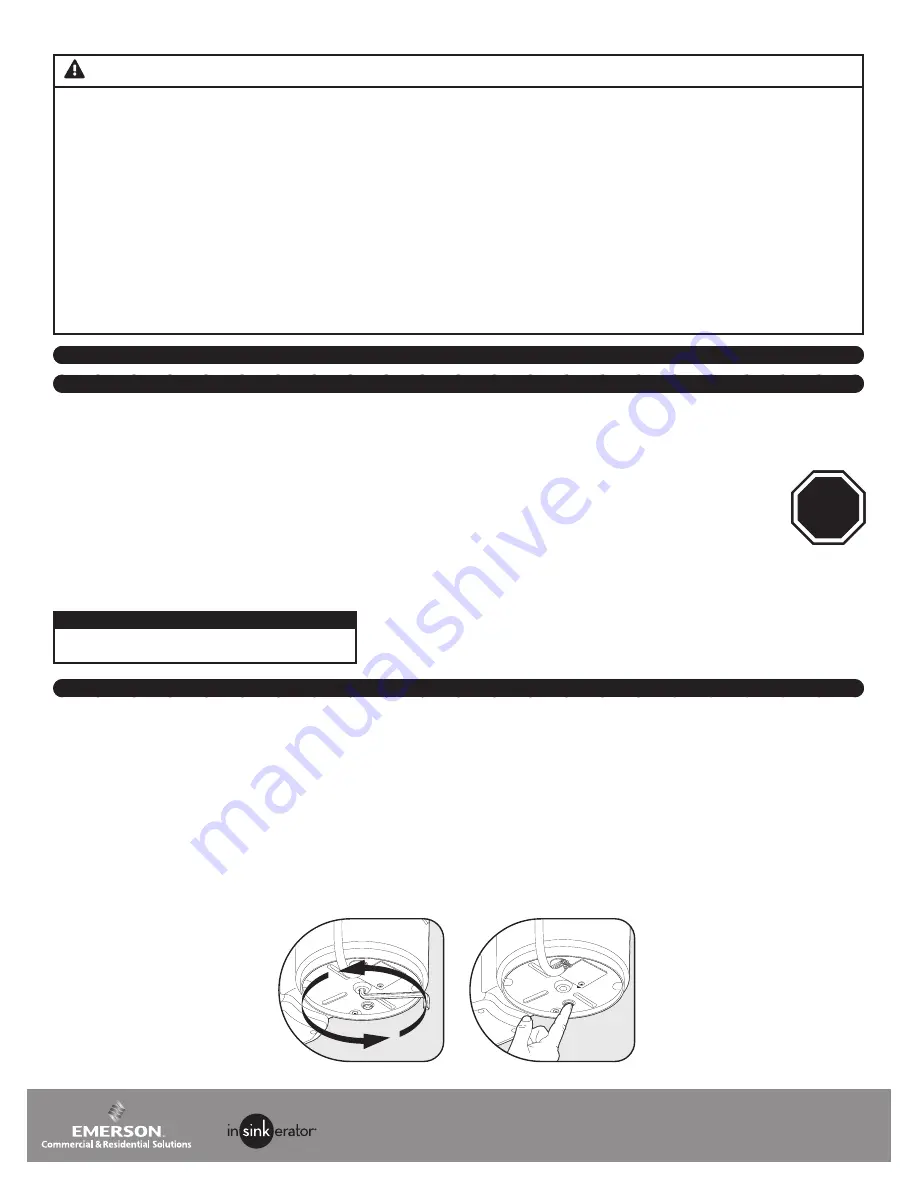
RELEASING DISPOSER JAM
If motor stops while disposer is operating, disposer may be jammed. To release jam:
1. Turn off disposer and water.
2. Insert one end of self-service Jam-Buster™ Wrench into center hole on bottom of disposer (see Figure A). Work Jam-Buster™ Wrench back and
forth until it turns one full revolution. Remove Jam-Buster™ Wrench.
3. Reach into disposer with tongs and remove object(s). Allow disposer motor to cool for 3 - 5 minutes, then lightly push red reset button on dis-
poser bottom (see Figure B). (If motor remains inoperative, check service panel for tripped circuit breakers or blown fuses.)
USER MAINTENANCE INSTRUCTIONS
• Read all instructions before using the appliance.
• To reduce the risk of injury, close supervision is required when an
appliance is used near children.
• Do not put fingers or hands into a waste disposer.
• Turn the power switch to the off position before attempting to
clear a jam, removing an object from the disposer or pressing reset
button.
• When attempting to loosen a jam in a waste disposer, use the
self-service wrenchette.
• When attempting to remove objects from a waste disposer, use
long-handled tongs or pliers.
• Do not put the following into a disposer: clam or oyster shells, caus-
tic drain cleaners or similar products, glass, china, or plastic, metal
(such as bottle caps, steel shot, tin cans, or utensils), hot grease or
other hot liquids.
• When not operating a disposer, leave the stopper in place to reduce
the risk of objects falling into the disposer.
• This product is designed to dispose of normal household food waste;
inserting materials other than food waste into disposer could cause
personal injury and/or property damage.
• To reduce the risk of injury and/or property damage, do not use the
sink containing the disposer for purposes other than food prepara-
tion (such as baby bathing or washing hair).
• Do not dispose of the following in the disposer: paints, solvents,
household cleaners and chemicals, automotive fluids, plastic wrap.
• FIRE HAZARD: Do not store flammable items such as rags, paper
or aerosol cans near disposer. Do not store or use gasoline or other
flammable vapors and liquids in vicinity of disposer.
• LEAK HAZARD: Regularly inspect disposer and plumbing fittings for
leaks, which can cause property damage and could result in personal
injury.
DO...
• First turn on cold water and then turn on the disposer. Continue
running cold water for several seconds after grinding is completed to
flush the drain line.
• Grind hard materials such as small bones, fruit pits, and ice. A
scouring action is created by the particles inside the grind chamber.
• Grind peelings from citrus fruits to freshen up drain smells.
• Use a disposer cleaner, degreaser, or deodorizer as necessary to
relieve objectionable odors caused by grease build-up.
NOTICE
F
ailure to flush the disposer properly may result in
damage to the disposer and/or property damage.
DON’T...
• DON’T POUR GREASE OR FAT DOWN YOUR
DISPOSER OR ANY DRAIN. IT CAN BUILD UP
IN PIPES AND CAUSE DRAIN BLOCKAGES. PUT
GREASE IN A JAR OR CAN AND DISPOSE IN
THE TRASH.
• Don’t use hot water when grinding food waste.
It is OK to drain hot water into the disposer between grinding periods.
• Don’t fill disposer with a lot of vegetable peels all at once. Instead,
turn the water and disposer on first and then feed the peels in
gradually.
• Don’t grind large amounts of egg shells or fibrous materials like corn
husks, artichokes, etc., to avoid possible drain blockage.
• Don’t turn off disposer until grinding is completed and only sound of
motor and water is heard.
15
Stop and read
Deténgase y lea
Arrêter et lire
1. Remove stopper from sink opening and run cold water.
2. Turn on disposer.
3. Slowly insert food waste into disposer. WARNING! Position stopper to minimize possible ejection of material while grinding.
4. After grinding is complete, turn disposer off and run water for a few seconds to flush drain line.
OPERATING INSTRUCTIONS
SAVE THESE INSTRUCTIONS
W A R N I N G
When using electric appliances, basic precautions are always to be followed, including:
Figure A
Figure
B


