background image

7

Insignia NS-A1111 5-CD Shelf System

www.insignia-products.com

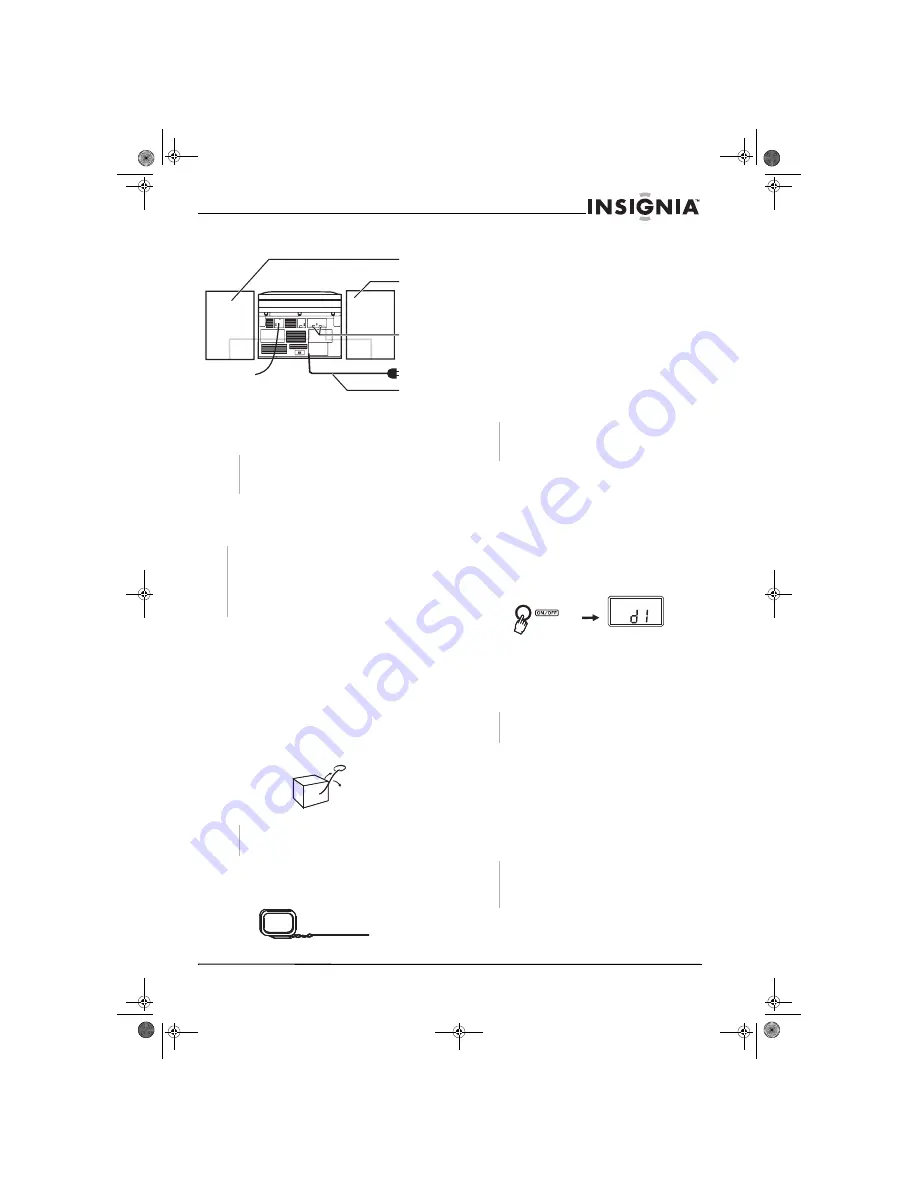
Connecting speakers to the shelf system

To connect the speakers:
Position the speakers supplied with the shelf 

system to the right and left of the shelf 
system.

Connect the wires from the speakers to the 

amplifier speaker connectors.

Connecting power to the shelf system

To connect the power cord:
Make sure that the speakers are properly 

connected and that the ON/OFF button is set 
to OFF.

Connect the AC power cord to an AC outlet.

Connecting the antenna

To connect the antenna:

Fully unwind the FM wire antenna. Extend 

the antenna and move it to determine the 
best sound reception.

Connect the provided AM loop antenna to the 

AM LOOP ANTENNA snap terminals on the 
back of the shelf system, then move it to 
determine the best sound reception.

Connecting external equipment

You can connect external audio systems to the 
shelf system.

To connect external equipment:
Make sure that the power on the shelf system 

is off.

Plug the jack from the external equipment 

into the aux in jack (with the music note 
symbol) on the front panel.

Connecting headphones

To connect the headphones:
Turn down the volume on the shelf system.

Plug headphones with a 3.5 mm stereo mini 

plug into the headphone jack.


Using your shelf system

Turning the shelf system on and off

The display changes according to the button 
pressed or feature selected.

To turn the shelf system on and off:
When the shelf system is off, press the ON/

OFF button on the shelf system once to turn 
it on. The display shows d1 and turns on the 
display backlight.

When the shelf system is on, press the ON/

OFF button on the shelf system once to turn 
it off. The display backlight goes out.

When the shelf system is turned off, the clock 
still shows on the display without a backlight. 
This is called the standby mode.

Listening to external equipment

To listen to external equipment:
Press the ON/OFF button on the shelf 

system once to turn it on.

Press the Function button on the front panel 

to Aux, indicated by a music note symbol on 
the display.

Turn on the external equipment.


Caution

Connecting speakers other than the speakers 
provided with the shelf system may damage the 
shelf system.

Note

Before operating the shelf system in a new area for the 
first time, you must check that the operating voltage of 
your shelf system is identical to the voltage of your 
local power supply. This shelf system is to be operated 
only at the power source voltage printed on the back 
panel. Disconnect from the power outlet when not in 
use for a long period of time.

Note

Do not connect the shelf system’s FM antenna to 
an outside antenna.

AC power 
cord

Amplifier 
speaker
conectors

Left 
speaker
box

Right
speaker
box

Note

When the headphones are connected, the 
speakers on the shelf system are automatically 
disabled.

Note

Disconnect the power cord when the unit is not 
going to be used for a long time.

Note

If the external equipment is a television and this 
shelf system is close to the TV, you may 
experience interference if the tuner function is 
selected while the TV is on.

NS-A1111_final_translationDTP.fm  Page 7  Friday, February 17, 2006  12:09 PM

Содержание NS-A1111

Страница 1: ...5 CD Shelf System Lecteur de CD de salon 5 disques Sistema de audio tipo ejecutivo con 5 CD NS A1111 NS A1111_final_translationDTP fm Page 1 Friday February 17 2006 12 09 PM...

Страница 2: ...NS A1111_final_translationDTP fm Page 2 Friday February 17 2006 12 09 PM...

Страница 3: ...stem only from the type of power source indicated on the rating plate located on the back of the shelf system If you are not sure of the type of power supply to your home consult your shelf system dea...

Страница 4: ...the service technician uses replacement parts specified by Insignia or those that have the same characteristics as the original part Unauthorized substitutions may result in fire electric shock or oth...

Страница 5: ...Remote control sensor Receives the remote control signal Tuner control Rotate to adjust the radio frequency Aux in indicator Lights when an external auxiliary audio source is plugged in Aux in jack C...

Страница 6: ...tch between CD tuner and aux in Indicator Description Band Displays FM or AM radio band Clock AM PM Indicates that the time is AM or PM Clock CD track broadcast station In clock mode displays the time...

Страница 7: ...OFF button on the shelf system once to turn it on The display shows d1 and turns on the display backlight 2 When the shelf system is on press the ON OFF button on the shelf system once to turn it off...

Страница 8: ...es on the display then press the search skip button repeatedly to set the desired hour 4 Press the PLAY PAUSE button until the minute flashes on the display then press the search skip button repeatedl...

Страница 9: ...n on the display 3 Press the open close button to open the disc tray 4 Load the first disc into the disc tray label side up 5 Press the disc skip button to revolve the disc tray clockwise Repeat to lo...

Страница 10: ...epeat all discs in the CD changer press Repeat on the remote control until the display shows REPEAT and rA indicating a all disc repeat The discs will play repeatedly from the current playing point 4...

Страница 11: ...n to start playback Press during play to pause play then press again to resume playing 2 Press a search skip button to move to another programmed track Maintaining your shelf system Cleaning the playe...

Страница 12: ...J Warranty information Limited warranty Insignia Products warrants to you the original purchaser of this Product that this product shall be free of defects in material or workmanship for a period of n...

Страница 13: ...invalid if the factory applied serial number has been altered or removed from the Product REPAIR REPLACEMENT AS PROVIDED UNDER THIS WARRANTY IS THE EXCLUSIVE REMEDY OF THE CONSUMER INSIGNIA SHALL NOT...

Страница 14: ...apis ou toute autre surface similaire Ne pas placer l appareil proximit ou au dessus d un radiateur ou d une source de chaleur Ne pas installer l appareil dans un meuble encastr tel qu une biblioth qu...

Страница 15: ...par un technicien qualifi pour r tablir le fonctionnement normal de l appareil Si l appareil est tomb ou si le bo tier a t endommag D t rioration marqu e des performances de l appareil Pi ces de recha...

Страница 16: ...mer le compartiment du CD Touche du temporisateur Pour programmer une alarme Touche M moire Pour programmer des pistes en m moire Touche Arr t Pour arr ter la lecture d un disque Fen tre d affichage I...

Страница 17: ...avant Pr r glage Pour d marrer arr ter momentan ment ou reprendre la lecture d un disque Touche R p tition Pour r p ter une piste Touche Bande Pour basculer entre les fr quences radio AM et FM Touche...

Страница 18: ...d coute Pour connecter le casque d coute 1 Baisser le volume de l appareil 2 Brancher le casque d coute avec une mini fiche st r o de 3 5 mm sur la prise pour casque d coute Utilisation du lecteur de...

Страница 19: ...r l affichage puis appuyer sur la touche Recherche Saut de fa on r p t e pour r gler l heure actuelle 3 Appuyer sur la touche LECTURE PAUSE jusqu ce que les minutes clignotent sur l affichage puis app...

Страница 20: ...tation radio voir page 20 2 Appuyer sur la touche m moire pour m moriser la station 3 R p ter les tapes 1 et 2 pour programmer jusqu 20 stations AM et 20 stations FM Acc s une station pr r gl e Pour a...

Страница 21: ...arri re saut de disque recherche pr r glage pour un retour rapide Rel cher la touche l endroit souhait 2 Maintenir appuy e la touche avant saut de disque recherche pr r glage pour une avance rapide Re...

Страница 22: ...ecture reprendra partir du d but de la premi re piste 3 En mode pause appuyer sur la touche LECTURE PAUSE pour commencer la lecture r p t e Le disque en cours de lecture reprendra partir de l endroit...

Страница 23: ...gulier et s il est tr s sale il peut ne pas tre lu Manipuler le disque en le tenant par la p riph rie et le centre Les empreintes digitales et la poussi re sur la surface enregistr e doivent tre essuy...

Страница 24: ...ES D TACH ES En outre Insignia fournira gratuitement les pi ces d tach es neuves ou remises neuf en change des pi ces d fectueuses pendant la dur e de la garantie l expiration de la p riode de garanti...

Страница 25: ...ations implicites de dur e d une garantie de sorte que les limitations ou exclusions nonc es ci dessus peuvent tre nulles dans le cas du premier acheteur La pr sente garantie donne au premier acheteur...

Страница 26: ...ipo ejecutivo y para protegerlo contra el sobrecalentamiento Estas aberturas no se deben bloquear ni cubrir No coloque la unidad sobre una cama un sof una alfombra u otra superficie similar No coloque...

Страница 27: ...cciones de operaci n ya que el ajuste incorrecto de otros controles puede resultar en da o y frecuentemente requerir trabajo intensivo de un t cnico calificado para restaurar la operaci n normal del s...

Страница 28: ...puerta del CD Bot n de Temporizador Presione para programar la alarma Bot n de Memoria Presione para programar pistas para guardarlas en la memoria Bot n de Detener Presione para detener la reproducci...

Страница 29: ...te Predefinir Presionar para comenzar a reproducir un disco para pausarlo o para reanudar la reproducci n Bot n de Repetir Presione para volver a reproducir una pista Bot n de Banda Presione para alte...

Страница 30: ...do Conexi n de equipo externo Puede conectar sistemas de audio externos al sistema de audio tipo ejecutivo Para conectar el equipo externo 1 Verifique que el sistema de audio est apagado 2 Conecte el...

Страница 31: ...io se encuentra encendido presione le bot n ON OFF Encendido Apagado en el sistema de audio para ingresar al modo standby El reloj se mostrar en la pantalla sin retroiluminaci n 2 Presione el bot n PL...

Страница 32: ...estaciones se asignan con n meros predefinidos comenzando con 1 en orden consecutivo para cada banda AM y FM Para programar emisoras de radio predefinidas 1 Seleccione manualmente una emisora de radi...

Страница 33: ...SE Reproducir pausar para comenzar a reproducir Presione durante la reproducci n para pausarla luego presi nelo para reanudar la reproducci n 3 Presione el bot n de detener para detener la reproducci...

Страница 34: ...ra seleccionar otra pista en el disco seleccionado o use el bot n de omisi n de disco para reproducir la primera pista del nuevo disco que ha seleccionado 5 Para cancelar la reproducci n repetida pres...

Страница 35: ...ione el bot n buscar saltar para moverse a otra pista programada Mantenimiento de su sistema de audio Limpieza del reproductor Limpiar con un pa o suave Si el reproductor est muy sucio humedezca un pa...

Страница 36: ...del FCC y con el rendimiento de seguridad del Departamento Estadounidense de Salud y Servicios Humanos y tambi n con los est ndares de rendimiento 21 CFR subcap tulo J de la radiaci n del FDA Nota An...

Страница 37: ...o autorizado por Insignia para realizar el servicio de reparaci n del Producto Esta garant a no cubre Productos vendidos EN EL ESTADO EN QUE SE ENCUENTRAN o CON TODAS SUS FALLAS ni productos consumibl...

Страница 38: ...R1 NS A1111_final_translationDTP fm Page 38 Friday February 17 2006 12 09 PM...

Отзывы: