background image

40 


FCC Statement


This  device  complies  with  Part  15  of  the  FCC  Rules.  Operation  is  subject  to  the  following  two 

conditions: (1) This device may not cause harmful interference, and (2) this device must accept 

any interference received, including interference that may cause undesired operation. 


NOTE: This equipment has been tested and found to comply with the limits for a Class B digital 

device,  pursuant  to  Part  15  of  the  FCC  Rules.  These  limits  are  designed  to  provide  reasonable 

protection  against  harmful  interference  in  a  residential  installation.  This  equipment  generates 

uses and can radiate radio frequency energy and, if not installed and used in accordance with the 

instructions,  may  cause  harmful  interference  to  radio  communications.  However,  there  is  no 

guarantee  that  interference  will  not  occur  in  a  particular  installation.  If  this  equipment  does 

cause harmful interference to radio or television reception, which can be determined by turning 

the equipment off and on, the user is encouraged to try to correct the interference by one of the 

following measures: 


-    Reorient or relocate the receiving antenna. 

-    Increase the separation between the equipment and receiver. 

-    Connect the equipment into an outlet on a circuit different from that 

      to which the receiver is connected. 

-    Consult the dealer or an experienced radio/TV technician for help. 


WARNING:  Any  changes  or  modifications  not  expressly  approved  by  the  party  responsible  for 

compliance could void the user's authority to operate this equipment. 


The device must not be co-located or operating in conjunction with any other antenna or  

transmitter.   

This device complies with FCC and IC radiation exposure limits set forth for an uncontrolled  

environment. 

The device should be installed and operated with a minimum distance of 20cm between the  

radiator and your body. 


INDUSTRY CANADA 

This device complies with RSS247 of Industry Canada. Cet appareil se conforme à RSS247 de 

Canada d'Industrie. 

This device complies with Industry Canada license-exempt RSS standard(s). Operation is subject to the 

following two conditions: (1) this device may not cause interference, and (2) this device must accept 

any interference, including interference that may cause undesired operation of the device. appareils 

radio exempts de licence. Son fonctionnement est sujet aux deux conditions suivantes: (1) le dispositif 

ne doit pas produire de brouillage prejudiciable, et (2) ce dispositif doit accepter tout brouillage recu, 

y compris un brouillage susceptible de provoquer un fonctionnement indesirable. 


Radiation Exposure Statement: The product comply with the Canada portable RF exposure limit set 

forth  for  an  uncontrolled  environment  and  are  safe  for  intended  operation  as  described  in  this 

manual. 


The further RF exposure reduction can be achieved if the product can be kept as far as possible from 

the user body or set the device to lower output power if such function is available. 


Déclaration  d'exposition  aux  radiations  :  Le  produit  est  conforme  aux  limites  d'exposition  pour  les 

appareils portables RF pour les Etats-Unis et le Canada établies pour un environnement non contrôlé. 


Le  produit  est  sûr  pour  un  fonctionnement  tel  que  décrit  dans  ce  manuel.  La  réduction  aux 

expositions RF peut être augmentée si l'appareil peut être conservé aussi loin que possible du corps 

de l'utilisateur ou que le dispositif est réglé sur la puissance de sortie la plus faible si une telle fonction 

est disponible. 
 

Содержание ITCDS-6000

Страница 1: ...USB Turntable Model ITUT 5000 ITUT 5000 is a part of ITCDS 6000 Instruction Manual PLEASE READ THIS INSTRUCTION MANUAL CAREFULLY BEFORE USE AND KEEP IT FOR FUTURE REFERENCE ...

Страница 2: ...ty If the provided plug does not fit into your outlet consult an electrician for replacement of the obsolete outlet 10 Protect the power cord from being walked on or pinched particularly at the plugs convenience receptacles and at the point where they exit from the apparatus 11 Only use attachments accessories specified by the manufacturer 12 Use only with the cart stand tripod bracket or table sp...

Страница 3: ... such a way that it does not require a safety connection to electrical earth 17 The mains plug is used as disconnect device the disconnect device shall remain readily operable 18 WARNING To reduce the risk of fire or electric shock do not expose this apparatus to rain or moisture The apparatus shall not be exposed to dripping or splashing and that no objects filled with liquids such as vases shall...

Страница 4: ...ock do not expose this appliance to rain or moisture CAUTION Use of controls or adjustments or performance of procedures other than those specified may result in hazardous radiation exposures CAUTION RISK OF ELECTRIC SHOCKS DO NOT OPEN To reduce the risk of electric shock do not remove cover or back No user serviceable parts inside Refer servicing to qualified service personnel The light flash wit...

Страница 5: ...d 5 To protect the stylus don t forget to put on the white protective needle cover after use 6 Do not attempt to clean the unit with chemical solvents as this might damage the finish Use a clean dry cloth 7 In order to shut off the power to this product completely unplug the power cord from the wall outlet Be sure to unplug the unit if you do not intend to use it for an extended period of time suc...

Страница 6: ... 2 45 RPM ADAPTOR 3 TONE ARM REST 1 4 SPEED SELECTOR 5 TONE ARM 6 TONE ARM REST 2 7 STYLUS 8 NEEDLE COVER 9 POWER INDICATOR 10 POWER BUTTON 11 DECORATION 12 RCA LIINE OUT SOCKET 13 USB SOCKET 14 DUST COVER 15 AC POWER CORD ...

Страница 7: ...ase do not place anything on top of the dust cover especially while playing a record 7 To pause or stop playing you need to lift and move the tone arm back to the tone arm rest manually 8 When the end of the record is reached the tone arm and rotation stop Lift the tone arm and place it on the tone arm rest manually 9 Remember to use the white plastic needle guard to protect the stylus and unplug ...

Страница 8: ...city 2 0 6 version if your machine lacks SSE2 support Audacity for Mac is a Universal Binary for OS X 10 6 and later Audacity runs best with at least 1 GB RAM and a 1 GHz processor 2 GB RAM 2 GHz on OS X 10 7 and later For lengthy multi track projects we recommend a minimum of 2 GB RAM and 2 GHz processor 4 GB RAM on OS X 10 7 and later The 2 1 1 release was the final release for PPC Macs Because ...

Страница 9: ...anguage choice in the Windows EXE Audacity installer only selects the language for the installer 5 The Audacity Setup Wizard will appear Click on Next to install the software 6 Continue to click on the Next buttons ...

Страница 10: ...g your files Note 1 Once you set up Audacity you do not need to re set it with each use 2 The Audacity win 2 1 2 exe helpfile included is available for Windows 8 Windows 7 Windows 10 requires appropriate drivers Windows Vista Windows XP 3 If you cannot run the exe document please go to the website below and download the file from it directly http www audacityteam org download windows ...

Страница 11: ...rst launching Audacity after installation This error occurs if you are running less than the latest Service Pack of updates for your Windows XP system Please see http manual audacityteam org o man faq_installation_and_plug_ins html entry_point for how to install the latest Service Pack and for advice about the potential security risks of running XP now that Microsoft no longer supports it 8 On fir...

Страница 12: ... will appear on the right hand side of the interface Click the arrow on Device below Playback and choose Realtek High Definition Audio or Microphone Sound Mapper Output Click the arrow on Device below Recording and choose USB PnP Audio Device Click the arrow on Channels to select 2 Stereo Do not click OK until you finish all of the settings Note If you cannot find the USB PnP Audio Device in the D...

Страница 13: ...vation Level dB to 36 NOTE Once the Sound Activated Recording is selected the Pause button will not work during recording You can Click Interface on the left side to select Sound Activation Level 4 Before exporting a MP3 file you need to find lame first If the program does not show the MP3 Library make sure the Audacity driver disc is inside your computer Click Libraries on the left side then in M...

Страница 14: ...me_enc dll click on LAME download page Jump straight to Windows download in the top line Left click Windows download and it will jump to the download chapter for Windows Audacity LAME is free so you can click libmp3lame win 3 99 3 zip under ZIP OPTION to download Click Save select the Folder you want to save it in then click Save again to save it ...

Страница 15: ...Lame box Click OK on Audacity Preferences to close and to complete your settings Now you can Record Export and save your favorite music 6 For detailed information about how to run this program please click Help and click Manual in web browser 7 Adjust the output and input volume to 20 or 0 2 level NOTE Because of the variation of different operation systems the input volume control may not work on...

Страница 16: ... songs Press stop button on the computer only when all your desired songs have been downloaded After your have finished downloading you may play back the songs through your computer In stop mode simply click SKIP TO START button and then the PLAY button TIP If you press the stop button by accident you can click Transport and click Append Record and you can continue to record in the same track For ...

Страница 17: ...ties interface Volume window will display select the Audio tab to reveal the settings In Sound recording select USB PnP Audio Device and click the Volume button to set the recording input level The WAVE IN window will appear In WAVE IN interface Adjust the recording volume to about 50 as per illustrated below The fluctuating wave will show on the interface when recording ...

Страница 18: ...will be seen You will see that the Speaker USB PnP Audio Device is set as default To ensure the sound click a playback device e g Speaker High Definition Audio then click Set Default and click OK The sound should now work For Other Windows versions users e g Windows XP Click Start and find Settings Control Panel In the Control Panel window find and double click into Sounds and Audio Devices In the...

Страница 19: ...rst song Highlighted 3 Click File tab then select Export Selected Audio 4 In the next window select a location as well as the format most people prefer to save audios in MP3 format MP3 format is most common in My Music and put the title in the file name Click Save NOTE The most common formats are MP3 WAV WAV uses a lot of space and MYA AAC most iPod devices can play audios with this format You can...

Страница 20: ...d highlight the end of the second song 2 Click file tab then select Export Selected Audio 3 Follow above steps to divide songs export and save one by one MP3 WAV AND OGG FORMAT THESE ARE DIGITAL FILE FORMATS FOR AUDIO MUSIC AND MOST CURRENT COMPUTERS ARE COMPATIBLE HOWEVER IF YOU COPY THE FILE ONTO A CD DISC CD R OR CD RW AND PLAY WITH ANOTHER CD PLAYER YOU HAVE TO MAKE SURE THE CD PLAYER SUPPORTS...

Страница 21: ...ck the file tab on the audacity interface 2 Select Export Selected Audio a window will appear as below Select the folder put title in the file name and click the pull down arrow to select a save type such as WAV or OGG format 3 Choose the file format of the recording that should be exported and put in the title in the file name and the folder of the location where it will be saved i e desktop Then...

Страница 22: ...he export saving is completed Setting the language 1 Click Edit and select Preferences 2 Another window titled with Audacity Preferences will appear Click the Interface tab and click the pull down arrow to select the language you wanted ...

Страница 23: ...ac is a Universal Binary for OS X 10 6 and later Audacity runs best with at least 1 GB RAM and a 1 GHz processor 2 GB RAM 2 GHz on OS X 10 7 and later For lengthy multi track projects we recommend a minimum of 2 GB RAM and 2 GHz processor 4 GB RAM on OS X 10 7 and later 1 Please insert the Audacity software disk that comes with your unit Click the Audacity disk on the desktop 2 Select Audacity_for...

Страница 24: ... About This Mac The next window will display and the processor type and the OS version will display as below 3 Double click on the Audacity_for_mac folder 4 Then double click audacity macosx ub 2 1 2 dmg Wait a few minutes until this window disappears Then another window will appear ...

Страница 25: ...5 Double click the Audacity folder and in the Audacity window files will be displayed in the folder 6 Double click the Audacity icon to start the software running alternatively drag the orange ball wearing headphones icon down onto the desktop toolbar Click on this icon to run Audacity ...

Страница 26: ... the play control buttons you will see the input and output level meters labeled L and R Under the output level meter is an icon that looks like a microphone Next to the microphone is a black arrow that points down Click this arrow and select Start Monitor If you do not see the input and output level meters open your Preferences again as described above ...

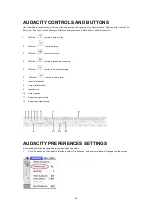
Страница 27: ...the button to play 3 Click the button to record 4 Click the button to pause the recording 5 Click the button to stop the recording 6 Click the button to skip to end 7 Input level monitor 8 Output level monitor 9 Input device 10 Output device 11 Adjust the input volume 12 Adjust the output volume AUDACITY PREFERENCES SETTINGS A few settings will be required before you download the music 1 Click Aud...

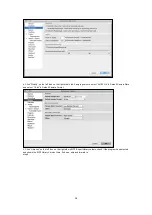
Страница 28: ... Software and re open and try again Ensure that the turntable is connected to the computer 3 Click Recording on the left Then on the right side in Playthrough column click the checkbox beside Software Playthrough Listen while recording or monitoring new track In the Sound Activated Recording column click the checkbox beside Sound Activated Recording then slide the meter to 36 db NOTE Once the Soun...

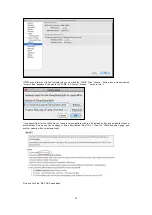
Страница 29: ...mn select 44100 Hz in Default Sample Rate and select 16 bit in Default Sample Format 5 Click Libraries on the left then on the right side in MP3 Export Library column check if the program has detected and shown the MP3 Library Version there If shown skip and forward to step 6 ...

Страница 30: ...e the LAME is Click the Browse button to find it If you cannot find it or the LAME file you found is not compatible click the Download button and a website will show automatically Scroll down the webpage to find a title named Mac OS X Click the LAME download page and another website will show automatically Find and Click the MAC OSX downloads ...

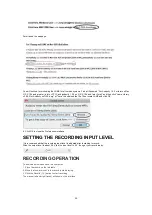
Страница 31: ...ME and click OK 6 Click OK to close the Preferences interface SETTING THE RECORDING INPUT LEVEL It is recommended that the recording input level is adjusted prior to starting to record Slide the output level to about 0 5 slide the input level to 0 3 then get your record ready RECORDING OPERATION To download music and save into computer 1 Place the record on the turntable 2 Move the tone arm over t...

Страница 32: ... not work during recording process if the Sound Activated Recording in the Preferences Recording is selected Clear the checkbox next to the Sound Activated Recording if you want to pause recording manually 5 Repeat steps 3 and 4 until you have finished downloading NOTE Do not click stop button on computer while continuously downloading songs Remember to click pause button in between your desired s...

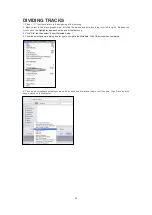
Страница 33: ...ht Release the mouse when the highlighter has reached the end of the first song 3 Click File tab then select Export Selected Audio 4 The window will pop up a dialog box for you to complete the Metadata Click OK button when completed 5 Then a window appears select your music file location and format and type in your file name Click Save and the song is saved on the computer ...

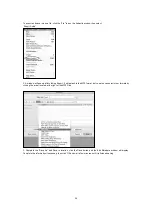
Страница 34: ...LES AFTER RECORDING IS COMPLETED When the recording is finished click the on the screen and stop the cassette playback You have a music download on your computer now You may play back the song through your computer Simply click the to play 1 To export and save individually click the File tab on the Audacity window then select Export Selected Audio ...

Страница 35: ...ort It will default to the MP3 format but you also can select other formats by clicking the arrow located at the right of the MP3 Files 3 Complete the Save As and Save in location click the Save button and the Edit Metadata window will display Complete the information if necessary then click OK and wait a few minutes until it is finished saving ...

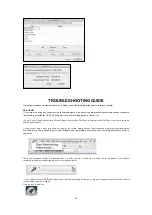
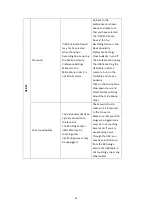
Страница 36: ... the turntable and reopen Audacity If you are not able to hear any audio as you play the record please click on the microphone drop down arrow and select Start Monitoring This will enable you to hear the audio from the turntable even if you have not record enabled the Audacity application Check the microphone slider to make sure that it is at full volume all the way to the right as shown below If ...

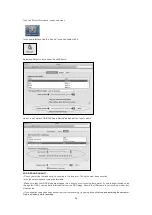
Страница 37: ...secured to the tone arm The stylus must be connected to the tone arm whenever using the turntable Make sure that your RCA plugs are plugged into a source or not touching bare metal If you are experiencing noise through the USB you may have interference from the RCA plugs Ensure the USB cable is not touching or near any other cables If you experience any odd sounds coming from the recording try clo...

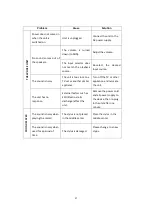
Страница 38: ...se to a TV set or another similar appliance Turn off the TV or other appliance and relocate the unit THE WHOLE UNIT The unit has no response External factors such as ESD Electro static discharge affect the unit Remove the power cord and all power supply to the device then re plug in the unit after one minute The sound is noisy when playing the record The stylus is not placed in the middle center P...

Страница 39: ...B Cable in after a moment turn on the turntable and reopen Audacity Click on the microphone drop down menu and select Start Monitoring Adjust the microphone slider USB PC Poor sound quality The stylus does not have a great connection to the tone arm The RCA Plugs and or USB Cable may be touching other interfering wires or may be unplugged Check your stylus to make sure it is secured to the tone ar...

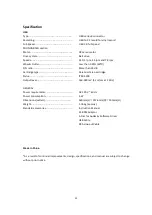
Страница 40: ...ons LxDxH Weight Standard accessories DC servo motor Belt drive 33 1 3 rpm 45 rpm and 78 rpm Less than 0 25 WTD More than 35 dB Ceramic stereo cartridge ITRRS 300 160 380 mV 5 cm sec at 1 KHz AC 120 V 60 Hz 5 W 360mm L 221 6mm D 105mm H 1 76 kg approx Instruction Manual 45 RPM Adaptor A Disc for Audacity Software Driver USB Cable RCA Line out Cable Made in China As a result of continual improvemen...

Страница 41: ...complies with FCC and IC radiation exposure limits set forth for an uncontrolled environment The device should be installed and operated with a minimum distance of 20cm between the radiator and your body INDUSTRY CANADA This device complies with RSS247 of Industry Canada Cet appareil se conforme à RSS247 de Canada d Industrie This device complies with Industry Canada license exempt RSS standard s ...

Страница 42: ...roduct contains chemicals known to the State of California to cause birth defects or other reproductive harm For more information on these regulations and a list of chemicals log on the following website address http www oehha ca gov prop65 html ...

Страница 43: ...42 ...

Отзывы: