background image

3

ADJUSTMENTS

Accessory Installation

Always turn off the air supply and disconnect the air
supply hose before installing, removing or adjusting any
accessory on this tool or before performing any
maintenance on this tool.

For Plain–Type Retainer No. HH1–1190

Grasp Retainer and remove Lock Spring from the Retainer
groove. Remove Retainer from Barrel. Raise chisel until the
oval, integral collar on the chisel shank clears the alignment
grooves inside the Retainer. Rotate the chisel 90

°

.

The chisel can now be removed from the front of the Retainer.
To install the chisel, insert the shank of the chisel into the
front of the Retainer until the chisel can be turned 90

°

,

allowing the oval, integral collar on the chisel shank
to drop and rest on the shoulder in the retainer.
Attach the Retainer to the Barrel by aligning the slot in the
Retainer with the groove in the Barrel. Insert the Lock Spring
through the slot in the Retainer body and push the Lock
Spring around the Barrel and Retainer until the Retainer is
secured to the Barrel.

For Rubber Buffered Type Retainer No. HHW1–300 (for
use with threaded barrel)

Grasp the Retainer (28) and unscrew it from the Barrel (17)
against the pressure of the Retainer Lock Spring (27).
Remove the buffer and the chisel from the rear of the Retainer.
The Buffer will split to allow the use of a wide chisel.
To install a wide chisel, pass the shank of the chisel through
the hole in the Retainer and by opening the split in the buffer,
fit it around the chisel making sure that the shoulder of the
chisel locates in the large counter bore of the buffer.  Slide the
assembly into place in the threaded end of the Retainer.

Moil point and narrow chisels can be removed and
installed without removing the buffer from the Retainer.

Align the end of the chisel with the Nozzel (21) and thread the
retainer onto the Barrel.  Tighten the Retainer clockwise on
the Barrel until the Retainer Lock Spring can be seen or heard
to locate in place in the recess in the barrel thread.  Check
correct engagement by trying to rotate the Retainer.  If
significant resistance is felt, the Retainer Lock Spring is
correctly engaged.  If no significant resistance is felt, rotate
the Retainer until Retainer Lock Spring engages properly.

PLACING TOOL IN SERVICE

Hammers are coated inside and out with rust–resisting oil
before leaving the factory.  Before using the Hammer, remove
this oil by dipping the tool in a suitable cleaning solution to
wash the oil from the exterior.  Pour about 6 cc of a suitable
cleaning solution into the air inlet and attach the air hose.
Insert a Chisel into the Hammer and while holding the chisel
blade against the work or a relatively solid object such as a
plank or timber, operate the tool for about 15 seconds.  Dry
the tool immediately after cleaning, pour 3 cc of
Ingersoll–Rand No. 10 Oil into the air inlet and again operate
the tool for 5 seconds to lubricate all working parts.

 LUBRICATION 

Ingersoll–Rand No. 10

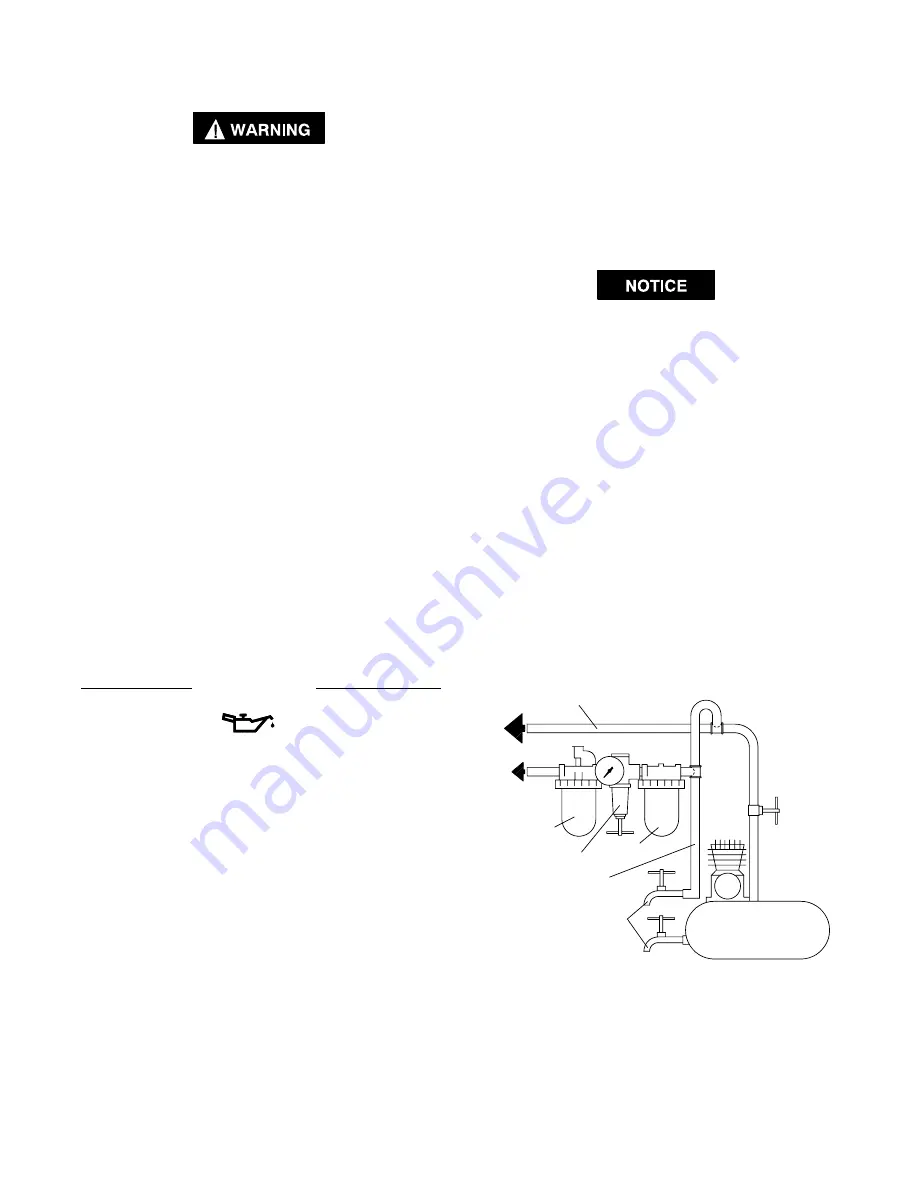
Always use an air line lubricator with these tools.
We recommend the following Filter–Lubricator–Regulator
Unit:

For USA – C18–03–FKG0–28

Before attaching the air hose, place about 3 cc of
Ingersoll–Rand No. 10 Oil into the air inlet.  This should be
done each day, even when an air line lubricator is used.
During the working day, check the tool to ensure that the
retainer components are lubricated.

After each two or three hours of operation, if an air line
lubricator is not used, disconnect the air hose  and pour about
3 cc of Ingersoll–Rand No. 10 Oil into the air inlet of the tool.
If the action of the Hammer becomes sluggish, pour about 
3 cc of a suitable cleaning solution  into the air inlet and run
the tool for not more than thirty seconds.  Immediately after

flushing the tool, pour about 3 cc of Ingersoll–Rand No. 10
Oil into the air inlet and run the tool for about thirty seconds
to lubricate internal parts.
Before storing a Hammer or if the Hammer is to be idle
for a period exceeding twenty–four hours,
 pour about 
3 cc of Ingersoll–Rand No. 10 Oil into the air inlet and operate
the tool for 5 seconds to coat the internal parts with oil.

MAIN LINES 3 TIMES
AIR TOOL INLET SIZE

TO
AIR
SYSTEM

TO
AIR
TOOL

LUBRICATOR

REGULATOR

FILTER

BRANCH LINE 2 TIMES
AIR TOOL INLET SIZE

DRAIN REGULARLY

COMPRESSOR

(Dwg. TPD905–1)

Содержание 2DA Series

Страница 1: ...Always use clean dry air at 90 psig maximum air pressure Dust corrosive fumes and or excessive moisture can ruin the motor of an air tool Do not lubricate tools with flammable or volatile liquids such as kerosene diesel or jet fuel Do not remove any labels Replace any damaged label USING THE TOOL Always wear eye protection when operating or performing maintenance on this tool Always wear hearing p...

Страница 2: ...ne Compressed air is dangerous Never point an air hose at yourself or co workers Never blow clothes free of dust with compressed air Be sure all hose connections are tight A loose hose not only leaks but can come completely off the tool and while whipping under pressure can injure the operator and others in the area Attach safety cables to all hoses to prevent injury in case a hose is accidentally...

Страница 3: ...to rotate the Retainer If significant resistance is felt the Retainer Lock Spring is correctly engaged If no significant resistance is felt rotate the Retainer until Retainer Lock Spring engages properly PLACING TOOL IN SERVICE Hammers are coated inside and out with rust resisting oil before leaving the factory Before using the Hammer remove this oil by dipping the tool in a suitable cleaning solu...

Страница 4: ...e Trigger 580 hex Plain 2 200 2 51 2DA2SA Grip with Outside Trigger 680 round Plain 2 200 2 51 3DA1SA Grip with Outside Trigger 580 hex Plain 1 900 3 76 3DA2SA Grip with Outside Trigger 680 round Plain 1 900 3 76 4DA1SA Grip with Outside Trigger 580 hex Plain 1 600 4 101 4DA2SA Grip with Outside Trigger 680 round Plain 1 600 4 101 ...

Страница 5: ...d un outil pneumatique Ne jamais lubrifier les outils avec des liquides inflammables ou volatiles tels que le kérosène le gasol ou le carburant d aviation Ne retirer aucune étiquette Remplacer toute étiquette endommagée UTILISATION DE L OUTIL Porter toujours des lunettes de protection pendant l utilisation et l entretien de cet outil Porter toujours une protection acoustique pendant l utilisation ...

Страница 6: ...evier de commande lorsque vous n utilisez pas l outil Ne posez jamais l outil sur vos pieds Ne pointez jamais l outil vers quelqu un L air comprimé est dangereux Ne pointez jamais un flexible d air comprimé sur vous ou vos collègues Ne nettoyez jamais la poussière de vos vêtements avec un jet d air comprimé Vérifiez le serrage de toutes les connexions d air comprimé Un flexible desserré peut non s...

Страница 7: ...indre jusqu à ce que l engagement du ressort de verrouillage de la douille dans l encastrement du filetage du cylindre puisse être vu ou entendu Vérifier l engagement correct en essayant de tourner la douille de retenue Une résistance importante indique que le ressort de verrouillage de la douille est correctement engagé En cas d absence de résistance tourner la douille de retenue jusqu à ce que l...

Страница 8: ...E LUBRIFICATEUR RÉGULATEUR FILTRE LIGNE SECONDAIRE AU MOINS 2 FOIS LA DIMENSION DE L ADMISSION D AIR DE L OUTIL VIDANGER RÉGULIÈREMENT COMPRESSEUR Plan TPD905 1 SPECIFICATIONS Course de piston Modèle Poignée Buse Douille de retenue Coups par minute in mm 2DA1SA Poignée à gâchette extérieure 0 580 hex ordinaire 2 200 2 51 2DA2SA Poignée à gâchette extérieure 0 680 rond ordinaire 2 200 2 51 3DA1SA P...

Страница 9: ...xima presión de 90 psig El polvo los vapores corrosivos y o el exceso de humedad podrían estropear el motor de una herramienta neumática No lubricar las herramientas con líquidos inflamables o volátiles tales como queroseno gasoil o carburreactor No saque ninguna etiqueta Sustituir toda etiqueta dañada USO DE HERRAMIENTA Usar siempre protección ocular al manejar o realizar operaciones de mantenimi...

Страница 10: ...ra usar la herramienta No apoye nunca la herramienta o su cincel sobre el pie No apunte nunca la herramienta a nadie El aire comprimido es peligroso No apunte nunca la manguera de aire hacia usted o sus compañeros No quite nunca el polvo de su ropa con aire comprimido Asegúrese que las conexiones de aire estén bien apretadas Una manguera floja no solamente pierde aire sino que puede salirse comple...

Страница 11: ... que se vea u oiga que el muelle de seguridad del retenedor encaja en su sitio en el rebaje de la rosca del cilindro Intente girar el retenedor para verificar que haya quedado bien alineado Si se nota una resistencia importante significa que el muelle de seguridad del retenedor quedó debidamente encajado Si no se nota mucha resistencia gire el retenedor hasta que el muelle de seguridad quede bien ...

Страница 12: ...ADOR FILTRO TUBERÍA DE RAMAL 2 VECES EL TAMAÑO DE ENTRADA DE HERRAMIENTA NEUMÁTICA PURGAR PERIÓDICAMENTE COMPRESOR esq TPD905 1 ESPECIFICACIONES Carrera de Pistón Modelo Empuñadura Boquilla Retenedor Golpes min in mm 2DA1SA Empuñadura con gatillo externo 0 580 hexagonal normal 2 200 2 51 2DA2SA Empuñadura con gatillo externo 0 680 redondo normal 2 200 2 51 3DA1SA Empuñadura con gatillo externo 0 5...

Страница 13: ...midade excessiva podem arruinar o motor de uma ferramenta pneumática Não lubrifique as ferramentas com líquidos inflamáveis ou voláteis tais como querosene diesel ou combustível de jactos Não remova nenhum rótulo Reponha qualquer rótulo danificado USANDO A FERRAMENTA Use sempre óculos de protecção quando estiver operando ou executando serviço de manutenção nesta ferramenta Use sempre protecção con...

Страница 14: ...nha as mãos e dedos fora do alcance da alavanca reguladora de pressão até o momento de operar a ferramenta Nunca descanse a ferramenta ou a barrena sobre o seu pé Nunca aponte a ferramenta para alguém Ar comprimido é perigoso Nunca aponte um mangueira de ar para si ou colega de trabalho Nunca sopre a suas roupas para tirar o pó com ar comprimido Certifique se de todas as conexões da mangueira este...

Страница 15: ...ca do cilindro Confirme que o engate está correcto tentando rodar o retentor Se sentir resistência significativa a mola de travamento do retentor está engatada correctamente Se não sentir resistência significativa rode o retentor até a mola de travamento do retentor engatar correctamente COLOCAÇÃO DA FERRAMENTA EM SERVIÇO Os Martelos são revestidos por dentro e por fora com óleo resistente à ferru...

Страница 16: ...NTA PNEUMÁTICA LUBRIFICADOR REGULADOR FILTRO LINHA SECUNDÁRIA 2 VEZES A DIMENSÃO DA ADMISSÃO DA FERRAMENTA PNEUMÁTICA DRENAR REGULARMENTE COMPRESSOR Des TPD905 1 ESPECIFICAÇÕES Curso de Pistão Modelo Punho Acoplamento Retentor Impactos por min pol mm 2DA1SA Punho com gatilho 0 580 hex flecha 2 200 2 51 2DA2SA Punho com gatilho 0 680 redonda flecha 2 200 2 51 3DA1SA Punho com gatilho 0 580 hex flec...

Страница 17: ...MAINTENANCE SECTION 17 SERIES 2D 3D 4D AND MDT3 EU HAMMERS Dwg TPC655 2 ...

Страница 18: ...U models only 92679646 7 Air Strainer 834 61 23 Bolt 4 3DA 549 9 Inlet Bushing 24 Arrow Retainer Plain Type HH1 1190 7 8 24 for 2DA 3DA 4DA 3DA 382 24A Lock Spring HH1 1194 3 8 for MDT3 EU 3DA 282 25 Warning Label 10 O ring 3DA 121 for 2DA 3DA and 4DA WARNING 2 99 11 Valve Cap HH 4 for MDT3 EU EU 99 12 Valve Spacer HH 8A 26 Buffer Screw Retainer for EU models only 3DW 50 13 Valve HH 2A 27 Retainer...

Страница 19: ...ssemble the tool any further than necessary to replace or repair damaged parts 2 Whenever grasping a tool or part in a vise always use leather covered or copper covered vise jaws to protect the surface of the part and help prevent distortion This is particularly true of threaded members and housings 3 Do not remove any part which is a press fit in or on a subassembly unless the removal of that par...

Страница 20: ...lightly with Ingersoll Rand No 10 Oil and insert Piston 16 in the bore small end first 3 Assemble Valve components in the following sequence by placing each over the Roll Pins 15 in the Barrel face Valve Seat 14 Valve 13 Valve Spacer 12 and Valve Cap 11 4 Lightly grease the Valve Sealing O ring 10 to hold it in place in its groove in the Handle 1 and replace the Handle over the Valve Assembly 5 Al...

Страница 21: ... Deflector along the Barrel until it snaps into position in its retaining groove The Exhaust Deflector can be rotated to direct the exhaust stream away from the operator Installation of Oversize Piston Do not install an oversize Piston without first lapping the Barrel Greater wear occurs near the center of the barrel bore than at either end To obtain full benefit from an oversize Piston 16 it is n...

Страница 22: ...lean suitable cleaning solution into the air inlet and operate for 30 seconds After flushing pour about 3 cc of oil into the air inlet and operate the tool for 5 seconds to coat the internal parts with oil Loss of power Worn Valve Replace the Valve Loss of efficiency Worn Piston and or accessory Replace Piston and or accessory SAVE THESE INSTRUCTIONS DO NOT DESTROY ...

Отзывы: