background image

19

Installing the Lower Retaining Bracket

The lower retaining bracket is not designed to hold the 
weight of the display. Its function is to hold the bottom 
of the display securely to the mounting surface and to 
allow adjustment of the display to insure perpendicu-
larity.

• Attach the lower retaining bracket to the bottom of 

the display with the side of the angled bracket with 
the 4 slotted holes against the bottom of the display 
and the other side between the display and the 
mounting surface.

• Mark on the mounting surface to locate the bottom 

and ends of the retaining bracket. Remove the 
retaining bracket from the display.

• Remove the display from the mounting bracket.
• Install the Lower retaining Bracket to the mounting 

surface with appropriate hardware and slots. Locate 
the bracket on the mounting surface using the 
locating marks made when it was on the display.

• Hang the display on the mounting bracket.
• Secure the display to the lower retaining bracket, 

leave the screws a little loose to allow for adjust-
ment. Use the hardware provided.

• Do not push or pull the display to align it with the 

slotted holes in the lower retaining bracket. If the 
holes do not align, remove the retaining bracket and 
repeat the steps to locate the bracket on the mount-
ing surface.

• Use a level or plumb bob to determine perpendicu-

larity. Move the bottom of the display either in or 
out till the display hangs perfectly straight. Tighten 
the screws on the lower retaining bracket.

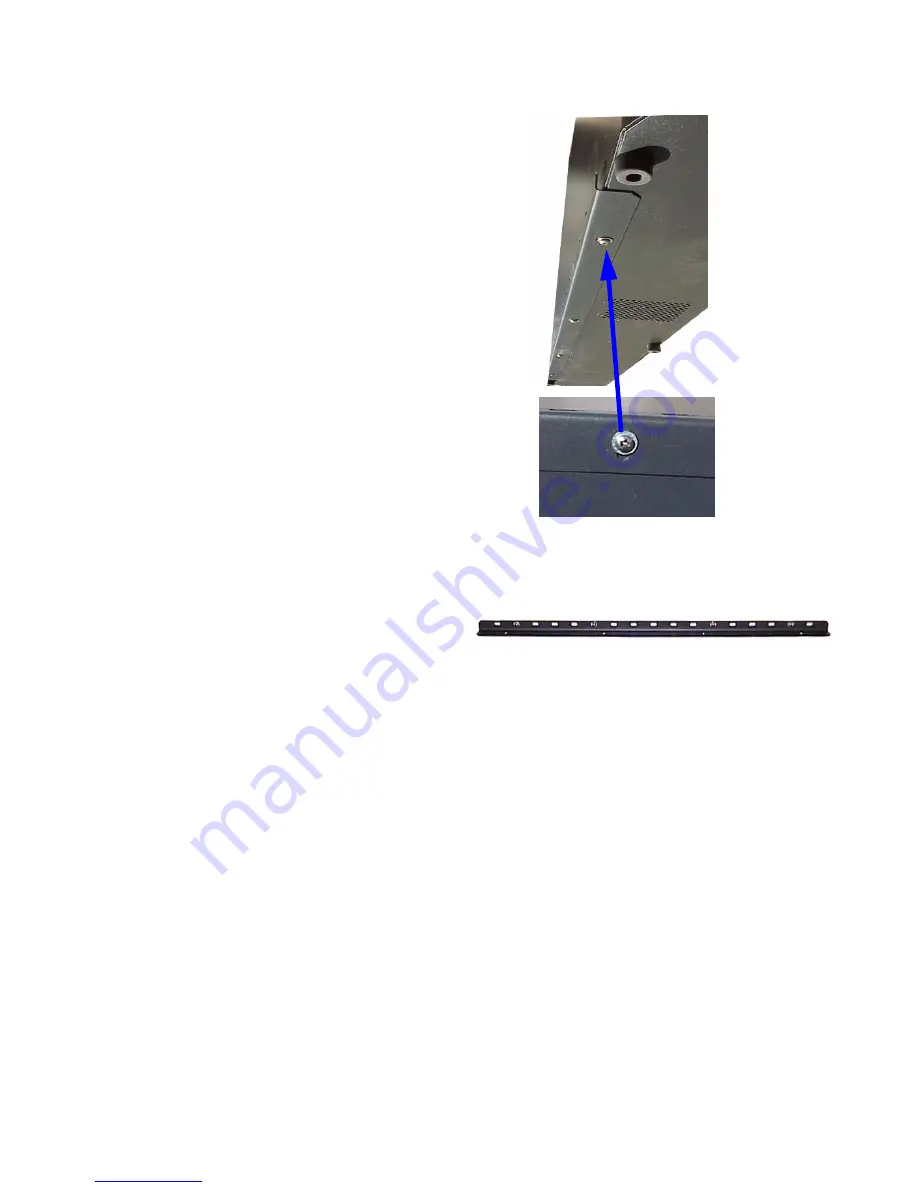
Lower retaining bracket installed on the bottom  
of the 

TD61

. The adjustment slot is shown in the 

blow-up picture.

Lower retaining bracket attached to mounting surface.

Downloaded from 

www.Manualslib.com


manuals search engine


Содержание TD61

Страница 1: ...TD 61 USER S GUIDE Downloaded from www Manualslib com manuals search engine...

Страница 2: ...ause birth defects or other reproductive harm Wash hands after handling Warning This product has a lamp which contains a very small amount of mercury Dispose of it as required by local state or federa...

Страница 3: ...6 2 3 Installing the TD61 18 2 4 Connecting Source Cables 20 2 5 Connecting RS232 RS485 Cables 22 3 Adjusting 23 3 1 Aligning the Image 24 3 2 Adjusting TD61 To Its Source 28 3 3 What Does Colorspace...

Страница 4: ...50 5 Maintenance 51 5 1 Changing a Lamp 52 5 2 Changing the Air Filter 54 6 Reference Section 55 6 1 Remote Control Functions 56 6 2 Menus Structures 60 6 3 TD61 Drawings 84 6 4 Connector Wiring 86 6...

Страница 5: ...3 1 Introduction 1 1 About the TD61 4 1 2 Accessories for TD61 6 1 3 Using the Remote Control 8 1 4 Your Safety is Important 10 Downloaded from www Manualslib com manuals search engine...

Страница 6: ...Video input is available using a standard 4 pin Din connector A component video input is available as Y Pb Pr on three RCA connectors color coded green blue and red A composite video input is availabl...

Страница 7: ...5 Downloaded from www Manualslib com manuals search engine...

Страница 8: ...s 2 screw 4 Wall Mounting Bar 1 Lower Retaining Bracket 1 Remote Control with batteries 1 Quick Start Card T25 L Key Torx Wrench RemovableI Ocover Customer furnished parts If you will be controlling t...

Страница 9: ...Remote Control T 25 L Key Torx Wrench VGA Cable Lower Retaining Bracket Wall Mounting Bracket Removable I O Cover DB9 RJ45 Adapter 8 32x3 8 pan head screws Downloaded from www Manualslib com manuals...

Страница 10: ...ontrol Later RS232 control may be used The remote control shown below lets you control the TD61 and get it setup and adjusted initially For a complete description of remote control func tions See 6 1...

Страница 11: ...9 Downloaded from www Manualslib com manuals search engine...

Страница 12: ...WARNING Possible UV exposure Use protective eye wear while operating with viewing screen removed CAUTION There are no user serviceable parts inside Refer all repair and maintenance to a qualified ser...

Страница 13: ...11 Hot Surface Downloaded from www Manualslib com manuals search engine...

Страница 14: ...12 Downloaded from www Manualslib com manuals search engine...

Страница 15: ...llation 2 1 What You Will Do 14 2 2 Unpacking the TD61 16 2 3 Installing the TD61 18 2 4 Connecting Source Cables 20 2 5 Connecting RS232 RS485 Cables 22 Downloaded from www Manualslib com manuals sea...

Страница 16: ...the TD61 on its back or face 3 Connect the source cables Data Video Audio 20 4 Connect control cables if needed RS232 RS485 22 5 Connect Power 20 6 Turn on power switch 24 7 Press the on button on the...

Страница 17: ...15 Downloaded from www Manualslib com manuals search engine...

Страница 18: ...ay want to install the wall mounting bracket from the accessory kit on a wall or optional stand before unpacking the rest of the way This would provide a safe place for the TD61 once 3 Remove the thre...

Страница 19: ...17 Downloaded from www Manualslib com manuals search engine...

Страница 20: ...1 there must be bolts placed within 7 5 inches from each end The inset on the illustration highlights a pin on the main wall mounting bracket that mates with a hole in the slot on the back of the TD61...

Страница 21: ...priate hardware and slots Locate the bracket on the mounting surface using the locating marks made when it was on the display Hang the display on the mounting bracket Secure the display to the lower r...

Страница 22: ...a yellow RCA connector S Video on a 4 pin DIN connector and Component video on red Pr green Y and blue Pb RCA connectors All three are compatible with NTSC PAL and SECAM Audio Connections There are t...

Страница 23: ...21 TD61 Signal Input Panel Left Side View Data Inputs Control Inputs and Loop thru Video Inputs Audio Inputs and Outputs Downloaded from www Manualslib com manuals search engine...

Страница 24: ...tter which unit this is Connect this first TD61 s RS485 Out to the next unit s RS485 In Start with RS232 and loop all the rest with RS485 The last display in a group should not usually need terminatio...

Страница 25: ...e 28 3 2 1 Adjusting to Computer Sources 30 3 2 2 Adjusting to Video Sources 32 3 3 What Does Colorspace Mean 34 3 4 Color Balancing TD61 36 3 5 Scaling and Cropping 38 3 6 Saving Your Work and Recall...

Страница 26: ...f your TD61 the effective resolution window may also shift The Image Alignment menu allows adjustment of the effective resolution in order to compensate for any minor variations that may occur after f...

Страница 27: ...is be done by adjusting the small mirror behind the center access panel Use the supplied Torx wrench to make the adjust ments Loosening all three screws exactly the same amount will make the image bi...

Страница 28: ...or in to compensate for the bowing The images at the right show the location of these screws 1 Loosen the three screws at the top of the screen 2 Grip the edge of the screen at the top and If the imag...

Страница 29: ...T menu select PAN IMAGE A Pan Image adjustment box I will open as shown below When Pan Image is selected remote control arrow keys will move the image up and down or left and right allowing you to cen...

Страница 30: ...evel relate to Color Balance If you have more than one TD61 in the area and you want them to display identical colors you need to adjust input levels and do color balancing You can do Input Levels fir...

Страница 31: ...29 Downloaded from www Manualslib com manuals search engine...

Страница 32: ...nu 3 4 Color Balancing TD61 on page 36 Adjusting levels completely automatically Open the AUTO SETUP OPTIONS menu and check DO BLACK WHITE LEVELS You can check the other items too particularly FREQUEN...

Страница 33: ...31 I Downloaded from www Manualslib com manuals search engine...

Страница 34: ...her TD61 s so they have the same values for Contrast Brightness Saturation and Hue as the first TD61 Adjusting with color bars 1 If possible use a color bar pattern from the video source you will use...

Страница 35: ...atch these Adjust Saturation so the outside bars match when Blue Only is checked Hue Match these Match these Adjust Hue so the inside bars match when Blue Only is checked Downloaded from www Manualsli...

Страница 36: ...lled YUV and sometimes called component video DVD players often have a set of three component video connectors This makes a picture of substantially higher quality than the single conductor Video Out...

Страница 37: ...is not nec essary to completely understand these waveforms However it should be clear that if the TD61 is set for one type say RGB and the signal is of the other type YPbPr the TD61 would process the...

Страница 38: ...ct ing ADVANCED OPTIONS COLOR BALANCE 3 If color temperature is important you should first set the color temperature If it is not important start with the default 6500K which yields the brightest disp...

Страница 39: ...ou can t decide which way to go or how to get this display closer to the others try any change If it is the wrong change it will be quickly obvious and you can go back Use the clipboard Color balance...

Страница 40: ...he display all around even if this means stretching and distorting the picture in one direction Letterbox Pillarbox means expand the picture until the first edges top bottom or left right touch the bo...

Страница 41: ...all the way out to the edges When shown on our dis play you may see black bars lines of white or other non picture information on the edges of an image Use the overscan setting to avoid seeing this V...

Страница 42: ...adjustments listed in this section Then press the SAVE button twice This opens the Save grid Navigate to an unchecked slot number or to a checked slot if you want to overwrite what s already saved Pre...

Страница 43: ...41 ENTER ENTER Downloaded from www Manualslib com manuals search engine...

Страница 44: ...42 Downloaded from www Manualslib com manuals search engine...

Страница 45: ...perating 4 1 Normal Start Up 44 4 2 Reading the Alpha Numeric Display 46 4 3 Controlling TD61 with Remote 48 4 4 Controlling TD61 with RS232 RS485 50 Downloaded from www Manualslib com manuals search...

Страница 46: ...ence At the end of the 45 seconds the lamp will turn on and the lamp fans will start if AUTO LAMP is on It shortens lamp life to turn it on when it is hot so the fans run for a minute or so to be sure...

Страница 47: ...45 Downloaded from www Manualslib com manuals search engine...

Страница 48: ...allast voltage to the lamp has failed Opt Engine Com optical engine is no longer communicating with the electronics module Lamp Failed lamp not striking Cooling Down xx xx is a countdown of the num be...

Страница 49: ...47 Downloaded from www Manualslib com manuals search engine...

Страница 50: ...ill appear as the last character of the LCD dis play If the signal is not accepted or understood an X will appear For a complete list of all remote actions see 6 1 Remote Control Functions on page 56...

Страница 51: ...49 Downloaded from www Manualslib com manuals search engine...

Страница 52: ...o address a single display use the specific ID of that display such as A6 or 00 or 1B To address all the displays with a certain Group ID use an address like 3 which will address all the displays in g...

Страница 53: ...51 5 Maintenance 5 1 Changing a Lamp 52 5 2 Changing the Air Filter 54 Downloaded from www Manualslib com manuals search engine...

Страница 54: ...2 screws at the bottom of the panel and slid ing it to the right 4 Use screwdriver to loosen the captive screw hold ing the lamp in place 5 Remove the defective lamp Note Guide pins are provided to in...

Страница 55: ...53 Downloaded from www Manualslib com manuals search engine...

Страница 56: ...s will give you some idea of how often the filter needs changing If it doesn t need changing after six months inspect again in a year As long as the environment doesn t change you can build an appropr...

Страница 57: ...n 6 1 Remote Control Functions 56 6 2 Menus Structures 60 6 3 TD61 Drawings 84 6 4 Connector Wiring 86 6 5 Regulatory Information 88 6 6 Specifications for TD61 90 Downloaded from www Manualslib com m...

Страница 58: ...6 1 Remote Control Functions The next four pages explain the actions of the remote control Turns the lamp on and off Moves the image on the screen Downloaded from www Manualslib com manuals search eng...

Страница 59: ...57 Starts the process of scanning the input connectors for the next available source See Saving Your Work and Recall ing a Memory on page 40 Downloaded from www Manualslib com manuals search engine...

Страница 60: ...Curtain pattern is selected in the Miscellaneous menu See page 76 Changes the value of the high lighted item In some menus like Picture Position these buttons con trol left right movement The but ton...

Страница 61: ...osition Position these button control up down movement Selects the highlighted item If there is an arrow in the item this button goes to that menu Selects the previous menu See Picture on page 60 Down...

Страница 62: ...You cannot adjust Horizontal Frequency in Analog because that is determined by the source so it is grayed out Other items can be adjusted if they are not grayed out Clicking in the Source item opens...

Страница 63: ...rs until they just touch 0 also Do not push this value lower than 0 because the number will not change but the picture will get worse Now display a white picture from the source computer Select the Wh...

Страница 64: ...t often used because most digital sources don t need them Reset is a button that will return the system to the default values for digital sources When the source is Digital and the colorspace is YPbPr...

Страница 65: ...milar controls on television receivers although PAL and SECAM receivers do not use a hue control The Blue Only check box is for adjusting the picture with color bars from the source See 3 2 2 Adjustin...

Страница 66: ...Position Press the SIZE POS to access the PIcture Position menu directly From the Main Menu select Position to access the Picture Position menu Downloaded from www Manualslib com manuals search engin...

Страница 67: ...ect ratio to display compressed DVDs correctly All of the picture is shown Justify moves the picture to the top middle or bottom or to the left center or right This has no function when the Scale Mode...

Страница 68: ...an t land on them Press ENTER to open the Recall detail menu The detail menu shows what will be recalled when you press ENTER again When Current appears in the Slot to Recall line it means that the TD...

Страница 69: ...n it To save highlight Save Now and press ENTER A Current notice will appear in Save to Slot to indicate that the save was successful and that the slot now con tains exactly what the TD61 is doing now...

Страница 70: ...akers It does not affect line out Balance use the keys on the remote control to adjust the balance between both internal and external speakers Line Out Balance use the keys on the remote control to ad...

Страница 71: ...amp fails you can t see this menu Mode ID Each mode has a number and this is the number of the one used now For XGA for instance there are several each with a different vertical fre quency number of a...

Страница 72: ...f which this display is a member such as a command addressed to 3 when this display s group ID 3 Not This display a command meant for one or more other displays in this circuit but not this one such a...

Страница 73: ...MONITOR four times to open the Test Patterns menu To set a custom test pattern color select Custom Color from the Test Pattern menu The Custom Test Pattern Color menu will appear on a neutral gray ba...

Страница 74: ...n this menu It is for refer ence only The Setup Summary menu looks different for digital or video sources Slot is only visible when the current settings are exactly the ones in a numbered memory slot...

Страница 75: ...re out of spec 3 Temperature critical 4 7 Temperature ok Pulse Plateau Ratio Current to the lamp consists of alternating negative and positive plateau s each followed by a pulse Software Version Versi...

Страница 76: ...ime the optics have the lamp on that is how long light has gone through the optical parts of the TD61 Lamp is supposed to be the amount of time the lamp has been on but it may be only the amount of ti...

Страница 77: ...constant as you adjust the brightness For example if you have the color set at Red 100 Green 80 and Blue 40 and adjust down 10 clicks you will wind up with Red 90 green 72 and Blue 36 The color has re...

Страница 78: ...re when attached to our display you can try disabling Plug and Play and rebooting the computer to see if it acts any better Normally Plug and Play should be enabled EDID for Digital Analog 2 allows yo...

Страница 79: ...A rapid on off on sequence may reduce lamp life Also the lamp should be allowed to heat up for at least five minutes before turning them off Before shutting down due to a missing source TD61 will sear...

Страница 80: ...600 or 19200 Terminate RS 485 adds electrical termination to the RS485 Should not normally be needed Group ID can be 0 9 A Z caps only Unit ID can be 0 9 A Z caps only In combination this gives 1296 u...

Страница 81: ...er if this is unchecked the system will not correctly set up the signal if you change resolutions Do Black White Levels automatically adjusts the lightest and darkest pixels to be white and black This...

Страница 82: ...ou to choose the Grid pattern the alignment pattern or none Reset to Default resets the image to factory resolu tion Illuminate Border turns the border outside the image green If the green border is v...

Страница 83: ...Options Position Press the SIZE POS to access the PIcture Position menu directly From the Main Menu select Position to access the Picture Position menu Downloaded from www Manualslib com manuals searc...

Страница 84: ...of the menus on the screen Menu Timeout sets how long menus will remain on the screen before disappearing on their own The choices are 5 15 and 60 seconds and Never Time Out which keeps the menu on in...

Страница 85: ...83 Drawings Program Information The middle section shows the native resolution of the TD61 and the Revision number of the firmware Downloaded from www Manualslib com manuals search engine...

Страница 86: ...84 6 3 TD61 Drawings TD61 Front View Dimensions in inches Downloaded from www Manualslib com manuals search engine...

Страница 87: ...85 Left Side View Rear View Signal Input Panel LCD Display Downloaded from www Manualslib com manuals search engine...

Страница 88: ...the two connectors is the same left to right the cable is straight thru The order of the colors doesn t matter as long as they are both the same DB15 standard VGA connector Yellow wire pin 3 Black wi...

Страница 89: ...NC DDC Clk DDC Data Analog VSync TMDS Data1 TMDS Data1 TMDS Data 1 3 Shield NC NC 5V Power 15 16 17 18 19 20 21 22 23 24 C1 C2 C3 C4 C5 G O I I I G I I I I I I G GND 5V Hsync Vsync Hot Plug Detect 1K...

Страница 90: ...tructions may cause harmful interference to radio communications However there is no guarantee that interference will not occur in a particular installation If this equipment does cause harmful interf...

Страница 91: ...89 Downloaded from www Manualslib com manuals search engine...

Страница 92: ...5 cm Electrical and Heat Specification Maximum Minimum Typical Notes Video input amplitude Component YPbPr Input 1 0 V p p 714 Vp p 0 5 V p p 75 ohm termination Conforming to standards 480i 480p 720p...

Страница 93: ...ng Device 0 8 HD2 12 degree DMD Native Resolution 1280 x 720 Color Wheel 6 segment RGB spinning up to 5X display frame rate Resolution Resolution Horizontal Native 1280 Pixels Resolution Vertical Nati...

Страница 94: ...l engine tolerances and 4 pixels due to chassis screen tol erances Focus Focus Quality 3 Grade Scale 1 Grade Scale 2 Grade Scale IFC Focus Pattern 2 meters from screen 9 locations Audio Audio inputs 3...

Страница 95: ...90 Color Balance Hide menu 36 color balance menu 75 color balancing 28 36 color bars adjusting video with 32 colorspace 34 61 62 commands received 70 computer source adjusting to 28 30 computer sourc...

Страница 96: ...white level 30 manufacturer s address 88 mechanical specifications 90 memory current data in 67 number of 67 overwriting a 67 recalling a 66 saving to a 67 slots 66 67 menu auto setup options 79 color...

Страница 97: ...pping weight lbs 90 signal lost retry on 79 slot memory 66 67 name of 67 source button 57 selecting 60 source computer adjusting to 30 source video adjusting to 32 Speaker Enable 68 specifications ele...

Страница 98: ...96 Downloaded from www Manualslib com manuals search engine...

Страница 99: ...ing shipping lightning or other acts of nature misuse neglect smoke exposure cigarette or otherwise accident unusual physical or electrical stress and or power surges unauthorized modifications includ...

Страница 100: ...d by a written letter that i explains the problem ii provides proof of date of purchase iii provides the dealer s name and iv provides the model and serial number of the Product Upon request of InFocu...

Страница 101: ...at www infocus com service Many resources are available on our website Some examples are Frequently Asked Questions about general projector usage and technical issues E mail support Online product re...

Страница 102: ...infocus com In Europe InFocus International BV Strawinskylaan 585 1077 XX Amsterdam The Netherlands Phone 31 20 579 2000 Fax 31 20 579 2999 In Asia 238A Thomson Road 18 01 04 Novena Square Singapore 3...

Отзывы: