


22
SET CAMERA ID
CAMERA SETUP
SET AE MODE
OSD SETUP
HOME RETURN
CONTROL SET
AUTOPAN SET
PATTERN SET
AREA SET
DEFAULT SET
EXIT
AREA NO :
TITLE :
DISPLAY :
AREA SET
RETURN
001
OFF
Gate 10
AREA NO
Function:
Select an area to define its title and on-screen display
status.
Options:
1 ~ 16.
The high-speed PTZ cameras support a total of
16 areas. Each area may have a unique description label.
.
TITLE
Function:
Edit a description title (up to 16 characters) for the
selected area.
Operation:
A total of 62 characters, including English letters in
upper and lower cases, as well as numbers from 0 to 9,
are available for editing the area title. Spaces can also be
created to separate description words.
To edit a description title,
1. Move the cursor to the first entry of the TITLE item;
2. Deflect the joystick downward (or upward) to select a suitable
character (or a space);
3. Move the cursor to the next entry;
4. Repeat Steps 2 through 3 until the whole title has been edited.
DISPLAY
Function:
Enable/disable the on-screen title description for the
selected area.
Options:
ON -
turn on the accompanying description label.
OFF -
(default) turn off the accompanying description
label.
AREA SET
Function:
This menu item is used to access the menu for setting
area boundaries. Details are addressed below.
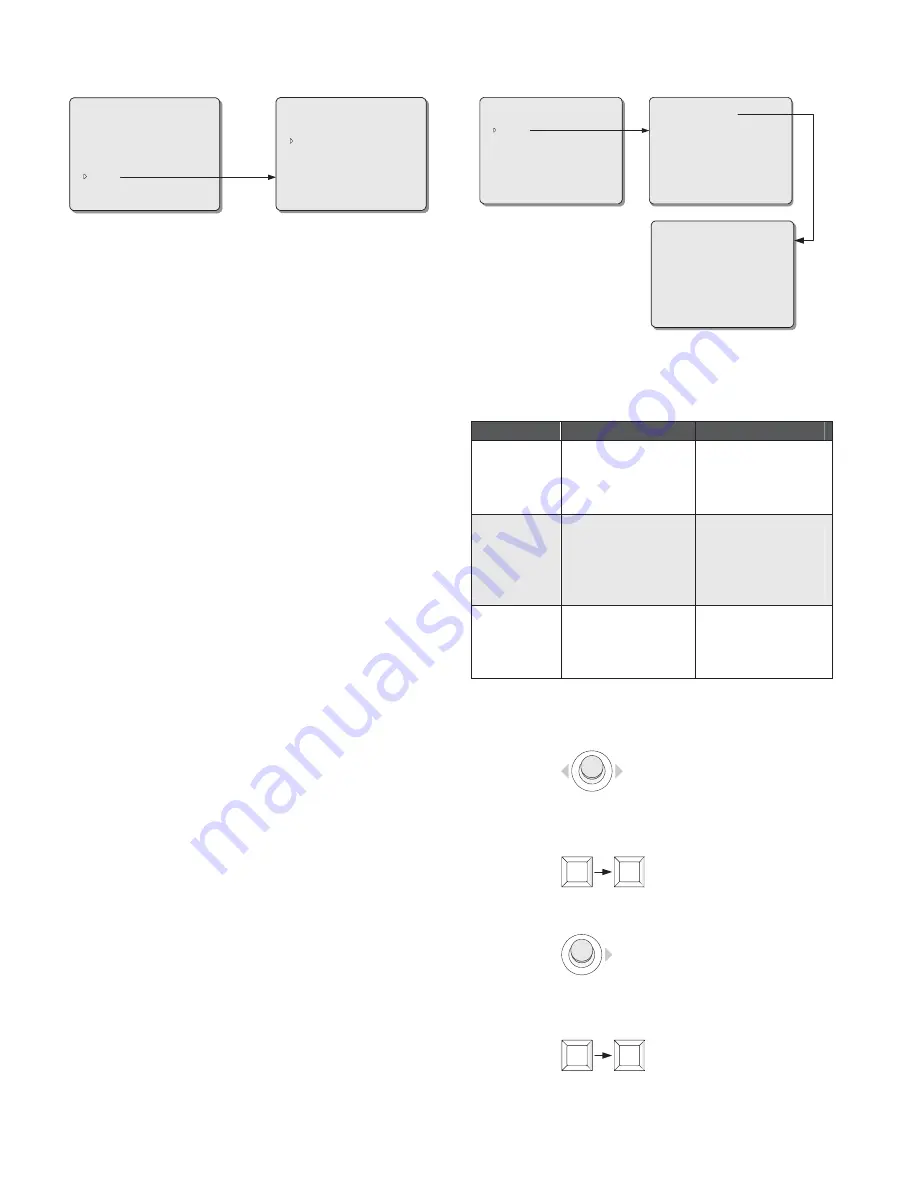
How to set area boundaries
When access to AREA SET menu, the menu for setting area
boundaries will be displayed, offering on-screen instructions for the
operation.
BEGIN SET AREA
1 PRESET BEGIN
3 PRESET EXIT
AREA NO :
TITLE :
DISPLAY :
AREA SET
RETURN
001
Gate 10
OFF
AREA NO: 001
2 PRESET SET BORDER
3 PRESET END
PAN RIGHT ONLY
PAN RIGHT ONLY
Code Commands: (see Table 3)
Table 3
Commands
Operations
Functions
"1,
SHOT"
Enter "1" on the
numeric keypad, and
then press the SHOT
key.
Start the setting
operation, and set the
starting boundary for
the first area.
"2, SHOT"
Enter "2" on the
numeric keypad, and
then press the SHOT
key.
Set the ending
boundary for the
current area (the
starting boundary for
its next area).
"3,
SHOT"
Enter "3" on the
numeric keypad, and
then press the SHOT
key.
Designate the current
area as the last, and
finish the setting
operation.
To define boundaries for required areas
1. Deflect the joystick to move the camera to the starting boundary
of the first area.
2. Enter code commands “1, SHOT” to start the setting operation.
The current position will be defined as the starting boundary for
the first area.
1
SHOT
3. Move the camera to the right until the ending boundary of the
area is displayed.
4. Enter code commands “2, SHOT” to set the current position as
the ending boundary for this area. This position is also the
starting boundary for the next area.
2
SHOT