background image

10

GB

Start-up and use

!

 The position of the corresponding gas burner is shown on every knob.

Gas burners

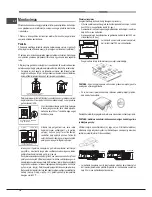
Each burner can be adjusted to one of the following settings using the 

corresponding control knob:

● 

Off

 Maximum

 Minimum

To light one of the burners, hold a lit match or lighter near the burner and, at 

the same time, press down and turn the corresponding knob anti-clockwise 

to the maximum setting.

Since the burner is fitted with a safety device, the knob should be pressed 

for approximately 2-3 seconds to allow the automatic device keeping the 

flame alight to heat up.

Models are equipped with an ignition button incorporated into the control 

knob. If this is the case, the ignitor is present, but not the button. To light a 

burner, simply press the corresponding knob all the way in and then turn it 

in the counter-clockwise direction to the “High” setting, keeping it pressed 

in until the burner lights.

!

 If a flame is accidentally extinguished, turn off the control knob and wait for 

at least 1 minute before trying to relight it.

To switch off the burner, turn the knob in a clockwise direction until it stops 

(when reaches the “●” position).

Practical advice on using the burners

To ensure the burners operate efficiently:

•  Use appropriate cookware for each burner (see table) so that the flames 

do not extend beyond the bottom of the cookware.

•  Always use cookware with a flat base and a cover.

•  When the contents of the pan reach boiling point, turn the knob to minimum.

Rapid (R)
Semi Rapid (S)
Auxiliary (A)

Ø Cookware Diameter (cm)

24 - 26
16 - 22

8 - 14

Burner

To identify the type of burner, refer to the designs in the section entitled, “Burner 

and Nozzle Specifications”.

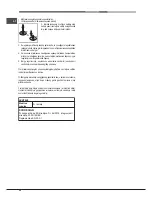
•  For maximum stability, always make sure that the pan supports are 

correctly fitted and that each pan is placed centrally over the burner.

•  Pan handles should be positioned in line with one of the support bars on 

the pan support grid.

•  Pan handle should be positioned so not to protrude beyond the front edge 

of the hob. 

The more variable aspect in terms of pan 

stability can often be the pan itself, (or 

the positioning of that pan during use). 

Well balanced pans, with flat bases that 

are placed centrally over the burner, 

with the pan handles aligned with one 

of the support fingers obviously offer the 

greatest stability.

Precautions and tips

!

 This appliance has been designed and manufactured in compliance with 

international safety standards. The following warnings are provided for safety 

reasons and must be read carefully.

General safety

•  This is a class 3 built-in appliance.

•  Gas appliances require regular air exchange to maintain efficient 

operation. When installing the hob, follow the instructions provided 

in the paragraph on “Positioning” the appliance.

•  These instructions are only valid for the countries whose symbols 

appear in the manual and on the serial number plate.

•  The appliance was designed for domestic use inside the home and is not 

intended for commercial or industrial use.

•  The appliance must not be installed outdoors, even in covered areas. It is 

extremely dangerous to leave the appliance exposed to rain and storms.

•  Do not touch the appliance with bare feet or with wet or damp hands and 

feet.

•  The appliance must be used by adults only for the preparation of food, 

in accordance with the instructions outlined in this booklet. Any other 

use of the appliance (e.g. for heating the room) constitutes improper 

use and is dangerous. The manufacturer may not be held liable for 

any damage resulting from improper, incorrect and unreasonable 

use of the appliance.

•  Ensure that the power supply cables of other electrical appliances do not 

come into contact with the hot parts of the oven.

•  The openings used for ventilation and dispersion of heat must never be 

covered.

•  Always make sure the knobs are in the “●”/“

” position when the appliance 

is not in use.

•  When unplugging the appliance always pull the plug from the mains socket, 

do not pull on the cable.

•  Never carry out any cleaning or maintenance work without having detached 

the plug from the mains.

•  In case of malfunction, under no circumstances should you attempt to repair 

the appliance yourself. Repairs carried out by inexperienced persons may 

cause injury or further malfunctioning of the appliance. Contact a Service 

Centre (see Assistance).

•  Do not close the glass cover (if present) when the gas burners or electric 

hotplates are still hot.

•  The appliance should not be operated by people (including children) 

with reduced physical, sensory or mental capacities, by inexperienced 

individuals or by anyone who is not familiar with the product. These 

individuals should, at the very least, be supervised by someone who 

assumes responsibility for their safety or receive preliminary instructions 

relating to the operation of the appliance.

•  Do not let children play with the appliance.

•  The appliance is not intended to be operated by means of an external 

timer or separate remote-control system.

Disposal

•  When disposing of packaging material: observe local legislation so that 

the packaging may be reused.

•  The European Directive 2012/19/EU on Waste Electrical and Electronic 

Equipment (WEEE), requires that old household electrical appliances must 

not be disposed of in the normal unsorted municipal waste stream. Old 

appliances must be collected separately in order to optimise the recovery 

and recycling of the materials they contain and reduce the impact on 

human health and the environment.The crossed out “wheeled bin” symbol 

on the product reminds you of your obligation, that when you dispose of 

the appliance it must be separately collected.

Содержание THA 642 IX/I

Страница 1: ...ord Kasutusjuhend 1 Hoiatused 2 Klienditugi 4 Seadme kirjeldus 5 Paigaldamine 12 Käitamine ja kasutamine 16 Ettevaatusabinõud ja soovitused 16 Hooldus 17 Veaotsing 17 Turinys Naudojimo instrukcijos 1 Įspėjimai 3 Pagalba 4 Prietaiso aprašymas 5 Montavimas 18 Įjungimas ir naudojimas 22 Atsargumo priemonės ir patarimai 22 Techninė priežiūra 23 Gedimų šalinimas 23 Cuprins Lietošanas instrukcija 1 Brīd...

Страница 2: ...e control system CAUTION the use of inappropriate hob guards can cause accidents Hoiatused HOIATUS sisselülitatud seade ja selle juurdepääsetavad osad muutuvad kasutamise ajal kuumaks Olge ettevaatlik ja vältige kontakti kütteelementidega Alla 8 aastased lapsed tuleb hoida seadmest eemal v a juhul kui neile on tagatud pidev järelevalve Vanemad kui 8 aastased lapsed ja isikud kellel on vähenenud fü...

Страница 3: ...ma ATSARGIAI Netinkamųviryklėsapsaugųnaudojimas gali sukelti nelaimingą atsitikimą Brīdinājumi BRĪDINĀJUMS Ierīce un tās atklātās daļas lietošanas laikā stipri sakarst Nepieskarieties sakarsušajāmierīcesdaļām Bērni kuriirjaunākipar astoņiemgadiem drīkstatrastiesierīcestuvumātikai stingrāpieaugušouzraudzībā Ierīcidrīkstlietotbērni kuriirsasniegušiastoņugaduvecumu betpersonas ar ierobežotām fiziskaj...

Страница 4: ...lia seadme mudel Mod seerianumber S N Need andmed leiate seadme andmeplaadilt ja või pakendilt Pagalba Informacija tipas anomalija prietaiso modelis Mod Serijos numeris S N Šią informaciją rasite duomenų plokštelėje kuri yra ant prietaiso ir arba pakuotės Palīdzība Paziņojums tipa anomālija ierīces modelis Mod sērijas numurs S N Šī informācija ir norādīta uz tehnisko datu plāksnītes kas piestiprin...

Страница 5: ...USSEADISseiskabgaasivoolu kuileekpeaksjuhuslikultkustuma 5 4 2 1 3 Prietaiso aprašymas Bendras vaizdas 1 GAMINIMO INDO laikančiosios grotelės 2 DUJŲ DEGIKLIAI 3 DUJINIŲ DEGIKLIŲ valdymo rankenėlės 4 DUJINIŲ DEGIKLIŲ uždegimo funkcija 5 SAUGOS ĮTAISAI DUJINIAI DEGIKLIAI skiriasi dydžiu ir galia Naudokite tokio skersmens gaminimo indus kurie geriausiai tinka tam tikram degikliui DUJINIŲ DEGIKLIŲ val...

Страница 6: ...containingLPGcylindersmustalsobeequippedwithventstoallow gas to escape in the event of a leak As a result LPG cylinders whether partially or completely full must not be installed or stored in rooms or storage areas that are below ground level cellars etc It is advisable to keep only the cylinder being used in the room positioned so that it is not subject to heat produced by external sources ovens ...

Страница 7: ... liability should these safety measures not be observed Gas connection The appliance should be connected to the main gas supply or to a gas cylinder in compliance with current national regulations Before carrying out the connection make sure the cooker is compatible with the gas supply you wish to use If this is not the case follow the instructions indicated in the paragraph Adapting to different ...

Страница 8: ...g using the adjusting screw 5 Oncetheadjustmenthasbeenmade replacethesealsontheby passes using sealing wax or a similar substance If the appliance is connected to liquid gas the regulation screw must be fastened as tightly as possible Once this procedure is finished replace the old rating sticker with one indicating the new type of gas used Stickers are available from any of our Service Centres Sh...

Страница 9: ...REDUCED HEAT CAPACITY kW GAS PRESSURE mbar min rat max 3 00 1 65 1 00 286 l h 167 l h 95 l h 218 g h 127 g h 73 g h 0 75 0 40 0 40 0 75 0 40 0 40 G20 20 mbar 1R 2S 1A 7 30 695 l h 9 52 G30 28 30 mbar 1R 2S 1A 7 30 531 g h 30 94 Type of gas used ELECTRIC SUPPLY 220 240V 50 60Hz 0 6W CATEGORY II2H3 LIQUEFIED PETROLEUM GAS Propane G31 Rapid Semi Rapid Auxiliary 214 g h 125 g h 71 g h 0 75 0 40 0 40 2...

Страница 10: ...tructionsprovided in the paragraph on Positioning the appliance These instructions are only valid for the countries whose symbols appear in the manual and on the serial number plate The appliance was designed for domestic use inside the home and is not intended for commercial or industrial use The appliance must not be installed outdoors even in covered areas It is extremely dangerous to leave the...

Страница 11: ...rrectly in the respective housings When replacing the grids make sure that the panstand area is aligned with the burner Models equipped with electrical ignition plugs and safety device require thorough cleaning of the plug end in order to ensure correct operation Check these items frequently and if necessary clean them with a damp cloth Any baked on food should be removed with a toothpick or needl...

Страница 12: ... suurema võimsuse peale Vedelgaas on õhust raskem ja koguneb seetõttu põranda lähedale Ruumid kuhu on paigutatud vedelgaasi balloonid peavad olema varustatud väljatõmbeventilatsiooniga et juhusliku lekkimise korral saaks gaas läbi selle välisõhku eralduda Seetõttu on keelatud osaliselt või täiesti täis gaasiballoonide paigaldamine või hoidmine ruumides mis on põrandapinnast madalamal keldrites jne...

Страница 13: ... vt osas Keeduplaadi reguleerimine kasutamiseks erinevat tüüpi gaasidega Kui ühendate pliidi vedelgaasiballooniga siis tuleb paigaldada siseriiklike õigusaktide nõuetele vastav reduktor Kontrollige kas gaasi rõhk vastab tabelis nr 1 Põletite ja düüside andmed toodud andmetele Nii on tagatud seadme ohutu ja pikaajaline talitlus ning samas madal energiakulu Ühendamine jäiga toruga vasest või terases...

Страница 14: ...vana andmesilt uue vastu millele on märgitud uue gaasi tüüp Sildid on saadaval kõigis teeninduskeskustes Kui gaasi rõhk erineb kas või veidi soovituslikust rõhust paigaldage sisselasketorule sobiv surveregulaator et seade vastaks kehtivatele riiklikele eeskirjadele Elektriühend used ANDMEPLAAT vt andmeplaadilt See seade on vastavuses EL määrus nr 66 2014 täiendus direktiivile 2009 125 EC EN 30 2 1...

Страница 15: ...GOORIA II2H3B P VEELDATUD NAFTAGAASI Butaan 25 30 35 VEELDATUD NAFTAGAASI Propaan G31 214 g h 118 g h 71 g h 25 30 35 Mudel konfiguratsiooni 4 PÕLETITE Hinnatud küttevõimsus kW Summaarnenominaalne Voolukiirus G20 20 mbar 1R 2S 1A 7 30 695 l h 9 52 G30 30 mbar 1R 2S 1A 7 30 531 g h 30 94 Tüüp gaasi kasutatakse ELEKTRIVARUSTUSE 220 240V 50 60Hz 0 6W Air vajalik m põlemist 1 m gaasi G31 30 mbar 1R 2S...

Страница 16: ...oht toodud juhiseid Need juhised kohalduvad ainult riikide suhtes mille sümbol on kasutusjuhendis ja seadme andmeplaadil See seade on mõeldud toidu valmistamiseks kodus ning ei sobi kasutamiseks äriliseks või tööstuslikuks otstarbeks Seadet ei tohi paigaldada välitingimustesse ka mitte kaetud aladele Äärmiselt ohtlik on jätta seade vihma ja tormi kätte Ärge puudutage keeduplaati paljaste jalatalda...

Страница 17: ...deskõiktoidujäägidjakontrollides etükskipõletiavadesteioleks ummistunud Loputage ja kuivatage Pangepõletidjapõletikattedõigestiomavastavatessekohtadessetagasi Restide tagasipanemisel jälgige et toidunõu toetumisala oleks põletiga samal joonel Elektrilistesüüteküünaldejaturvaseadmegavarustatudmudelidnõuavad korrektse töötamise tagamiseks küünla otsa põhjalikku puhastamist Kontrolligeneidelementesag...

Страница 18: ...tosiosdujosnusėdaantgrindų nesyrasunkesnėsužorą Todėl patalpos kurioseyraSNDbalionų taippatturibūtisuventiliacijosangomis kadatsiradusnuotėkiuidujosišeitų SNDbalionai pilniarišdaliespripildyti negali būti montuojami ar laikomi patalpose arba saugyklose kurios yra po žeme pvz rūsyje Patartina patalpoje palikti tik naudojamą balioną Balionasturibūtipastatytastaip kadnebūtųveikiamasšilumąskleidžianči...

Страница 19: ... atsakomybės jei nesilaikoma šių saugos nurodymų Dujų prijungimas Prietaisas turi būti jungiamas prie pagrindinės dujų tiekimo jungties arba dujų baliono laikantis šiuo metu šalyje galiojančių reikalavimų Prieš jungdami įsitikinkite kad viryklė yra suderinama su dujų tiekimo jungtimi kurią norite naudoti Jei ji nesuderinama laikykitės instrukcijų nurodytų punkte Pritaikymas prie įvairių tipų dujų ...

Страница 20: ... reguliavimo varžtu padidinkite liepsną 5 Baigę reguliavimą apylankose pakeiskite sandariklį naudodami sandarinimo vašką arba analogišką priemonę Jei prietaisas prijungtas prie suskystintųjų dujų šaltinio nustatymo varžtas turi būti priveržiamas kuo tvirčiau Užbaigę šią procedūrą senąjį lipduką pakeiskite nauju kuriame nurodoma jog naudojamos naujo tipo dujos Lipdukų galite gauti bet kuriame mūsų ...

Страница 21: ...s konfigūracija 4 DEGIKLIAI Nominali Šildymo galia kW Totalnominali vartojimas 3 3 G20 20 mbar 1R 2S 1A 7 30 695 l h 9 52 G30 30 mbar 1R 2S 1A 7 30 531 g h 30 94 Tipas dujų naudojamas MAITINIMO ŠALTINIS 220 240V 50 60Hz 0 6W Reikalingas oras m dujų degimo 1 m G31 30 mbar 1R 2S 1A 7 30 521 g h 30 94 218 g h 120 g h 73 g h 3 00 1 65 1 00 Greitas Pusiau greitas Papildomas SUSKYSTINTŲ DUJŲ Butanas G30...

Страница 22: ...niams prietaisams kad normaliai dirbtų reikia reguliarios oro apykaitos Montuodami kaitlentę laikykitės instrukcijų pateiktų dalyje apie prietaisų padėtį Nurodymai galioja tik šalyse kurių simboliai pateikti instrukcijoje ir serijos numerio plokštelėje Prietaisas naudotinas namuose jis neskirtas pramoninei ar komercinei panaudai Prietaiso negalima įrengti lauke net ir dengtose vietose Labai pavoji...

Страница 23: ...inkite ar neužsikimšusios degiklių angos Nuskalaukite ir nudžiovinkite Vėl teisingai uždėkite degiklius ir antgalius ant jų korpusų Kaiuždedategroteles įsitikinkite kadkeptuvėspadėklosritisyraišlygiuota su degikliu Modeliussuelektriniaisdegimokištukaisirapsauginiuįtaisureikiaatidžiai nuvalyti ties kištuko galu kad jie veiktų tinkamai Juos dažnai patikrinkite prireikusnuvalykitedrėgnuskudurėliu Pri...

Страница 24: ...dīta Sašķidrinātānaftasgāzeizplūstuzgrīdas jotāirsmagākapargaisu Tādēļ telpām kurāstiekglabātiLPGbaloni irjābūtaprīkotāmarventilācijasejām lainoplūdesgadījumā gāzevarētutiktizvadīta Šāiemesladēļgandaļēji ganpilnīgipiepildītosLPGbalonusnedrīkstierīkotvainovietotglabāšanai telpās vai noliktavās kas atrodas zem pirmā stāva līmeņa pagrabos un tamlīdzīgās vietās Telpā ir ieteicams glabāt vienīgi balonu...

Страница 25: ...nas dēļ Gāzes pievienošana Ierīce galvenajai gāzes padevei vai gāzes balonam ir jāpievieno saskaņā ar spēkā esošajiem valsts normatīvajiem aktiem Pirms pievienošanas pārliecinieties ka plīts ir saderīga ar gāzes padevi kuru vēlaties izmantot Ja tā nav izpildiet instrukcijas kuras norādītas sadaļā Pielāgošana dažādiem gāzes veidiem Ja izmantojat sašķidrināto gāzi no balona ierīkojiet spiediena regu...

Страница 26: ...liesma ir noregulēta nomainiet apvadu blīvējumu izmantojot hermetizējošu smēri vai līdzīgu vielu Ja plīts ir pievienota sašķidrinātas gāzes padevei regulēšanas skrūve ir jāpievelk pēc iespējas ciešāk Kad procedūra ir pabeigta nomainiet veco tehnisko datu uzlīmi ar jaunu uz kurasnorādītsjaunaisgāzesveids Uzlīmesirpieejamasmūsuservisacentros Jaizmantotāsgāzesspiediensircitāds vaimazlietatšķirīgs nek...

Страница 27: ...patēriņš nominal G20 20 mbar 1R 2S 1A 7 30 695 l h 9 52 G30 30 mbar 1R 2S 1A 7 30 531 g h 30 94 Veids izmantojamā gāze ELEKTROAPGĀDES 220 240V 50 60Hz 0 6W Air nepieciešams m gāzes sadegšanas 1m G31 30 mbar 1R 2S 1A 7 30 521 g h 30 94 286 l h 157 l h 95 l h 0 75 0 40 0 40 SAŠĶIDRINĀTĀ NAFTAS GĀZE Butāns Ātrdarbīgums Daļējs ātrdarbīgums Papildu 85 63 50 3 00 1 65 1 00 0 75 0 40 0 40 25 30 35 SAŠĶID...

Страница 28: ...ērojiet instrukcijas kas norādītas sadaļā ierīces Novietošana Šī instrukcija attiecas tikai uz tām valstīm kas ir minētas rokasgrāmatā un ierīces sērijas numura plāksnītē Ierīce ir paredzēta lietošanai iekštelpās mājsaimniecības nevis komerciālām vai ražošanas vajadzībām Ierīci nedrīkst uzstādīt ārpus telpām pat tad ja plīts uzstādīšanas vieta ir nosegta Pakļaut ierīci lietus un nokrišņu iedarbība...

Страница 29: ...gļa atvere nav nosprostota Noskalojiet un nosusiniet Degļus un to vāciņus uzstādiet atpakaļ pareizi attiecīgajos korpusos Uzliekot atpakaļ režģus pārliecinieties vai pannu novietošanas zona ir salāgota ar degli Modeļiem ar elektriskās aizdedzes spraudņiem un drošības ierīci nepieciešama pamatīga spraudņa gala tīrīšana lai nodrošinātu pareizu darbību Bieži pārbaudiet šos elementus un pēc nepiecieša...

Страница 30: ...30 LV ...

Страница 31: ...LV 31 ...

Страница 32: ...32 LV 195141979 00 06 2016 XEROX FABRIANO Indesit Company S p A Viale Aristide Merloni 47 60044 Fabriano AN www indesit com ...

Отзывы: