background image


26 

Содержание Powerhouse Elite PHE 9000

Страница 1: ...er Assembly Instruction Parts List Warranty Ordering Parts Model PHE 9000 Retain This Manual for Reference 03 17 04 OWNER S MANUAL POWERHOUSE ELITE SMITH MACHINE PHE 9000 IMPEX FITNESS PRODUCTS 14777...

Страница 2: ...IMPEX FITNESS PRODUCTS For your safety and benefit read this manual carefully before using the machine As a manufacturer we are committed to provide you complete customer satisfaction If you have any...

Страница 3: ...DO NOT wear robes or other clothing that could become caught in the machine Running or aerobic shoes are also required when using the machine 7 Use the machine only for its intended use as described...

Страница 4: ...SMITH MACHINE HARDEWARE PACK 3...

Страница 5: ...SMITH MACHINE HARDEWARE PACK 4...

Страница 6: ...SMITH MACHINE HARDEWARE PACK 5...

Страница 7: ...Attach the Middle Vertical Frame 4 the Rear Base Frame 5 and the Foot Plate 8 to the Cross Brace 3 Align the holes and secure them together with two M10 x 3 Carriage Bolts 76 Washers 87 and M10 Aircr...

Страница 8: ...D through H to install the other side J NOTE Help of another person for this step is strongly recommended Place the Lifting Sleeve 12 in between the two Safety Stop Frames 9 Align the holes and inser...

Страница 9: ...DIAGRAM2 8...

Страница 10: ...t Bar Frame Bracket 15 onto the Rear Middle Vertical Frame 4 14 Secure it to the Rear Vertical Frame 14 with two M10 x Allen Bolts 73 and Washers 87 Secure it to the Middle Vertical Frame 4 with one M...

Страница 11: ...ecure them with two M10 x 5 3 8 Allen Bolts 66 four Washers 87 and two M10 Aircraft Nuts 88 C Secure each Lat Bar Frames to the front of the Bracket from each side with two M10 x 2 3 8 Carriage Bolts...

Страница 12: ...ne Lock Ring 64 M6 x 3 8 Allen Bolt 84 and M6 Aircraft Nut 90 C Attach the Butterfly Arm Pad 34 to the Left Butterfly Secure it with two M8 x 2 Allen Bolts 74 and 5 8 Washers 89 D Repeat the Procedure...

Страница 13: ...CABLE LOOP DIAGRAM 12...

Страница 14: ...M10 Aircraft Nut 88 F Draw the Cable around the back Pulley then upward to the open bracket underneath the Lat Bar Frame Bracket 15 Attach a Single Pulley Bracket 98 to the bracket Secure it with one...

Страница 15: ...DIAGRAM 6 14...

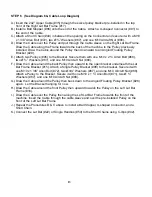
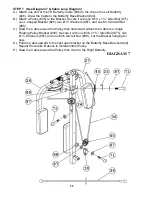
Страница 16: ...ashers 87 and one M10 Aircraft Nut 88 C Draw the Cable around the Pulley then downward Attach the Cable to a Single Floating Pulley Bracket 30 Secure it with one M10 x 1 Allen Bolt 71 two Washers 87 a...

Страница 17: ...to a Double Floating Pulley Bracket 29 Install a Pulley to the upper bracket D Draw the Cable around the Pulley and upward to the Angled Floating Pulley Bracket 28 previously installed in Step 6 Insta...

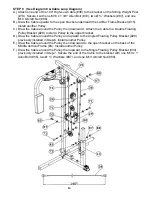
Страница 18: ...then upward to the Double Floating Pulley Bracket 29 previously installed in Step 8 Install another Pulley D Draw the Cable around the Pulley then down to the open bracket on the Rear Base Frame Conne...

Страница 19: ...18...

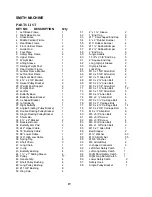
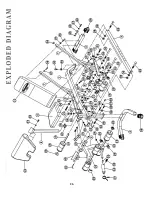
Страница 20: ...y Base 1 73 M10 x Allen Bolt 4 24 Butterfly Base Bracket 1 74 M8 x 2 Allen Bolt 6 25 L shaped Bracket 2 75 M10 x 3 Carriage Bolt 4 26 Left Butterfly 1 76 M10 x 3 Carriage Bolt 2 27 Right Butterfly 1 7...

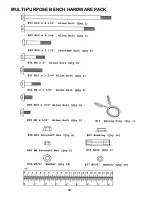
Страница 21: ...MULTI PURPOSE BENCH HARDWARE PACK 20...

Страница 22: ...Secure each end with two M10 x Allen Bolts 30 and Washers 36 Attach a Lock Knob 18 to the Nut underneath the Main Frame 1 B Slide the Sliding Block 8 onto the Incline Adjustment Bar 9 Align the hole...

Страница 23: ...hem with one M10 x 6 Allen Bolt 32 two Washers 36 and one M10 Aircraft Nut 38 Do not over tighten the nut and bolt The Supports need to swivel on the Bolt D Attach two Bushings to the pivot on the Mai...

Страница 24: ...ckrest Board 12 onto the Backrest Supports 7 Secure it with four M8 x 2 Allen Bolts 34 and 5 8 Washers 37 B Place the Seat Pad 11 onto the Seat Support Frames 6 Secure it with four M8 x 2 Allen Bolts...

Страница 25: ...fway through the holes on the Leg Developer 5 Push six Foam Rolls 19 onto the Tubes from both ends Plug six Foam Roll End Caps 20 into the Tubes C Slide the Olympic Sleeve 16 onto the weight post on t...

Страница 26: ...hers 37 Insert the Arm Curl Stand into the front opening on the Main Frame 1 Use the Lock Knob to hold the desired Arm Curl height B The Leg Developer can be locked when doing Sit Up exercises Simply...

Страница 27: ...26...

Страница 28: ...End Cap 6 21 Bushing 16 22 1 5 8 x 3 1 8 End Cap 1 23 1 Cone shaped End Cap 1 24 1 End Cap 1 25 1 5 8 x 2 3 8 End Cap 2 26 1 5 8 x End Cap 12 27 2 Sleeve 3 28 2 Stabilizer End Cap 4 29 M10 x 2 Carria...

Страница 29: ...or other damages with respect to any economic loss loss of property loss of revenues or profits loss of enjoyments or use costs of removal installation or other consequential damages or whatsoever na...

Отзывы: