US
DRAFTER 550 PRO
F
ES
USER MANUAL
MANUEL D‘UTILISATION / MANUAL DE USO
US331000000015
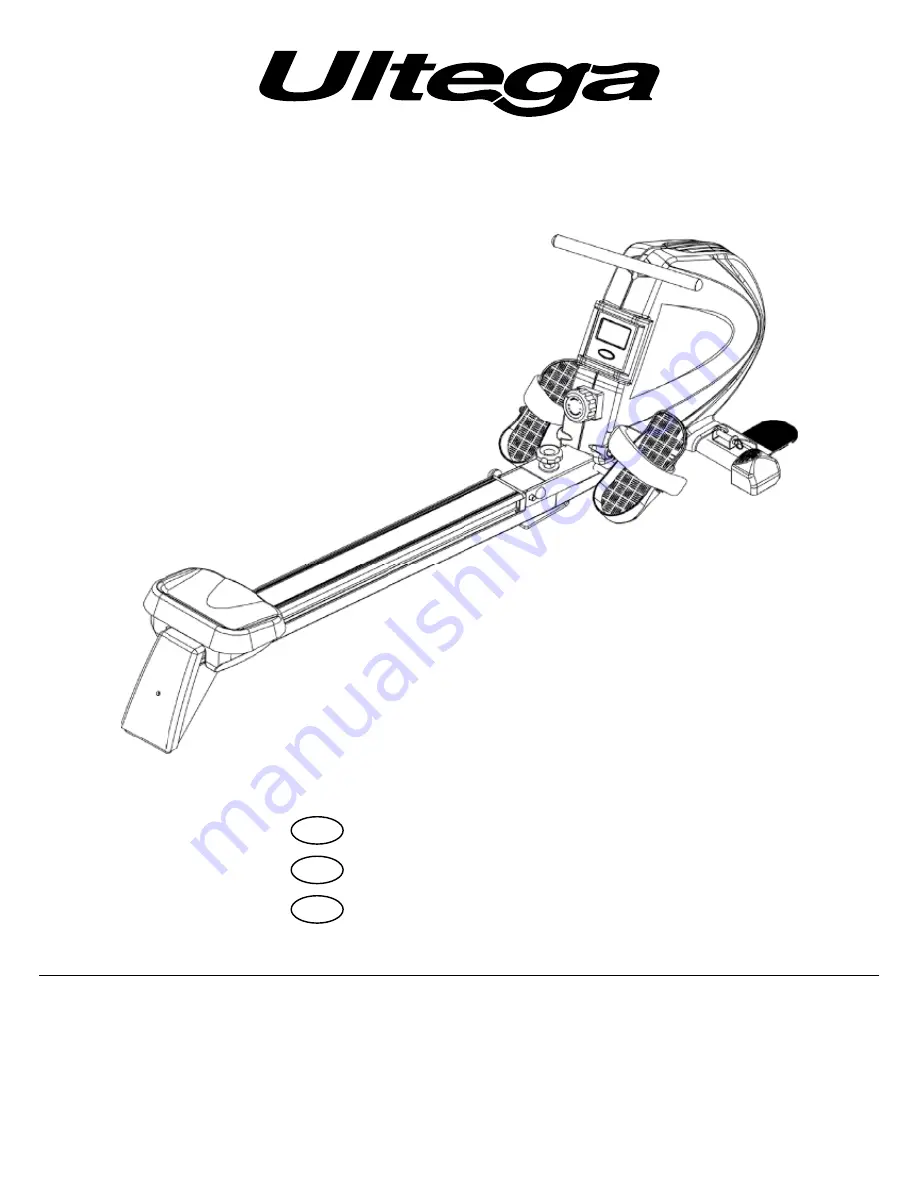
Страница 1: ...US DRAFTER 550 PRO F DRAFTER 550 PRO ES DRAFTER 550 PRO USER MANUAL MANUEL D UTILISATION MANUAL DE USO US331000000015...
Страница 2: ...eatures and technology are thus possible at any time Therefore no claims may be derived from the information illustrations and descriptions in this manual Reprint duplication or translation also of ex...
Страница 3: ...www ultega net 3 US HARDWARE LIST 16 ASSEMBLY EXPLODED DRAWING 17 ASSEMBLY STEP 18 COMPUTER FUNCTION 23 WARM UP AND COOL DOWN 24 INDEX...
Страница 4: ...l ixing tube OD16x1 2Tx156 5 2pcs No 46 Screw M10x52 2pcs No 47 Flat washer OD20xID10 5x2 0T 2pcs No 9 Flat head M7 8x80 1pc No 11 Flat head screw M6x10 1pc No 12 Flat head screw M5x8 4pcs No 14 Inner...
Страница 5: ...www ultega net 5 US ASSEMBLY EXPLODED DRAWING...
Страница 6: ...spanner see ig 1 Attach the Aluminum Sliding Tube 8 to the Main Frame 39 secure by 1 2 x100 Screw 36 OD22xID13x2 0T Flat Washer 33 and Nylon Cap 54 then insert the Pull Pin 37 see ig 2 and ig 3 Put t...
Страница 7: ...o the end of Aluminum Sliding Tube 8 secure by lock with the M8x20 Screw 14 and OD20xID8 5x1 5T Flat Washer 16 Pull the resistance rope under Aluminum sliding Tube 8 then hook on holder Pic 4 Loosen K...
Страница 8: ...ith Seat Block 10 secure with M6x10 Screw 11 Schritt 5 Attach the cover 2 to the rear stabilizer 3 secure with M5x10 Screw 25 Schritt 6 Remove the Pull Pin 37 loosen Knob 87 and Flat Washer 88 Fold th...
Страница 9: ...ID8 5x1 5T Flat Washer 16 M8 Spring Washer 15 and M8 Nut 31 Step 8 Insert the Pedal Axle 58 through the Main Frame 39 slide Pedal Tube 32 D22xID13x2 0T Flat Washer 33 and Pedal 30 57 then lock it up w...
Страница 10: ...function display on the monitor and hold the button for 2 seconds to total reset all function value COMPATIBILITY By using the Drafter 550 you will get the possibility to check your heart rate every...
Страница 11: ...u and your doctor Monitor your pulse frequently Establish your target heart rate based on your age and condition Set up your equipment on a lat even surface at least 3 feet from walls and furniture EX...
Страница 12: ...rkouts each week with at least one day of rest between workouts After a few months of regular exercise you may complete up to ive workouts each week if desired Remember the key to success is when exer...
Страница 13: ...your back leg as well Stretches Calves achilles tendons and ankles 4 Quadriceps Stretch With one hand against a wall for balance reach back and grasp one foot with your other hand Bring your heel as c...
Страница 14: ...diications techniques ventuellement apport es Les photos donn es et autres descriptions indiqu es dans le pr sent mode d emploi ne sont donc pas contractuelles Toute repr sentation reproduction ou tra...
Страница 15: ...www ultega net 15 F LISTE DES PETITES FOURNITURES 28 VUE CLAT E DU MONTAGE 29 INSTRUCTIONS DE MONTAGE 30 FONCTIONS DE L ORDINATEUR 35 EXERCICES D ASSOUPLISSEMENT 36 SOMMAIRE...
Страница 16: ...D13 2 0T 2 pi ces No 34 Tige de ixation de la p dale CD16x1 2Tx156 5 2 pi ces No 46 Vis M10 52 2 pi ces No 47 Rondelle plate OD20 ID10 5 2 0T 2 pi ces No 9 Vis t te plate 1 pi ce No 11 Vis t te plate...
Страница 17: ...www ultega net 17 F LISTEDES PETITES FOURNITURES...
Страница 18: ...ante en aluminium 8 sur le ch ssis principal 39 avec la vis 1 2 x100 36 la rondelle OD22xlD13x2 0T 33 et le capuchon en plastique 54 Puis r ins rez la cheville amovible 37 Illustr 2 et 3 Placez le cac...
Страница 19: ...luminium 8 et ixez le avec une vis M8x20 14 et une rondelle plate OD20xlD8 5x1 5T 16 Tirez la courroie sous le barre coulissante en aluminium 8 puis accrochez la sur le support Illustr 4 Desserrez la...
Страница 20: ...arr t du si ge 10 puis ixez avec une vis M6x10 11 tape 5 Fixez le cache 2 sur le pied stabilisateur arri re 3 avec une vis M5x10 25 tape 6 Retirez la cheville amovible 37 desserrez la molette 87 et la...
Страница 21: ...22xlD8 5x1 5T 16 une rondelle lastique M8 15 et un crou M8 31 tape 8 Faites passer l axe de la p dale 58 dans le ch ssis principal 39 le tube de la p dale 32 une rondelle plate D22xlD13x2 0T 33 et la...
Страница 22: ...ONCTIONS MODE Appuyez pour s lectionner la fonction sur l cran et maintenez la touche enfonc e pendant 2 secondes pour remettre toutes les fonctions z ro COMPATIBILIT Le Drafter 550 vous ofre la possi...
Страница 23: ...rogressivement en vous ixant des objectifs r alistes ent rin s par votre m decin Prenez votre pouls r guli rement D terminez la fr quence cardiaque optimale atteindre en tenant compte de votre ge et d...
Страница 24: ...minutes de gymnastique et de stretching tirements pour permettre la musculature de se d tendre et viter les courbatures FR QUENCE D ENTRA NEMENT Pour conserver ou am liorer votre condition physique pr...
Страница 25: ...ambe 4 tirement du quadriceps et des muscles de la hanche Appuyez une main sur le mur pour garder l quilibre Avec l autre main saisissez votre pied et maintenez le Essayez de ramener le talon le plus...
Страница 26: ...a caracter sticas y tecnolog a en todo momento Por lo tanto no podr n derivarse reclamos de la informaci n ilustraciones y descripciones contenidas en este manual La reimpresi n reproducci n o traducc...
Страница 27: ...www ultega net 27 ES LISTA DE HARDWARE 4 DIAGRAMA EXPLOSIVO DEL ENSAMBLAJE 5 PASOS DEL ENSAMBLAJE 6 FUNCIONES DE LA COMPUTADORA 11 CALENTAMIENTO Y ENFRIAMIENTO 12 NDICE...
Страница 28: ...6 Tornillo M10x52 2pcs No 47 Arandela plana 2pcs No 9 Cabeza plana M7 8x80 1pc No 11 Tornillo de cabeza plana M6x10 1pc No 12 Tornillos de cabeza plana M5x8 4pcs No 14 Tornillo de hex gono interior M8...
Страница 29: ...www ultega net 29 ES DIAGRAMA EXPLOSIVO DELENSAMBLAJE...
Страница 30: ...m quina Paso 2 Retire el perno 37 el tornillo 36 la arandela plana 33 y la tapa de nylon 54 con la llave ver ig 1 Fije el tubo corredizo de aluminio 8 al marco principal 39 asegure con 36 la arandela...
Страница 31: ...corredizo de aluminio 8 asegurado con el tornillo M8X20 14 y la arandela plana 16 Hale la cuerda de resistencia por debajo del tubo corredizo de aluminio 8 luego enganche al sujetador Pic 4 Aloje la p...
Страница 32: ...asiento 10 aseg relo con el tornillo M6x10 11 Paso 5 Fije la cubierta 2 al estabilizador trasero 3 asegure con el tornillo M5x10 25 Paso 6 Retire el perno 37 aloje la perilla 87 y la arandela plana 8...
Страница 33: ...8 a trav s del marco principal 39 deslice el tubo del pedal 32 La arandela plana 33 y el pedal 30 57 luego aseg relo con la arandela plana 16 la arandela de resorte M8 15 y la tuerca M8 31 Paso 9 Reti...
Страница 34: ...tor y sostenga el bot n durante dos segundos para restablecer totalmente todos los valores de funci n COMPATIBILIDAD AL usar el Drafter 550 tendr la posibilidad de revisar su ritmo cardiaco cada vez c...
Страница 35: ...de frecuencia card aca en funci n de su edad y condici n Conigure el equipo sobre una supericie plana y uniforme al menos 3 pies de distancia de las paredes y los muebles INTENSIDAD DE LOS EJERCICIOS...
Страница 36: ...e los entrenamientos Despu s de algunos meses de ejercicio regular puede completar hasta cinco sesiones de entrenamiento cada semana si lo desea Recuerde la clave del xito est cuando el ejercicio se c...
Страница 37: ...atr s tambi n Estiramientos Gemelos tendones de Aquiles y tobillos 4 Estiramiento de Cu driceps Con una mano en la pared para mantener el equilibrio tire hacia atr s y agarre un pie con la mano contr...
Страница 38: ...lease contact our service hotline or send us an email irst Manufacturer Service Summary USA Inc 372 W Ontario Street 304 Chicago IL 60654 Hotline 888 278 6970 E mail service us ultega net ES GARANT A...