+CAM HD AW Quick Start Guide
5
Outdoor Wall-Mount
1.
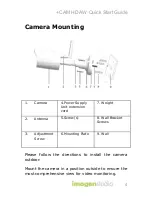
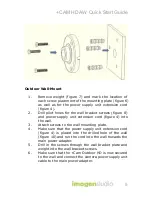
Remove weight (figure 7) and mark the location of
each screw placement of the mounting plate (figure 6)
as well as for the power supply unit extension cord
(figure 4).
2.
Drill pilot holes for the wall bracket screws (figure 8)
and power supply unit extension cord (figure 4) into
the wall.
3.
Attach screws to the wall mounting plate.
4.
Make sure that the power supply unit extension cord
(figure 4) is placed into the drilled hole of the wall
(figure 10) and run the cord into the wall towards the
main power adapter.
5.
Drill in the screws through the wall bracket plate and
weight into the wall bracket screws.
6.
Make sure that the +Cam Outdoor HD is now secured
to the wall and connect the camera power supply unit
cable to the main power adapter.
Содержание +CAM-HD-AW
Страница 1: ... Cam Outdoor HD CAM HD AW All Weather ...
Страница 20: ...Revised Nov 18 2014 ImogenStudio 2014 ...


