15
English
ENTER
ENTER
MENU
MENU
MENU
MENU
ENTER
ENTER
ENTER
ENTER
ENTER
E
M
E
M
E
M
E
ENTER
MENU
MENU
ENTER
MENU
MENU
MENU
MENU
ENTER
M
MENU
E = ENTER
M = MENU
30 s
3s
MENU
ENTER
E
M
E
M
E
M
E
M
E
E
M
E
M
E
E
E
M
E
M
E
M
E
M
E
M
E
M
E
M
E
M
E
M
E
M
E
M
E
M
ENTER
MENU
ENTER
ENTER
ENTER
ENTER
MENU
ENTER
MENU
ENTER
MENU /
MENU /
MENU /
MENU /
M /
MENU /
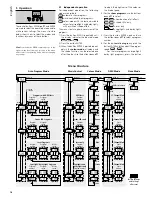
Auto Program Mode
Music Control
DMX Mode
System Settings
Colour Mode
Slave Mode
Programs with All Effects
All Effects
Red
27-Channel Mode
Spotlight /
Derby Light
Configuration
Green
Strobe LED Programs
Strobe LEDs only
9-Channel Mode
Laser Programs
Laser only
Blue
5-Channel Mode
Spotlight / Derby Light Programs
Spotlights and
Derby Lights only
Auto-off Feature
for Display
(after 30 s)
Wireless
Footswitch
Mode
Reset
Test
Strobe
3-Channel Mode
DMX start address
Program
number
Program
speed
Program
number
Program
speed
Start
address
Program
number
Program
number
Start
address
Start
address
Start
address
Program
number
Program
number
Program
speed
Factory settings
and settings
after reset
Motor
speed
Motor
speed
Program
number
Program number
Program
speed
ENTER again and then adjust the motor
speed (
…
) .
7) For the
music-controlled programs,
turn up the control MICROPHONE SENSI-
TIVITY until the FXBAR-5SET responds to
the music as desired . When the volume
of the music system is changed, readjust
the control accordingly . If there is no op-
timum music control although the control
has been turned up very far, increase the
volume or reduce the distance between
the speakers and the FXBAR-5SET .
After 5 seconds, when no sound
(music) has been registered, all units will
switch off their light beams . As soon as
sound is registered again, they will switch
them on again .
8) To select another mode, start with step 1
again .
Function and example
refer to chapter 6.1
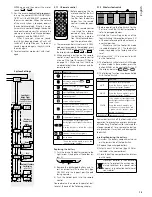
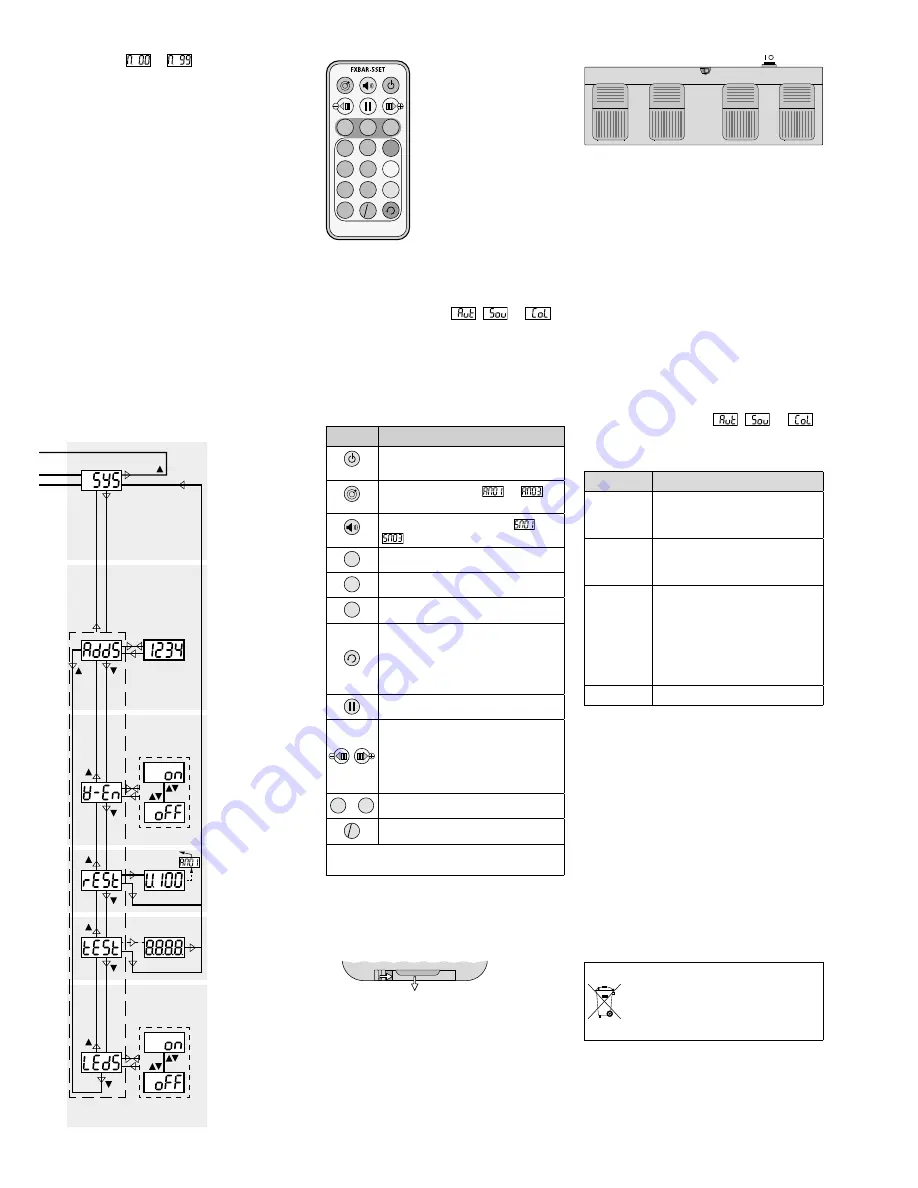
5.1.1 IR remote control
- --
MUSIC
ON/OFF
AUTO
0
8
7
9
5
4
6
2
1
3
B
C
A
1) Before operating the re-
mote control for the first
time, remove the protec-
tive film from the battery
holder . Thus, the remote
control is ready for oper-
ation .
If the remote control
is not used for a longer
period of time, remove
the battery as a precau-
tion . It may leak and dam-
age the remote control .
2) The remote control will not work in DMX
mode or slave mode . In these modes, press
the button MENU on the controller first until
the display indicates
,
or
.
3) When pressing a button on the remote
control, always point the remote control
at one of the two IR sensors (7) (figure
on page 12) . Make sure that there are
no obstacles between the sensor and the
remote control:
Button
Function
ON/OFF
light beams on/off
AUTO
automatic programs
…
with all effects*
MUSIC
music-controlled programs
…
with all effects*
A
spotlight/derby light programs*
B
laser programs*
C
strobe LED programs*
switchover between automatic
mode and music control for the
spotlight /derby light programs, laser
programs and strobe LED programs
(buttons A – C)
stop / start of program
colour mode: all spotlights and
derby lights emit light of the same
colour
Use the buttons to select the colours
one after the other .
0
…
9
speed of automatic programs
- --
no function
* Press the button again to go to the
next program number .
Replacing the battery
1) Push the latch of the battery holder to the
right (arrow 1) and pull out the holder (ar-
row 2) .
1.
2.
2) Remove the discharged battery and in-
sert a new battery (3 V button cell, type
CR 2025) into the support, positive pole
facing upwards .
3) Push the holder back into the remote
control .
Please observe the note on disposal of bat-
teries at the end of the following chapter .
5.1.2 Wireless footswitch
ANT
BLACKOUT
COLOR
MUSIC
AUTO
1) Before operating the footswitch for the
first time, insert the 12 V battery provided,
refer to paragraph below .
2) Unfold the transmitting antenna of the
footswitch and the reception antenna (12)
of the controller and put both antennas in
a vertical position .
Make sure that the footswitch mode
is enabled (chapter 6 .2) . The footswitch
mode is enabled in the factory and after
reset .
3) Use the switch “I
” on the rear to switch
on the footswitch .
4) The footswitch will not work in DMX mode
or slave mode . In these modes, press the
button MENU on the controller first until
the display indicates
,
or
.
5) The following functions can be controlled
with the footswitch:
Pedal
Function
AUTO
automatic show programs
Press the button again to go to
the next program number .
MUSIC
music-controlled show programs
Press the button again to go to
the next program number .
COLOR
colour mode: all spotlights and
derby lights will emit light of the
same colour
Press the button again to go
to the next colour: white – red
– green – blue – yellow – cyan –
purple – white etc .
BLACKOUT
light beams on /off
Remember to switch off the footswitch after
operation to prevent unnecessary discharge
of the battery . If the footswitch is not used for
a longer period of time, remove the battery
as a precaution . It may leak and damage the
footswitch .
Inserting/Replacing the battery
1) Unscrew the battery compartment cover
on the lower side of the footswitch .
2) Replace the discharged battery .
3) Insert a new 12 V battery (type 23AE) as
indicated in the compartment .
4) Close the battery compartment and screw
on the cover .
Never put batteries in the household
waste . To protect the environment,
always take them to a special waste
disposal, e . g . collection container at
your retailer .
Содержание FXBAR-5SET
Страница 2: ......

