background image


16 

Advanced Mode  

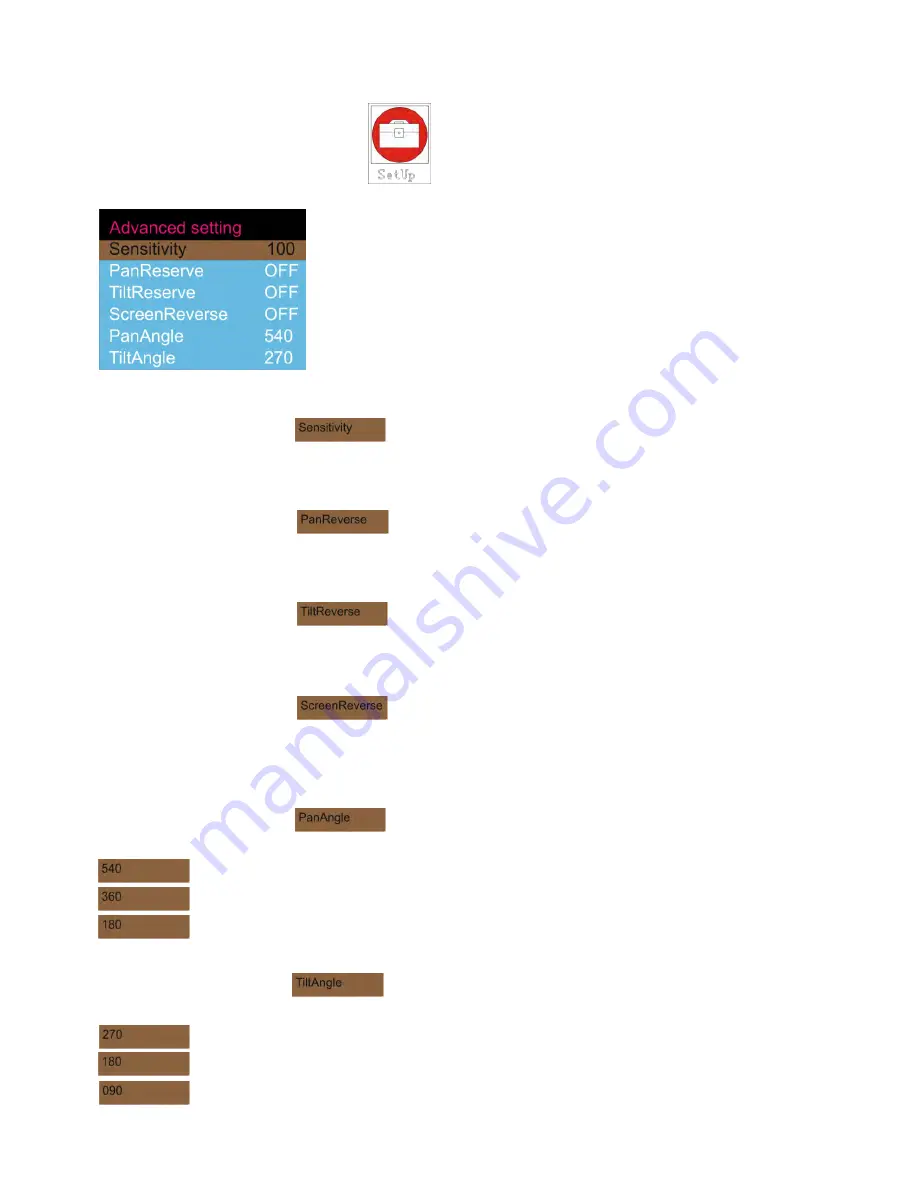
You can select 6 different Advanced settings when using the 

BEAM-

20

LED

 Beam.  


1)


Press MODE until the display shows                      , then press ENTER to open the menu and change your 
settings.  


2)


Use the UP / DOWN buttons to select all 6 settings.  


Audio Sensitivity 


1)


When the display shows :                          , the device is in Audio Sensitivity Mode. 

2)


Press ENTER to open the menu and change your settings. 

3)


When you press Up/Down, you can set the audio sensitivity from 000 to 100. T 


Pan movement Mode 


1)


When the display shows :                           and has been set to OFF, the device is in normal Pan Mode. 

2)


Press ENTER to open the menu and change your settings. 

3)


When you press Up/Down and set the device to ON, the Pan function is reversed. 


Tilt movement Mode 


1)


When the display shows :                          and has been set to OFF, the device is in normal Tilt Mode. 

2)


Press ENTER to open the menu and change your settings. 

3)


When you press Up/Down and set the device to ON, the Tilt function is reversed. 


Display Mode 


1)


When the display shows :                          and has been set to OFF, the device is in normal Display 
Mode. 

2)


Press ENTER to open the menu and change your settings. 

3)


When you press Up/Down and set the device to ON, the Display function is reversed. 


Pan Mode 


1)


When the display shows :                          , then press ENTER to open the menu and change your 
settings. You are able to set 3 different Pan Angles. 


Pan is 540º. 


Pan is 360º.  


Pan is 180º. 


Tilt Mode 


1)


When the display shows :                         , then press ENTER to open the menu and change your 
settings. You are able to set 3 different Tilt Angles.  


Tilt is 270º. 


Tilt is 180º.  


Tilt is 090º.


Содержание BEAM-20LED

Страница 1: ......

Страница 2: ......

Страница 3: ...abling 11 Control Panel 12 Control Mode 12 DMX Addressing 12 Menu Overview 13 Main Menu Options 14 DMX Addressing 14 Built in Programs Mode 15 DMX Advanced Basic Mode 15 Advanced Mode 16 Audio Sensiti...

Страница 4: ...antly reduced If improving your lifespan expectancy is of a higher priority place care in providing for lower operational temperatures This may include climatic environmental and the reduction of over...

Страница 5: ...plug Never pull out the plug by tugging the power cord Make sure that the device is not exposed to extreme heat moisture or dust Make sure that the available voltage is not higher than stated on the r...

Страница 6: ...fety and the safety of others Rigging Please follow the European and national guidelines concerning rigging trussing and all other safety issues Do not attempt the installation yourself Always let the...

Страница 7: ...with the mains Connect the device to the mains with the power plug Always pay attention that the right color cable is connected to the right place International EU Cable UK Cable US Cable Pin L BROWN...

Страница 8: ...ged due to shipping Transportation damage has to be reported to us within one day after receipt of the delivery Any return shipment has to be made post paid at all times Return shipments must be accom...

Страница 9: ...grams selectable by DMX Light Source 1 x 20W LED Colourwheel with 7 dichroic colours and white Color functions Rainbow flow effect Rotating Gobowheel with 9 metal gobos and open with Gobo Shake Functi...

Страница 10: ...Always disconnect from electric mains power supply before cleaning or servicing Damages caused by non observance are not subject to warranty Set Up and Operation Follow the directions below as they p...

Страница 11: ...d alone device Turn on the music If the device is set to sound control then the BEAM 20LED will react to the beat of the music Please see page 15 for more information about the sound control options M...

Страница 12: ...a DMX signal cable from the first unit s DMX out socket to the second unit s in socket Repeat this process to link the second third and fourth units 5 Supply electric power Plug electric mains power c...

Страница 13: ...ial data link without the use of a DMX optically isolated splitter may result in deterioration of the digital DMX signal Maximum recommended DMX data link distance 100 meters Maximum recommended numbe...

Страница 14: ...ld be 1 12 13 013 the DMX address of the third BEAM 20LED should be 13 12 25 025 etc Please be sure that you don t have any overlapping channels in order to control each BEAM 20LED correctly If two or...

Страница 15: ...13 Menu Overview...

Страница 16: ...e Display Pan Tilt Angle System Info DMX Addressing With this menu you can set the DMX address 1 Press Mode until the display shows 2 Press Enter to confirm You can choose 512 different DMX addresses...

Страница 17: ...l show The device now has 9 channels Auto Mode 1 Use the Up Down buttons to scroll through the Running Mode 2 When the display shows press ENTER to open the menu and change your settings 3 You can cho...

Страница 18: ...to ON the Pan function is reversed Tilt movement Mode 1 When the display shows and has been set to OFF the device is in normal Tilt Mode 2 Press ENTER to open the menu and change your settings 3 When...

Страница 19: ...0 3 Press the Up button to change the value Press the Down button to go to the next digit 4 Enter password 2323 5 A new menu will open and the display shows 6 You can scroll through the menu with the...

Страница 20: ...tinuously the so called Rainbow effect 0 15 Open White 16 31 Blue 32 47 Yellow 48 63 Pink 64 79 Green 80 95 Red 96 111 Light Blue 112 127 Orange 128 191 Clockwise rotation CW rainbow effect from slow...

Страница 21: ...nction 80 84 X Y negative direction after 5 seconds 85 89 X negative direction after 5 seconds 90 94 No Function 95 99 Y negative direction after 5 seconds 100 104 No Function 105 109 Cancel X negativ...

Страница 22: ...r clockwise rotation CCW rainbow effect from slow to fast Channel 4 Rotating Gobo wheel Gobo Shake 0 9 Open White 10 15 Gobo 1 16 21 Gobo 2 22 27 Gobo 3 28 33 Gobo 4 34 39 Gobo 5 40 45 Gobo 6 46 51 Go...

Страница 23: ...100 104 No Function 105 109 Cancel X negative direction after 5 seconds 110 114 No Function 115 119 Cancel Y negative direction after 5 seconds 120 124 No Functions 125 129 Cancel X Y direction after...

Страница 24: ...es must not show any damages or material fatigue The IMG Stage Line BEAM 20LED Beam requires almost no maintenance However you should keep the unit clean Otherwise the fixture s light output will be s...

Страница 25: ...ry out the steps below in sequence until a solution is found Once the unit operates properly do not carry out following steps If the light effect does not operate properly refer servicing to a technic...

Страница 26: ...d with 120 Ohm termination plug Insert termination plug in output jack of the last fixture on the link Incorrect addressing of the fixtures Check address setting One of the fixtures is defective and d...

Страница 27: ...and white Color functions Rainbow flow effect Rotation Bi directional Gobo functions Gobo flow effect Gobo shake Rotating Gobowheel with 9 metal gobos and open with Gobo Shake Function No replaceable...

Страница 28: ...MONACOR INTERNATIONAL GmbH Co KG Zum Falsch 36 28307 Bremen Germany A 0000 99 01 04 2016...

Отзывы: