background image

10780631 • 07 - 2003  3

rd

Ed.

10780631 • 07- 2003  3

Ed.

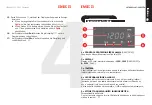
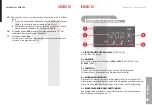
Mounting instructions

Working is not affected, in any way, by the mounting position (angle of
elevation).

Before mounting it is necessary to verify that data on the label
correspond to the ones required (type of input, auxiliary supply, etc.).

In the wiring scrupulously respect the wiring diagram; an error in connection
unavoidably leads to wrong measurements or damages to the meter.
In the connections, avoid placing the cables in parallel with power conductors
or near to strong electromagnetic field sources 

(for instance big transformers,

remote control switches, etc.)

.

For measuring input we suggest to use shielded-conductor cables.

In the models 

DG4P2

• 

DG4Q2 

(with alarms) • 

RM3C

, contact position

shown in the wiring diagram is referred to non-fed meter.  

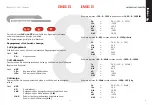
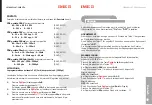
Alarmes

Avec les menus 

AL.1

et 

AL.2

il est possible de configurer 2 alarmes.

Pour chaque alarme il faut configurer:

• tYP

TYPE DE ALARME

Hi

= maximum ou bien 

Lo

= minimum

• rEL

SORTIE RELAIS

n.E

= normalement excité ou bien 

n.d

= normalement désexcité

• SEt

SEUIL

-1999…1999 

(DG4P - RM3C)

0...9999 

(DG4Q)

• HYS

HYSTÉRÉSIS

-1999…1999 

(DG4Q)

0...9999

• dEL

TEMPS DE REPONSE

0…60

= 0…60 secondes

18

0

Appuyer plusieurs fois sur 

PgUp

jusqu’à afficher 

AL.1

19

0

Appuyer en même temps sur 

▲▼

L’afficheur montre 

PAS

suivi par

tYP

20

1

En appuyant une fois sur 

l’afficheur indique la type d’alarme

(

Hi

maximum, 

Lo

minimum)

a

Pour confirmer le type d’alarme, appuyer sur 

PgUp

et continuer

la programmation 

(voir point 21)

b

Pour modifier le type, agir sur 

et après appuyer sur 

PgUp

Français

1

11

1

English

H

15

Содержание DG4P

Страница 1: ...878 1 Fax 02 45 03 448 39 02 45 86 76 63 www imeitaly com info imeitaly it Istruzioni d Uso User s Guide Guide d utilisation Bedienungsanleitung DG4P DG4P DG4Q DG4Q RM3C RM3C ISTRUMENTI MISURE ELETTRI...

Страница 2: ...m DIN43700 SUPPLY INPUT 20 21 1 2 14 16 15 2 17 18 1 19 3 4 5 SENSOR OUTPUT 24 23 option 1 5 2 5 3 5 4 3 5 4 5 Ch1 200V Ch2 20V Ch3 200mV Ch4 20mA Ch5 2mA S 305 138 S 305 139 SUPPLY INPUT 20 21 1 2 14...

Страница 3: ...ie den Wert ndern wollen k nnen Sie mit den Tasten und den gew nschten Wert einstellen und mit PgUp abschlie en 250 Am Display erscheint HYS 261 Durch Dr cken von erscheint am Display die Hysterese Sc...

Страница 4: ...modelli DG4P2 DG4Q2 con allarmi RM3C la posizione dei contatti indicata nello schema si riferisce allo strumento non alimentato Istruzioni per l installazione In den Men s AL 1 und AL 2 k nnen zwei A...

Страница 5: ...in condizione di anomalia Al rientro dalla condizione di anomalia e il LED si spegne automaticamente 5 ETICHETTA ADESIVA UNITA INGEGNERISTICA Personalizzabile dall utente Con lo strumento vengono for...

Страница 6: ...Display der Anfangswert des Me bereiches a Wenn der angezeigte Wert der gew nschte ist dr cken Sie PgUp um Programmierung fortzusetzen siehe Punkt 8 b Wenn Sie den Wert ndern wollen k nnen Sie mit de...

Страница 7: ...one normale Premendo PgUp viene visualizzato End Premere contemporaneamente Sul display appare Sto e lo strumento esce automaticamente dalla program mazione 5 5 BEREICH Hier wird der ben tigte Me bere...

Страница 8: ...e i valori da visualizzare in corrispondenza del campo di misura Men dSP dP punto decimale visualizzazione L dS valore da visualizzare in corrispondenza dell inizio del campo misura L In H dS valore d...

Страница 9: ...rogrammierung Durch die Men s InP und dSP ist es m glich den Signalwert zu messen und die entsprechende Anzeige zu w hlen Die Programmierung erfolgt in drei Schritten Eingangskanal Me bereich Anzeige...

Страница 10: ...en 10780631 07 2003 3a Ed 10780631 07 2003 3 Ausgabe PORTATA Permette di selezionare la portata desiderata sono disponibili 5 portate canali Ch1 portata 200V per ingressi compresi tra 50 50V e 200 200...

Страница 11: ...modificarne la posizione agire su fino ad ottenere quella desiderata quindi premere PgUp 120 Sul display appare L dS visualizzazione inizio scala 131 Premendo una volta sul display viene visualizzato...

Страница 12: ...ostazione ed esce automaticamente dal men di programmazione Frontscheibenbeschreibung 1 IP50 FRONTSCHUTZ EN60529 DG4P DG4Q Option IP54 Frontschutz 2 ANZEIGE Rote LED Anzeige H chstanzeige 1999 1999 DG...

Страница 13: ...ipo visualizzato corrisponde a quello desiderato premere PgUp e continuare la programmazione vedere p to 21 Die Einbaulage Neigungsgrad hat keinen Einflu auf die Funktion Bevor DG4P DG4Q eingebaut wir...

Страница 14: ...isteresi impostata punto di ripristino allarme a Se il valore visualizzato corrisponde a quello desiderato pre mere PgUp e continuare la programmazione vedere p to 27 b Se si desidera modificare il va...

Страница 15: ...u bien jusqu obtenir la valeur d sir e puis appuyer sur PgUp 250 L afficheur indique HYS 261 En appuyant une fois sur l afficheur indique la valeur de l hyst r sis selectionn e point de reprise de l a...

Страница 16: ...ables In the models DG4P2 DG4Q2 with alarms RM3C contact position shown in the wiring diagram is referred to non fed meter Alarmes Avec les menus AL 1 et AL 2 il est possible de configurer 2 alarmes P...

Страница 17: ...entering the menu you can display the state of the alarms verifying if one or both of the relays are in anomaly condition When this anomaly condition is over the LED automatically turns off 5 ENGINEER...

Страница 18: ...lle 131 En appuyant une fois sur l afficheur indique la valeur du d but chelle a Si la valeur affich e correspond celle d sir e appuyer sur PgUp et continuer la programmation voir point 14 b Pour la v...

Страница 19: ...leaves the programming ETENDUE Permet de s lectionner l tendue d sir e 5 tendues canaux sont disponibles Ch1 tendue 200V pour entr es comprises entre 50 50V et 200 200V DG4P RM3C 0 50V et 0 200V DG4Q...

Страница 20: ...he values to be displayed corresponding with the measuring range Menu dSP dP display decimal point L dS value to be displayed corresponding with the beginning of the measuring range L In H dS value to...

Страница 21: ...InP et dSP il est possible de s lectionner la valeur du signal mesurer et l affichage correspondant La programmation se produit sur trois phases successives Canal d entr e Plage de mesure Affichage 1...

Страница 22: ...e meter stores the setting and automatically leaves the programming menu Affichage En plus de la valeur instantan e mesur e il est possible d afficher la valeur maximum lue pic maximum et l tat des al...

Страница 23: ...splay the beginning of scale value is shown a If the displayed value is the desired one press PgUp and go on with the programming see item 14 b If you want to modify the value act on or until you get...

Страница 24: ...on 2 AFFICHEUR Afficheur LED rouges indication maximum 1999 1999 DG4P RM3C et 0 9999 DG4Q 3 CLAVIER 3 touches utilis es pour la configuration ou le choix de l affichage valeur instantan e valeur de pi...

Страница 25: ...ows the type of alarm a If the displayed type is the desired one press PgUp and go on Alarms Instructions pour l installation La position de fixation degr d inclinaison n a aucune incidence sur le fon...

Страница 26: ...amming see item 27 b If you want to modify the value act on or until you get the desired one then press PgUp 270 Display shows dEL 281 Pressing once the display shows the loaded delay a If the display...

Отзывы: