IMB MB5004E-IM Скачать руководство пользователя страница 7

3

三、安全注意事项

为了安全地使用自动机的注意事项

1. 为了防止因触电造成的事故,在接通了电源的状态下,请不要打开马达电气箱的盖

子,也不要触摸电气箱内的零件。

1. 为了防止对人身的伤害,请不要在卸下了皮带护罩、手指防护器等安全装置的状态

下运转机器。

2. 为了防止被卷入机器的人身事故,缝纫机运转中,请不要让手指、头发、衣服靠近

皮带轮、V 型皮带、马达附近,也不要把物品放到上面。

3. 为了防止对人身的伤害,打开电源时或缝纫机运转中,请不要把手指放到机针附近。

4、为了防止对人身的伤害,踩下脚踏开关前请将手远离撑料组。

5. 为了防止对人身的伤害,缝纫机运转中,请不要把手指放到挑线杆护罩内。

6. 为了防止对人身的伤害,更换机线时,请一定关闭电源。

7. 为了防止对人身的伤害,缝纫机上下动作时或返回原来位置时,请一定注意不要夹

到手指。

8. 缝纫机运转中,请不要切断电源或切断空气供给源。

9. 为了防止因触电造成的事故,在卸下电源地线的状态下,请不要运转缝纫机。

10. 为了防止因触电和电气零件损坏造成的事故,插拔电源插头时,请一定先关掉电

源开关。

11. 为了防止因电气零件损坏造成的事故,打雷时,为了安全请停止作业,并拔掉电

源插头。

12. 为了防止因电气零件损坏造成的事故,从寒冷的地方立即移动到温暖的地方等时

会发生结露现象,因此请待水滴万全干燥之后再接通电源。

13. 因为本产品属于精密机器,所以操作时请充分注意,不要把水、油溅到机器上面,

也不要让机器掉落给与机器冲击。

14. 本机器是 A 级工业用机器。在家庭环境下使用此机器的话,有可能发生电波干扰

的现象。此时,请使用人采取适当的措施解决电波干扰问题。
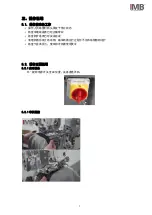
*重要安全信息:

√对机器操作不当可能会导致人身伤害,请在操作前仔细阅读本说明并正确操作。
√机器正式运行通电前,请先通气。
√严禁在通电状态下打开电控箱或触摸屏内部零件。
√本机器需要在接受培训后或专人指导下使用,以确保使用者的人身安全。

Содержание MB5004E-IM

Страница 1: ...al CHANGZHOU WISDOM VALLEY ELECTRICAL TECHNOLOGY CO LTD Please read the operation manual of the touch screen interface before using the device Please keep this operation manual of touch screen interfa...

Страница 2: ...IMB No part of this manual may be copied or transcribed without requesting prior authorization from IMB The contents of this manual may be subject to change without advance notification We are happy t...

Страница 3: ......

Страница 4: ...1 2 3 4 4 1 4 4 2 5 4 3 6 7 5 1 7 5 2 7 9 6 1 9 6 2 10 6 3 11 6 4 12 6 5 13 14 15 16 17...

Страница 5: ...1 1 GC6770 2 3 4 5 6 7 8 9 10 11 12 2 3 1 4 5 6 11 9 8 10 7 12...

Страница 6: ...2 MB5004E 1 GC6770 2 rpm 4000 3 V 220 4 Mpa 0 5 5 AC 6 mm 2 5 7 mm 9 53 8 mm 280 800 9 mm 950L 1000W 1300H 10 kg 165...

Страница 7: ...3 1 1 2 V 3 4 5 6 7 8 9 10 11 12 13 14 A...

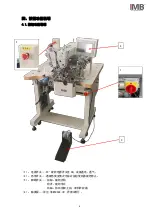
Страница 8: ...4 4 1 1 90 ON 2 3 4 MB5004E IM 1 3 4 2...

Страница 9: ...5 4 2 a b...

Страница 10: ...6 ON ON 1 2 3 ON OFF OFF 1 2 3 ON OFF 1 2 1 2 3 4 4 3 1 2...

Страница 11: ...7 5 1 5 2 5 2 1 90 ON 5 2 1...

Страница 12: ...8 5 2 3 5 2 4 90 OFF...

Страница 13: ...9 6 1 Mp 1 0 4 0 5 2 0 1 0 2 3 0 3 0 4 4 0 1 0 2 5 0 1 0 2 6 0 3 0 4...

Страница 14: ...10 6 2 6 2 1 6 2 2...

Страница 15: ...11 6 3 6 3 1 6 3 2 1 0 2mm 1 1 1 1...

Страница 16: ...12 6 4 1 2 6 4 1 1 2 6 4 2 2...

Страница 17: ...13 6 5 1 2 3 4 5 1 2 3 4 5 6 1 2 3 4 5 6 7 1 1 2 3 4 2 5 3 6 7 6 60 1 2 3 4 6 4 1 2 2 1 3 3 2 1 3 4 5 6 7 2 1 3...

Страница 18: ...2500451300100 2 1 1 02500451300200 2 2 1 050201409006 1215 2 6 02500451300300 1 1 02500451300400 2 1 7 02500451300500 1 02500451300600 1 1 8 02500451300700 2 1 9 02500451300800 3 1 10 02500451300900 4...

Страница 19: ...15 15 02500451301400 9 1 16 02500451301500 1 1 17 02500451301600 2 1 18 02500451301700 3 1 19 02500451301800 1 10 1 10 2 MB5004E 1 2 3 1 2 3 1 2...

Страница 20: ...16 11 1 11 2 GC6770 C 1 2 3 4 5 6 7...

Страница 21: ...17 MB5004E...

Страница 22: ...ENGLISH...

Страница 23: ...stop reset operation 7 5 Operating instructions 8 5 1 Preparation before operation 8 5 2 Operation process description 8 6 Debugging method 10 6 1 Air pressure adjustment 10 6 2 Cross position detecti...

Страница 24: ...Typical GC6770 Head 2 Touch screen 3 Control box 4 Power switch 5 Lifting stand 6 Pedal 7 Detector device 8 Stretch fabric group 9 Large size adjustment group 10 Feeding group 11 Pressing group 12 Em...

Страница 25: ...E Automatic bottom hemmer 1 Machine head GC6770 2 Maximum speed rpm 4000 3 Voltage V 220 4 Air pressure Mpa 0 5 5 Motor AC 6 Stitch length mm 2 5 7 Hemming width mm 9 53 8 Leg circumference mm 280 800...

Страница 26: ...ve the cloth guide when the preparation work is finished and the sewing state is reached 9 In order to prevent accidents caused by electric shock please do not operate the sewing machine when the grou...

Страница 27: ...refully and operate correctly before operation Please ventilate the machine before it is officially powered on do not turn on the internal parts of the electric cabinet or touch screen while the power...

Страница 28: ...o on at 90 to power and ventilate the equipment 2 Emergency stop switch in case of emergency press this button to stop the machine 3 Pedal Step forward sewing begins Loosening sewing stops Back steppi...

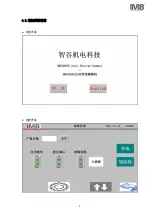
Страница 29: ...6 4 2 Operator interface description a Power on interface b Main interface...

Страница 30: ...abric group Leg switch ON Cycle switch between left leg and right leg Subdivision of left and right foot patterns improves sewing quality OFF Regardless of the left and right trouser legs Sewing in th...

Страница 31: ...her the needle has been installed Clean up the debris on the machine table to ensure that there will be no debris obstructing the operation of the machine Check the pressure of the barometer to make i...

Страница 32: ...9 5 2 3 Step forward Start to finish sewing 5 2 4 Shut down After the operation turn the power switch 90 to the off position and the equipment will be shut down...

Страница 33: ...e adjustment meter No Name Range Mp 1 Roller cylinder 0 4 0 5 2 Front presser foot cylinder 0 1 0 2 3 Rear presser foot cylinder 0 3 0 4 4 Lower hook cylinder 0 1 0 2 5 Middle strut cylinder 0 1 0 2 6...

Страница 34: ...roller and the bearing The light of switch 1 will be off At this time the cross position signal is obtained The machine uses this signal as the basis for starting and ending the needle 6 2 1 When the...

Страница 35: ...idth Step 2 loosen the screw 1 in the figure below and then pull back the Limit plate to the final position Step 3 assemble the selected rear presser foot in place install it on the mounting plate as...

Страница 36: ...13 2 6 4 Adjustment of seam width 1 2 Mounting plate Screws 1 Rear presser foot Limit plate Fixed block Hook bar Screw 2...

Страница 37: ...According to the above definition it can be seen that the adjustment method of the stop width is After loosening the screw in figure 2 Move the front presser foot forward and backward by hand After re...

Страница 38: ...be selected by trial For example 1 2 3 and 4 in the tightened state Put the trouser leg on the stretch fabric group The touch screen turns off automatic sewing Step on the pedal At this time the stre...

Страница 39: ...on The upper and lower feeding wheels are not synchronized Adjust the upper and lower feeding wheels to the same speed 8 Daily maintenance requirements 8 1 The equipment maintenance list and requireme...

Страница 40: ...and are protected by national intellectual property laws and regulations Without the written permission of the right holder the patented technology of the achievement shall not be implemented and the...

Отзывы: