


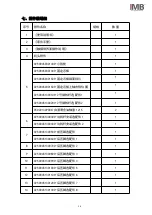


6
按钮
功能/状态
操作
产量计数
记录产量
点击“清零”按钮可清零
自动缝纫
ON-(骨位确认 ON)
1、(前)踩一下脚踏板启动缝纫
2、检测到骨位时机器停止,
3、(前)踩一下脚踏板继续缝纫至自动结束并上抬前
后压脚 、收缩撑料杆
ON-(骨位确认 OFF)
(前)踩一下脚踏板启动缝纫至自动结束并上抬前后压
脚、收缩撑料杆
OFF
1、长(前)踩脚踏板进行缝纫动作
2、松开脚踏结束缝纫动作
3、(后)踩一下脚踏上抬前后压脚、收缩撑料杆
裤脚切换
ON
左裤脚和右裤脚循环切换(细分左右脚模式可提高缝纫
质量
OFF
不分左右裤脚,在同一模式下缝纫
穿线
便于穿线
1、点击“穿线”按钮后前后压脚下压,空出穿线空间
2、点击“复位”按钮可使前后压脚上抬
绕底线
绕底线
1、点击“绕底线”按钮
2、将绕线器摆放到位
3、长(前)踩脚踏进行绕底线
4、松开脚踏结束绕底线
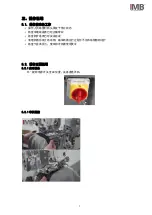
4.3
急停复位操作
1、按下急停按钮后,显示屏跳出急停对话框
2、急停复位:首先右旋急停按钮使之弹出,其次点击显示屏上“复位”按钮。
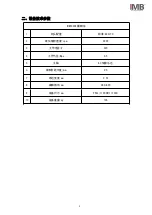
Содержание MB5004E-IM
Страница 3: ......
Страница 4: ...1 2 3 4 4 1 4 4 2 5 4 3 6 7 5 1 7 5 2 7 9 6 1 9 6 2 10 6 3 11 6 4 12 6 5 13 14 15 16 17...
Страница 5: ...1 1 GC6770 2 3 4 5 6 7 8 9 10 11 12 2 3 1 4 5 6 11 9 8 10 7 12...
Страница 7: ...3 1 1 2 V 3 4 5 6 7 8 9 10 11 12 13 14 A...
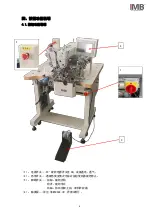
Страница 8: ...4 4 1 1 90 ON 2 3 4 MB5004E IM 1 3 4 2...
Страница 9: ...5 4 2 a b...
Страница 10: ...6 ON ON 1 2 3 ON OFF OFF 1 2 3 ON OFF 1 2 1 2 3 4 4 3 1 2...
Страница 11: ...7 5 1 5 2 5 2 1 90 ON 5 2 1...
Страница 12: ...8 5 2 3 5 2 4 90 OFF...
Страница 13: ...9 6 1 Mp 1 0 4 0 5 2 0 1 0 2 3 0 3 0 4 4 0 1 0 2 5 0 1 0 2 6 0 3 0 4...
Страница 14: ...10 6 2 6 2 1 6 2 2...
Страница 15: ...11 6 3 6 3 1 6 3 2 1 0 2mm 1 1 1 1...
Страница 16: ...12 6 4 1 2 6 4 1 1 2 6 4 2 2...
Страница 17: ...13 6 5 1 2 3 4 5 1 2 3 4 5 6 1 2 3 4 5 6 7 1 1 2 3 4 2 5 3 6 7 6 60 1 2 3 4 6 4 1 2 2 1 3 3 2 1 3 4 5 6 7 2 1 3...
Страница 20: ...16 11 1 11 2 GC6770 C 1 2 3 4 5 6 7...
Страница 21: ...17 MB5004E...
Страница 22: ...ENGLISH...
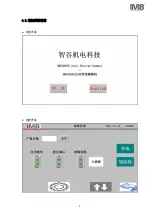
Страница 29: ...6 4 2 Operator interface description a Power on interface b Main interface...


