


16
7
、
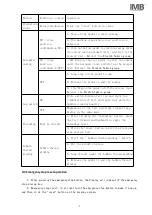
Common problems and Solutions
7.1. Common problems and solutions are shown in the table below
phenomenon
Cause analysis
Solution
Disconnection
/ jumper
1. Too low presser foot
pressure;
2. Needle damage;
3. Incorrect position of
shuttle bed and needle。
1. Adjust the presser foot
pressure;
2. Change needle;
3. Adjust the position of
shuttle bed and needle。
Poor thread
cutting
Cutter wear
1. Sharpening fixed knife
2. Replace fixed / moving
cutter
Bad size of
edge
The position of the pull hook
is not suitable
Adjust the hook position
Nonunion of
cross
position
The upper and lower feeding
wheels are not synchronized
Adjust the upper and lower
feeding wheels to the same
speed
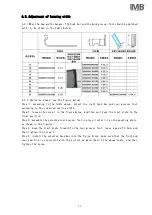
8
、
Daily maintenance requirements
8.1. The equipment maintenance list and requirements are shown in the table below
No.
Project
Frequency
Requirement
Daily
Weekly
Monthly
Half
year
1
Clean up the
dust
√
Remove dust from equipment surface and
parts
2
Cleaning up
oil pollution
√
Clean the greasy dirt on the table ,
needle plate and bobbin
3
Air tube
interface
√
The air tube interface is tight without
air leakage
4
Oil
√
Oil volume not lower than warning line
5
Bobbin
√
Check if the bobbin is scratched
6
Slider
√
Check slide lubrication and add
lubricant if necessary
7
Electric
control box
√
Cooling fan runs normally, clean up the
dust in time
Содержание MB5004E-IM
Страница 3: ......
Страница 4: ...1 2 3 4 4 1 4 4 2 5 4 3 6 7 5 1 7 5 2 7 9 6 1 9 6 2 10 6 3 11 6 4 12 6 5 13 14 15 16 17...
Страница 5: ...1 1 GC6770 2 3 4 5 6 7 8 9 10 11 12 2 3 1 4 5 6 11 9 8 10 7 12...
Страница 7: ...3 1 1 2 V 3 4 5 6 7 8 9 10 11 12 13 14 A...
Страница 8: ...4 4 1 1 90 ON 2 3 4 MB5004E IM 1 3 4 2...
Страница 9: ...5 4 2 a b...
Страница 10: ...6 ON ON 1 2 3 ON OFF OFF 1 2 3 ON OFF 1 2 1 2 3 4 4 3 1 2...
Страница 11: ...7 5 1 5 2 5 2 1 90 ON 5 2 1...
Страница 12: ...8 5 2 3 5 2 4 90 OFF...
Страница 13: ...9 6 1 Mp 1 0 4 0 5 2 0 1 0 2 3 0 3 0 4 4 0 1 0 2 5 0 1 0 2 6 0 3 0 4...
Страница 14: ...10 6 2 6 2 1 6 2 2...
Страница 15: ...11 6 3 6 3 1 6 3 2 1 0 2mm 1 1 1 1...
Страница 16: ...12 6 4 1 2 6 4 1 1 2 6 4 2 2...
Страница 17: ...13 6 5 1 2 3 4 5 1 2 3 4 5 6 1 2 3 4 5 6 7 1 1 2 3 4 2 5 3 6 7 6 60 1 2 3 4 6 4 1 2 2 1 3 3 2 1 3 4 5 6 7 2 1 3...
Страница 20: ...16 11 1 11 2 GC6770 C 1 2 3 4 5 6 7...
Страница 21: ...17 MB5004E...
Страница 22: ...ENGLISH...
Страница 29: ...6 4 2 Operator interface description a Power on interface b Main interface...


