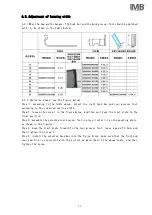
IMB MB5004E-IM Скачать руководство пользователя страница 38

15

Size

Combination

Small

1+2+3+4+5

Medium

1+2+3+4+5+6

Large

1+2+3+4+5+6+7

Explain:

1

No.1. No. 2, No. 3 and No. 4 stretch fabric group are stretched by the air cylinder before sewing and

tightened after sewing

2

)、

No. 5 is the feeder wheel, and its position is fixed

3

)、

6 and 7 can be adjusted on the slide rail at the same time

Method: loosen the nut to adjust

),

And 6 can be adjusted within 60 ° around the axis point

Method: loosen the axis point and its left and

right screws to adjust

)。

Summary

According to the specific trouser leg, which kind of driving wheel combination can be

selected by trial,For example: 1, 2, 3 and 4 in the tightened state,Put the trouser leg
on the stretch fabric group,The touch screen turns off automatic sewing,Step on the pedal,
At this time, the stretch fabric group is opened。Then you can observe if the trouser legs
are tight,If it is tight, it will work properly;If it's not tight,Then you need to add
No. 6 drive wheel,It is still based on whether it can be tightened;And so on......

Additional notes:

Block , Sidewall 1, Sidewall 2,limited plate, It's used to limit the the leg. For position
requirements, see "adjustment of hemming width"

Adjustment method:
1、Block:Loosen the two set screws to adjust its position
2、Sidewall 1: Loosen the screw 1 to adjust its position
3、Sidewall 2: Loosen the screw 3 to adjust its position

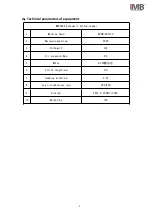
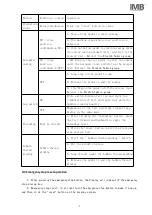
Содержание MB5004E-IM

Страница 1: ...al CHANGZHOU WISDOM VALLEY ELECTRICAL TECHNOLOGY CO LTD Please read the operation manual of the touch screen interface before using the device Please keep this operation manual of touch screen interfa...

Страница 2: ...IMB No part of this manual may be copied or transcribed without requesting prior authorization from IMB The contents of this manual may be subject to change without advance notification We are happy t...

Страница 3: ......

Страница 4: ...1 2 3 4 4 1 4 4 2 5 4 3 6 7 5 1 7 5 2 7 9 6 1 9 6 2 10 6 3 11 6 4 12 6 5 13 14 15 16 17...

Страница 5: ...1 1 GC6770 2 3 4 5 6 7 8 9 10 11 12 2 3 1 4 5 6 11 9 8 10 7 12...

Страница 6: ...2 MB5004E 1 GC6770 2 rpm 4000 3 V 220 4 Mpa 0 5 5 AC 6 mm 2 5 7 mm 9 53 8 mm 280 800 9 mm 950L 1000W 1300H 10 kg 165...

Страница 7: ...3 1 1 2 V 3 4 5 6 7 8 9 10 11 12 13 14 A...

Страница 8: ...4 4 1 1 90 ON 2 3 4 MB5004E IM 1 3 4 2...

Страница 9: ...5 4 2 a b...

Страница 10: ...6 ON ON 1 2 3 ON OFF OFF 1 2 3 ON OFF 1 2 1 2 3 4 4 3 1 2...

Страница 11: ...7 5 1 5 2 5 2 1 90 ON 5 2 1...

Страница 12: ...8 5 2 3 5 2 4 90 OFF...

Страница 13: ...9 6 1 Mp 1 0 4 0 5 2 0 1 0 2 3 0 3 0 4 4 0 1 0 2 5 0 1 0 2 6 0 3 0 4...

Страница 14: ...10 6 2 6 2 1 6 2 2...

Страница 15: ...11 6 3 6 3 1 6 3 2 1 0 2mm 1 1 1 1...

Страница 16: ...12 6 4 1 2 6 4 1 1 2 6 4 2 2...

Страница 17: ...13 6 5 1 2 3 4 5 1 2 3 4 5 6 1 2 3 4 5 6 7 1 1 2 3 4 2 5 3 6 7 6 60 1 2 3 4 6 4 1 2 2 1 3 3 2 1 3 4 5 6 7 2 1 3...

Страница 18: ...2500451300100 2 1 1 02500451300200 2 2 1 050201409006 1215 2 6 02500451300300 1 1 02500451300400 2 1 7 02500451300500 1 02500451300600 1 1 8 02500451300700 2 1 9 02500451300800 3 1 10 02500451300900 4...

Страница 19: ...15 15 02500451301400 9 1 16 02500451301500 1 1 17 02500451301600 2 1 18 02500451301700 3 1 19 02500451301800 1 10 1 10 2 MB5004E 1 2 3 1 2 3 1 2...

Страница 20: ...16 11 1 11 2 GC6770 C 1 2 3 4 5 6 7...

Страница 21: ...17 MB5004E...

Страница 22: ...ENGLISH...

Страница 23: ...stop reset operation 7 5 Operating instructions 8 5 1 Preparation before operation 8 5 2 Operation process description 8 6 Debugging method 10 6 1 Air pressure adjustment 10 6 2 Cross position detecti...

Страница 24: ...Typical GC6770 Head 2 Touch screen 3 Control box 4 Power switch 5 Lifting stand 6 Pedal 7 Detector device 8 Stretch fabric group 9 Large size adjustment group 10 Feeding group 11 Pressing group 12 Em...

Страница 25: ...E Automatic bottom hemmer 1 Machine head GC6770 2 Maximum speed rpm 4000 3 Voltage V 220 4 Air pressure Mpa 0 5 5 Motor AC 6 Stitch length mm 2 5 7 Hemming width mm 9 53 8 Leg circumference mm 280 800...

Страница 26: ...ve the cloth guide when the preparation work is finished and the sewing state is reached 9 In order to prevent accidents caused by electric shock please do not operate the sewing machine when the grou...

Страница 27: ...refully and operate correctly before operation Please ventilate the machine before it is officially powered on do not turn on the internal parts of the electric cabinet or touch screen while the power...

Страница 28: ...o on at 90 to power and ventilate the equipment 2 Emergency stop switch in case of emergency press this button to stop the machine 3 Pedal Step forward sewing begins Loosening sewing stops Back steppi...

Страница 29: ...6 4 2 Operator interface description a Power on interface b Main interface...

Страница 30: ...abric group Leg switch ON Cycle switch between left leg and right leg Subdivision of left and right foot patterns improves sewing quality OFF Regardless of the left and right trouser legs Sewing in th...

Страница 31: ...her the needle has been installed Clean up the debris on the machine table to ensure that there will be no debris obstructing the operation of the machine Check the pressure of the barometer to make i...

Страница 32: ...9 5 2 3 Step forward Start to finish sewing 5 2 4 Shut down After the operation turn the power switch 90 to the off position and the equipment will be shut down...

Страница 33: ...e adjustment meter No Name Range Mp 1 Roller cylinder 0 4 0 5 2 Front presser foot cylinder 0 1 0 2 3 Rear presser foot cylinder 0 3 0 4 4 Lower hook cylinder 0 1 0 2 5 Middle strut cylinder 0 1 0 2 6...

Страница 34: ...roller and the bearing The light of switch 1 will be off At this time the cross position signal is obtained The machine uses this signal as the basis for starting and ending the needle 6 2 1 When the...

Страница 35: ...idth Step 2 loosen the screw 1 in the figure below and then pull back the Limit plate to the final position Step 3 assemble the selected rear presser foot in place install it on the mounting plate as...

Страница 36: ...13 2 6 4 Adjustment of seam width 1 2 Mounting plate Screws 1 Rear presser foot Limit plate Fixed block Hook bar Screw 2...

Страница 37: ...According to the above definition it can be seen that the adjustment method of the stop width is After loosening the screw in figure 2 Move the front presser foot forward and backward by hand After re...

Страница 38: ...be selected by trial For example 1 2 3 and 4 in the tightened state Put the trouser leg on the stretch fabric group The touch screen turns off automatic sewing Step on the pedal At this time the stre...

Страница 39: ...on The upper and lower feeding wheels are not synchronized Adjust the upper and lower feeding wheels to the same speed 8 Daily maintenance requirements 8 1 The equipment maintenance list and requireme...

Страница 40: ...and are protected by national intellectual property laws and regulations Without the written permission of the right holder the patented technology of the achievement shall not be implemented and the...

Отзывы: