background image

1

2

3

4

5

6

7

8

9

10

11

12

5-20

USING THE SPECIAL FUNCTIONS

12. DEPARTMENT CODES

You can  administer  the  copy  quantity  of  each  group  by  setting  a  department  code  for  each  purpose
(copier and printer ). Up to 500 codes can be set.
*You need a master code to be registered when you use this function for the first time.

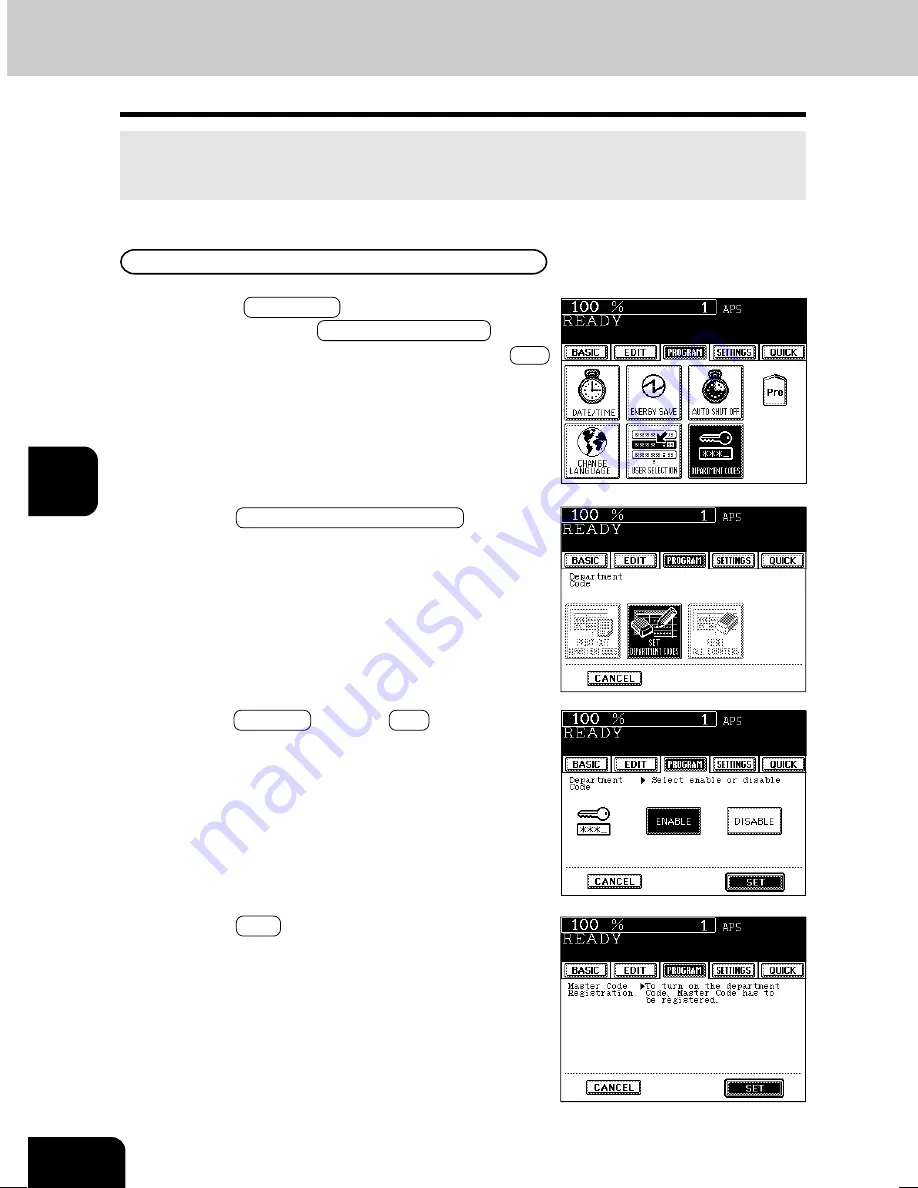
1

Press the   PROGRAM  key to enter the program

menu, and press the  DEPARTMENT CODE  key.

- If the desired function keys are not displayed, press the  Next

key to change the menu screen.

Master code registration

2

Press the  SET DEPARTMENT CODES  key in the

department code menu.

3

Press the  ENABLE  key, then  SET  key.

4

Press the   SET  key.

05-SPECIALFUNCTIONS.P65

5/15/03, 7:17 PM

20

Содержание im6530

Страница 1: ...www imagistics com Operating Manual im8130 im6530...

Страница 2: ......

Страница 3: ...ction against harmful interference when the equipment is operated in a commercial environment This equipment generates uses and can radiate radio frequency energy and if not installed and used inaccor...

Страница 4: ...odel Off Mode The copier consumes less than 20 watts in the Off Mode Off Mode Default Time The default time for the Off Mode is 90 minutes Automatic Energy Save The copier consumes less than 255 watts...

Страница 5: ...unction To order supplies including toner staples and paper call the Imagistics Supply Line at 1 800 462 6797 For faster service please have your machine model PCN and serial number available before c...

Страница 6: ...and SERVICE General ISO 9000 and ISO 14000 Toner for the Imagistics im8130 im6530 is manufactured in ISO 9001 or ISO 9002 and ISO 14001 certified factories Quality craftsmanship and environmental fri...

Страница 7: ...ot avoided may result in minor or mod erate injury partial damage of the equipment or surrounding assets or loss of data Note Indicates a procedure you should follow to ensure the optimal performance...

Страница 8: ...the proper copy den sity Automatic paper selection reads the size of originals automatically and sets the paper size and Auto matic zoom selection calculates the copy magnification Comes with rich ed...

Страница 9: ...1 General copying procedures 2 2 2 Setting copy paper 2 4 Acceptable copy paper types and sizes 2 4 Handling and storing paper 2 5 Changing the paper size of the drawer Setting the drawer for special...

Страница 10: ...riginal feeding 5 2 2 Mixed sized originals 5 4 3 Job memory 5 5 4 Bypass copying 5 8 Bypass copying on standard size paper 5 10 Bypass copying on non standard size paper 5 11 5 Weekly timer 5 13 6 Se...

Страница 11: ...ding paper to the Tandem LCF Large Capacity Feeder 7 4 Adding paper to the External LCF Lage Capacity Feeder optional 7 5 3 Replace toner cartridge symbol 7 6 4 Clear paper symbol 7 9 Reversing automa...

Страница 12: ...1 2 3 4 5 6 7 8 9 10 11 12 8 This page intentionally left blank...

Страница 13: ...Canada where a 2 pin plug is used the copier must be grounded for safety Never ground it to a gas pipe a water pipe or any other object not suitable for grounding 3 After a suitable place has been sel...

Страница 14: ...outside of the copier becomes unusually hot If any part of this copier is damaged or if it has been dropped If the copier has been exposed to rain or liquid 3 It is recommended that only supplies made...

Страница 15: ...1 PRODUCTO DE LASER DE CLASE 1 PS Certification Label PRODUCT IS CERTIFIED BY THE MANUFACTURER TO COMPLY WITH DHHS RULE 21 CFR SUBCHAPTER J APPL I CABLE AT THE DATE OF MANUFACTURE MANUFACTURED JS M Id...

Страница 16: ...s each of the copier After moving installing the copier be sure to turn the adjusters clockwise to fix them firmly on the ground To unlock the adjusters when moving the copier turn them counterclockwi...

Страница 17: ...equipment 1 2 Main components 1 2 Optional equipment 1 3 Control panel 1 4 Touch panel 1 6 2 Turning ON the power switch 1 8 Turning ON the Power Switch Auto Job Start 1 8 Controlling the use of the c...

Страница 18: ...slot Toner cartridge Front cover Exit cover Power switch Reversing automatic document feeder Operator s manual pocket Back side Transfer unit Transfer unit lever Original glass Tandem LCF Large Capac...

Страница 19: ...e punch unit Makes punching holes on copies for binding in notebooks Inserter Enable the use of special types of paper and printed paper in addition to the staple sorting or the hole punch mode Availa...

Страница 20: ...functions JOB STATUS key Press this key to monitor the statuses of 1 Job list 2 Deleting jobs 3 Moving jobs 4 Copying status and 5 Setting drawers This key flashes in case of 1 No paper in the drawer...

Страница 21: ...lamps To resume copying press this key again If you press this key when the optional printer controller is installed the power supply to the printer board is not cut off which allows automatic return...

Страница 22: ...ons The contents of the touch panel screens on this manual show a copier equipped with full options Function setting area Total copy quantity Reproduction ratio Message Index keys Set functions confir...

Страница 23: ...u press any key that is half tone shaded the function selected is cleared Also if the copier is left inactive for approx 45 seconds the automatic function clear Page 1 4 works and the settings will be...

Страница 24: ...Warming Up Up to 5 jobs can be stored in the memory Place the originals for the 6th job on the original glass or the reversing automatic document feeder and press the START key The following message...

Страница 25: ...volumes made by individual groups or departments of your company Registering changing and deleting a department code Page 5 20 The department codes and the key copy counters Page 1 10 cannot be used t...

Страница 26: ...technician The key copy counters and the department codes Page 1 9 cannot be used together 1 The following message appears on the basic screen Set key copy counter 2 Insert your key copy counter slowl...

Страница 27: ...Changing the paper size of the drawer Setting the drawer for special uses 2 6 3 Setting originals 2 9 Acceptable original types and sizes 2 9 When placing an original on the glass 2 10 When using the...

Страница 28: ...ous feed mode is selected Page 5 2 copying begins 2 Place the original s Acceptable originals Page 2 9 When placing an original on the glass Page 2 10 When using the reversing automatic document feede...

Страница 29: ...ide down except in the following cases When paper is exited with its printed side up When Non sort Non staple mode is selected for setting the original on the original glass When the paper size is not...

Страница 30: ...Q 8 x 8 A B format A3 297 x 420mm A4 297x210mm A4 R 210x297mm A5 R 148 x 210mm B4 257 x 364mm B5 257 x 182mm B5 R 182 x 257mm FOLIO 210 x 330mm Drawers Feeder PaperType Paper Size Remarks Tandem LCF E...

Страница 31: ...double copying on the same side of paper this may cause a malfunction Do not use paper with creases wrinkles curled paper paper prone to curling smooth paper or tough paper this may cause paper misfee...

Страница 32: ...ht side of the size selection lever to unlock it 5 Push the arrow part left side to lock the size selection lever 6 Place paper in the drawer s Place the paper in face down Notes for placing paper in...

Страница 33: ...return to the basic screen You can set the drawer for various uses cover sheet sheet insertion and tab paper thick paper special sheets The default paper is plain paper Page 2 4 Drawer for cover sheet...

Страница 34: ...key For example when inserting 90 lb Index paper press INSERT key and press THICK 1 key The setting is completed as shown on the right Clearing the Drawer for Special Uses Press the drawer key corres...

Страница 35: ...n paper formats are mixed 3 SETTING ORIGINALS Standard size LT format LD LG LT LT R ST R A B format A3 297 x 420mm A4 297 x 210mm A4 R 210 x 297mm A5 R 148 x 210mm B4 257 x 364mm B5 257 x 182mm B5 R 1...

Страница 36: ...lass 2 Align the original against the left inner corner of the glass 3 Lower the reversing automatic document feeder slowly When using the non sorting and non staple mode the paper exits face up When...

Страница 37: ...nnot be moved or originals which are surface treated may fail to be separated properly Do not use the following types of originals as they tend to misfeed or become damaged 1 Badly wrinkled or folded...

Страница 38: ...raight along the slides it will then be pulled in automatically When the original starts being pulled in let go of it Slide Slide In the Continuous Feed Mode Page 5 2 1 After aligning the edges of ori...

Страница 39: ...py modes as required Auto Start Confirming and Cancelling Auto Job Start Cancelling the job while waiting for the original to be stored in the memory If you want to cancel copying the original when it...

Страница 40: ...h interrupt copying Cover sheet copying Sheet insertion copying Document storage Overlay 2 Replace the original with a new one Page 2 9 1 Press the INTERRUPT key This message appears Without performin...

Страница 41: ...ing the Scanning of the Original 1 Press the control panel STOP key on the operational panel during the scanning 2 If the screen on the right appears press the MEMORY CLEAR key Stopping a Multicopying...

Страница 42: ...el then the JOB LIST key on the touch panel 2 Select the job you want to delete then press the DELETE key 3 Press the Delete key 4 The job will be deleted The menu on the right shows an example of the...

Страница 43: ...e job you want to move 3 Press the MOVE key then press the position where the selected job is to move to The job to be moved will be shifted next to new priority The job with top priority having been...

Страница 44: ...1 2 3 4 5 6 7 8 9 10 11 12 2 18 HOW TO MAKE COPIES...

Страница 45: ...1 Paper selection 3 2 Automatic paper selection APS 3 2 Manual paper selection 3 3 2 Reduction and enlargement copying 3 4 3 Duplex copying 1 sided 2 sided book type 3 7 4 Copy density adjustment 3 11...

Страница 46: ...This function however is applicable to plain paper only When you place regular sized originals on the glass or in the reversing automatic document feeder the built in sensors automatically work to det...

Страница 47: ...ransparent originals such as OHP films and tracing paper completely dark originals or originals with dark borders or irregular sized originals such as newspapers and magazines For these types of origi...

Страница 48: ...s of originals use the other reduction enlargement modes Original sizes for which Automatic Magnification Selection automatic detection is available Page 2 9 Set the paper size for the OTHER key as re...

Страница 49: ...tio is computed and displayed on the screen OTHER key Page 5 14 Specifying both Original Size and Copy Size 2 Place the original s Page 2 9 3 Press the desired drawer then the ZOOM key The copy paper...

Страница 50: ...io Each time you press either key the reproduction ratio changes by 1 Holding down the key changes it continuously You can also select the reproduction ratio by pressing the 400 200 100 50 or 25 key d...

Страница 51: ...15 12 13 15 13 13 3 DUPLEX COPYING 1 SIDED 2 SIDED BOOK TYPE This function allows you to set the type of originals 1 sided 2 sided or book type and the desired type of copying 1 sided or 2 sided Orig...

Страница 52: ...4 When using the mode of 1 Sided Originals to 2 Sided Copies and 2 Sided Originals to 2 Sided Copies in bypass copying be sure to specify the paper size Page 5 10 5 11 Select other copy modes as requ...

Страница 53: ...the BOOK 2 key 6 Place the first page s to be copied on the glass and press the START key If you do not copy your originals from the first page the copies will not be arranged in the same order as th...

Страница 54: ...book again and press the START key Repeat the procedure above until all your originals have been scanned 8 After all your originals have been scanned press the FINISHED key Press the COPY FINAL PAGE...

Страница 55: ...nual mode In the automatic mode the sensors automatically detect the density of each original and select the optimum image density In the manual mode you can select the desired level of image density...

Страница 56: ...density manually on the basic screen 4 Press either or key to adjust the copy density to the desired level Each time you press the or key your copies will become lighterordarker respectively 3 Press...

Страница 57: ...is to be selected for originals containing photo and text mixed together Select other copy modes as required 5 Press the START key The amount of toner consumed varies depending on the selected image o...

Страница 58: ...required 4 Press the START key For the functions of the finishing and duplex modes which are not shown on the display set them on the basic screen Finishing mode setting Page 6 2 Duplex copying Page 3...

Страница 59: ...irror image 4 10 Negative Positive reversal 4 11 6 2 IN 1 4 IN 1 4 12 7 Copying with annotation 4 14 8 Page numbering copying 4 15 9 Magazine sort from the editing menu 4 16 10 Cover copying 4 18 11 S...

Страница 60: ...r binding is created by shifting the original image to either the right or left side You can also create binding margins in the center inner margin when using Book Type Originals to 2 sided copies Pag...

Страница 61: ...Press the START key 5 Adjust the width of the binding margin then press the SET key The default width of the margin is 7mm 0 276 To adjust the width press the 0mm or 40mm key to select the desired num...

Страница 62: ...ss the 5mm or 20mm key to select the desired number then press the SET key 2 EDGE ERASE If your original has a dirty or torn edge it may be reproduced as a black mark on the copy In that case use Edge...

Страница 63: ...11 Utilizing this feature allows the facing pages of a book or magazine to be copied page by page onto two separate sheets of paper or duplex copied on one sheet There is no need to move the original...

Страница 64: ...als have been scanned press the FINISHED key Press the COPY FINAL PAGE key if the last original has only one page 6 Place the first page s to be copied on the glass and press the START key If you do n...

Страница 65: ...Similarly set the reproduction ratio forY When placing the original on the reversing automatic document feeder set the reproduction ratios from 25 to 200 2 Place the original s Page 2 9 3 Press the ED...

Страница 66: ...ide of the area copied or masked only the outside of the area copied Four rectangular areas can be specified on an original Image editing is only possible with standard sized originals If the settings...

Страница 67: ...ginal scale 5 Using the original scale on the left and the inner top scale read the position of the desired area as fol lows X1 Distance from the top left to the left edge of the specified area X2 Dis...

Страница 68: ...to enter the edit menu and press the EDITING key Copies are made with images completely reversed in terms of right and left 4 Press the MIRROR key Mirror Image 2 Place the original s Page 2 9 1 Place...

Страница 69: ...key 2 Place the original s Page 2 9 3 Press the EDIT key to enter the edit menu and press the EDITING key Negative Positive Reversal 1 Place paper in the drawer s Page 2 4 The white area of originals...

Страница 70: ...re reduced and copied onto a single sheet and 4 IN 1 copying where four originals are reduced and copied onto a single sheet In addition duplex 2 IN 1 4 IN 1 modes are available where four eight origi...

Страница 71: ...IN1 DUPLEX key 5 Select the type of the original Press the 1 SIDE or 2 SIDE key 3 Press the EDIT key to enter the edit menu and press the 2IN1 4IN1 key 1 Place paper in the drawer s Page 2 4 When usin...

Страница 72: ...nal s Page 2 9 3 Press the EDIT key to enter the edit menu and press the ANNOTATION key If the desired function keys are not displayed press the Next or Pre key to change the menu screen 4 Select the...

Страница 73: ...r the edit menu and press the PAGE NUMBER key If the desired function keys are not displayed press the Next or Pre key to change the menu screen 4 Select the orientation Short edge or Long edge and po...

Страница 74: ...he mode operated from the BASIC menu when the finisher optional is installed see page 6 6 9 MAGAZINE SORT FROM THE EDITING MENU 1 Place paper in the drawer s Page 2 4 2 Select the paper type For drawe...

Страница 75: ...ey Maximum number of sheets that can be stapled Page 6 7 Select other copy modes as required 6 Press the START key When placing an original on the glass perform steps 5 and 6 on page 2 3 as needed 5 A...

Страница 76: ...cial uses Page 2 7 When placing it on the bypass guide it is necessary to set the paper size and weight Page 5 10 2 Place or confirm that if there is paper other than cover paper in the drawer s Page...

Страница 77: ...and back covers BOTH BLANK To add copied top and blank back covers TOP COPIED BACK BLANK 6 Press the BASIC key to enter the basic menu and select the paper source of the same size and direction as th...

Страница 78: ...e the specified page 1Place sheets of paper in the drawer for the sheet insertion Page 2 6 4 Press the EDIT key to enter the edit menu and press the SHEET INSERTION key If the desired function keys ar...

Страница 79: ...eat step 6 Up to 15 pages can be specified To have different sheets inserted than Insert source 1 select INSERT SOURCE 2 and similarly key in the pages where you want the sheets inserted then press th...

Страница 80: ...e used in this mode When selecting YES of Hole Punch the tab paper on the User Selection Page 5 19 you can combine it with the optional hole punch mode Page 6 8 Setting Tab Paper in the Drawer 1 Pull...

Страница 81: ...e Theshiftwidthmeansthedistancethe imageshouldbeshiftedwhencopied onthetabpaper Shift width Tab width Original Tab paper The range of the tab width the shift width Originals Sheets of tab paper 1st 2n...

Страница 82: ...set to 13mm 0 51 for the tab width and the shift width You can change the initial setting default setting on the User Selection Page 5 19 The range of the tab width the shift width Tab width Shift wid...

Страница 83: ...paper at the value in the tab width set mode Page 4 23 2 Place the original s Page 2 9 Tab Paper Copying 3 Press the EDIT key to enter the edit menu and press the TAB PAPER key If the desired function...

Страница 84: ...ress the START key 12 TAB PAPER MODE Cont 4 Press the BLANK TAB INSERT key 3 Press the EDIT key to enter the edit menu and press the TAB PAPER key If the desired function keys are not displayed press...

Страница 85: ...START key 4 Press the COPIED TAB INSERT key 3 Press the EDIT key to enter the edit menu and press the TAB PAPER key If the desired function keys are not displayed press the Next or Pre key to change t...

Страница 86: ...tored in up to 24 locations Up to 1 000 original sheets can be stored in each location Total Document Storage capacity is determined by the size of the documents 2 Press the EDIT key to enter the edit...

Страница 87: ...om the list on the display and press TEST PRINT To delete a memorized job select the ID from the list on the display and press the DELETE key Then press the Delete key on the next screen 2 Press the E...

Страница 88: ...gement However the original can be overlaid with reduction and enlargement by adjusting it to the size of stored image 4 Press the row of the file name list you desire then press the FILE NAME key 3 P...

Страница 89: ...starts printing out Deleting Image 1 Perform steps 2 to 3 Page 4 29 2 Press the file name you desire the selected file name will be shaded then press the DELETE key 7 The form will be stored as shown...

Страница 90: ...esired function keys are not displayed press the Next key to change the menu screen 1 Place paper in the drawer s Page 2 4 2 Place the original s Page 2 9 6 Press the START key Select other copy modes...

Страница 91: ...on keys are not displayed press the Next key to change the menu screen This function allows you to emphasize the letters and edges of images 1 Place paper in the drawer s Page 2 4 4 Press the SOFT or...

Страница 92: ...ion of vertical opening set non set 5 Press the SET key 1 Place paper in the drawer s Page 2 4 6 Press the START key Select other copy modes as required 2 Place the original s Page 2 9 3 Select 1 Side...

Страница 93: ...8 Bypass copying on standard size paper 5 10 Bypass copying on non standard size paper 5 11 5 Weekly timer 5 13 6 Setting the OTHER size key 5 14 7 Setting the date and time 5 15 8 Setting the automa...

Страница 94: ...gle feed mode where if you insert an original it is automatically pulled in and starts being copied 1 Place paper in the drawer s Page 2 4 4 Press the ADF key When the number of originals is too large...

Страница 95: ...original Page 2 9 The original is automatically pulled in and the screen changes as shown on the right If there are more originals set them in the same way The same operation is carried out whether or...

Страница 96: ...sized originals in the reversing automatic document feeder you can make copies by setting MIXED SIZED ORIGINALS The available combination of mixed sized originals are as follows 4 Press the SET key 5...

Страница 97: ...mory but you can rewrite new jobs on the memory key in which some copy modes have already been stored 3 Press the MEMORY key 1 Select the desired copy modes Example Reproduction ratio 85 Copy quantity...

Страница 98: ...pies 1 Place paper in the drawer s Page 2 4 5 Press the Memory Number key where the desired combination of copy job settings are stored Memory Number keys where copy jobs have already been stored are...

Страница 99: ...confirm the copy modes stored in the Memory Number key perform steps 3 to 5 on the previous page then press the SETTINGS key Confirming Stored Copy Jobs The screen on the right is an example of jobs...

Страница 100: ...her press the FUNCTION CLEAR key or wait 45 seconds before the bypass copying mode automatically returns to the default mode The copier stops its operation when the paper set on the bypass guide has r...

Страница 101: ...menu and press BYPASS FEED key If the standard size paper has been set you do not have to perform steps 3 to 4 2 Place the original s Page 2 9 If you select the paper type not corresponding to the typ...

Страница 102: ...LT or ST you will select the OTHER key in step 2 In this case you need to make the OTHER key recognize the same size as the paper that has been set 3 If you set the paper other than plain paper press...

Страница 103: ...call the data stored in the MEMORY Then press the lower SET key When using the digital keys to key in the size Key in the length and press the upper SET key Simlarly set the value for the width Press...

Страница 104: ...tings will be rewritten and stored on that Memory Number key Storing a Non Standard Size in the MEMORY 4 Key in each dimension then press the MEMORY key Key in the length and press the upper SET key S...

Страница 105: ...and press the WEEKLY TIMER key The WEEKLYTIMER key is half tone shaded when the weekly timer has already been set 2 Check the settings on the display and if corrections are necessary press the CHANGE...

Страница 106: ...key on the screen on the right to recognize the size that will be used The initial setting for this key is COMP 6 SETTING THE OTHER SIZE KEY 1 Press the PROGRAM key to enter the program menu and pres...

Страница 107: ...SET key Setting the Clock fore Daylight SavingTime Press the key to shade it on the first day of summer then press the SET key If the time was 13 40 before setting the daylight saving time system for...

Страница 108: ...t is left inactive for a certain period of time ENERGY SAVER key Page 1 5 2 Select the period of time in minutes on the display allowed before the Automatic Energy Saving mode is activated The setting...

Страница 109: ...e not displyed press the Next key to change the menu screen When the power of the optional printer controller is ON the copier goes into the sleep mode which stands by with the minimun power consumpti...

Страница 110: ...o enter the program menu and press the CHANGE LANGUAGES key If the desired function keys are not displayed press the Next key to change the menu screen 10 SWITCHING LANGUAGES The language used on the...

Страница 111: ...can change the initial setting default setting of each mode displayed on the User Selection screen After changing the setting there are two procedures as follows Mode that is automatically reflected...

Страница 112: ...be set You need a master code to be registered when you use this function for the first time 1 Press the PROGRAM key to enter the program menu and press the DEPARTMENT CODE key If the desired functio...

Страница 113: ...CODE and press the SET key The master code is 5 digits 00000 is invalid 7 Master code name is displayed in the department number 001 Master code registration is completed Procedure to display the dep...

Страница 114: ...low Input the master code for using SET DEPARTMENT CODES and RESET ALL COUNTERS 3 The department code menu is displayed The screen when the master code is entered The screen when the department code i...

Страница 115: ...rtment code and press the CHANGE key 4 Input the department name and press the SET key Entering letters Page 5 29 5 Key in the desired department code the same number both for NEW CODE and for RETYPE...

Страница 116: ...ARTMENT CODES Cont Changing a Specific Department Code 1 Press the SET DEPARTMENT CODES key in the department menu 2 Press the ENABLE key then SET key 3 Press the department number where you want to c...

Страница 117: ...epartment code for CURRENT CODE and the new department code both for NEW CODE and RETYPE NEW CODE and press the lower SET key The master code is 5 digits 00000 is invalid Changing of the department co...

Страница 118: ...rtment number where you want to delete the department code and press the DELETE key 4 Press the YES key Deleting of the selected department code is completed Clearing a Specific Department Counter 1 P...

Страница 119: ...UNTERS key 1 Press the SET DEPARTMENT CODES key in the department code menu 2 Press the DISABLE key then the SET key Disabling set is completed 4 Press the YES key The counter reset is completed Disab...

Страница 120: ...PRINT OUT DEPARTMENT CODES key in the department code menu Printing starts Clearing All Counters This function clears all counters to 000000 Available only when the master code is entered The total c...

Страница 121: ...B Space Press this key to delete the letter before the cursor Space Press this key to enter a space Press these keys to move the cursor SET Press this key to fix all entered letters Cancel Press this...

Страница 122: ...13 ENTERING LETTERS Cont 1 Press the B Space key to delete eeting 2 Press the CapsLock key to enter the capital letters Example Correct Meeting to MEETING 3 Press the E T I N and G keys 4 Press the SE...

Страница 123: ...7 8 9 10 11 12 5 31 5 Press the B Space key to delete M 6 Press the N key to enter N then the SET key to fix the entered characters 4 Press the key to move the cursor to under G 3 Press the E E T I M...

Страница 124: ...1 2 3 4 5 6 7 8 9 10 11 12 5 32 USING THE SPECIAL FUNCTIONS...

Страница 125: ...ERTER 1 Finishing modes and finishers optional 6 2 2 Sort group copying 6 3 3 Staple sorting optional 6 4 4 Magazine sort saddle stitch mode booklet mode optional 6 6 5 Hole punch mode optional 6 8 6...

Страница 126: ...n the panel The touch panel used in this chapter appears when the op tional saddle stitch finisher 9948 9975 with hole punch unit and inserter are installed with your copier Names of the Main Componen...

Страница 127: ...OLIO Example of making 5 sets of copies from 5 page originals Sort copying Group copying 1 Place paper in the drawer s Page 2 4 4 Press the SORT or GROUP key 2 Place the original s Page 2 9 5 4 3 2 1...

Страница 128: ...ms automatic stapling at one of the following three positions The paper weight should be in the range of 16lb Bond 28lb Bond Special paper such as OHP films or labels is excluded Stapling cannot be wo...

Страница 129: ...h are loaded the maximum number of sheets that can be stapled is shown in the lower row Do not exceed the maximum number of sheets that can be stapled for 24lb Bond and 28lb Bond paper See the above t...

Страница 130: ...n the Magazine Sort mode is selected 1 sided originals can be copied and bound like magazines or booklets When a finisher with a saddle stitch optional 9948 9975 is installed you can select the saddle...

Страница 131: ...ent weights is loaded the maximum number of sheets that can be stapled will be that of the paper with the highest weight Paper size Paper weight Maximumcapacityforsaddlestitch When the tray load capac...

Страница 132: ...nge the menu screen 5 HOLE PUNCH MODE OPTIONAL 1 Place paper in the drawer s Page 2 4 When using this mode in bypass copying Page 5 8 be sure to specify the paper size With the optional hole punch uni...

Страница 133: ...t in the Inseter LD LG LT LT R COMP A3 A4 A4 R B4 B5 FOLIO Paper size Plain paper 16 lb Bond 20 lb Bond Thick paper more than 20 lb Bond 140 lb Index Recycled paper Special paper OHP film Color paper...

Страница 134: ...aper for the initial setting of the copier at the time of installation the procedures from step 5 to 8 are not necessary When you want to insert papers with making copies place the paper in the drawer...

Страница 135: ...he SHEET INSERT key before pressing the SET key 6 Press the key of the paper size placed in the inserter 7 Press the MEDIA TYPE key Forplainpaper skipstep7andstep8becausethese procedures are not neces...

Страница 136: ...isprocedure Up to 15 insert locations can be specified in a single copy job 9 Press the SHEET INSERT key 11 When specifying the page number is completed press the lower SET key For combining it with t...

Страница 137: ...s facing up as shown on the right 2 Set with the control panel of the inserter If you desire hole punch press the key on the panel below The lamp of the hole punch lights If you desire staple or saddl...

Страница 138: ...1 2 3 4 5 6 7 8 9 10 11 12 6 14 SELECTING FINISHING MODES...

Страница 139: ...ional 7 5 3 Replace toner cartridge symbol 7 6 4 Clear paper symbol 7 9 Reversing automatic document feeder 7 10 Inside of the copier 7 12 Paper misfeed on the bypass guide 7 15 External LCF optional...

Страница 140: ...ALS symbol Flashes if an original misfeed occurs inside the reversing automatic document feeder Page 7 10 PAPER EXIT MISFEED symbol Flashesif a paper misfeed occurs at the paper exit Page7 12 PAPER PA...

Страница 141: ...ed folded wrinkled or damp sheets of paper Make sure that a gap of approx 0 5 mm less than 1 mm in total is left between the paper and the side guide If there is no gap this may cause paper misfeeding...

Страница 142: ...not open refer to the labels attached in the tandem LCF Up to 2500 sheets of paper 20 lb Bond can be set Paper starts being fed from the elevator tray A at first and when it runs out of paper the pape...

Страница 143: ...heets that can be set Page 2 4 Fan the paper well then place it on the elevator tray aligning it on the rear guide tray Set the paper so that it does not protrude beyond the line of indication shown o...

Страница 144: ...ymbol flashes Add toner 1 Open the front cover This message will appear on the sceen Here at Imagistics dependable high quality image output is what we do By using genuine Imagistics toner you can ens...

Страница 145: ...er orange on the toner cartridge then insert the toner cartridge to the end If you cannot insert the toner cartridge completely rotate it slightly to check the position and insert it again If the tone...

Страница 146: ...TOUCH PANEL Replace Toner Bag When the toner bag becomes full of used toner the REPLACE TONER BAG symbol flashes Please call your service technician to ask to have the used toner bag replaced with a n...

Страница 147: ...move the optional finisher including the inserter and the hole punch unit Separating it from the copier While pressing the release lever gently move the finisher position A including the hole punch un...

Страница 148: ...BOL Cont Paper Misfeed in the Reversing Automatic Document Feeder 2 Rotate the blue knob to remove any misfed originals 1 Push the button on the reversing automatic document feeder to open the cover 3...

Страница 149: ...rrow pull it toward you 6 Open the original exit tray and remove any misfed originals 8 Remove any misfed originals 5 Lift the original feeding tray and remove any misfed originals 4 Lift the blue han...

Страница 150: ...UCH PANEL Paper Misfeed inside of the Copier 1 Open the paper feed cover When installing the external LCF optional open the paper cover after doing step 1 of page 7 15 3 Open the bypass cover 2 Remove...

Страница 151: ...turning the knob in the direction of the arrow Metal area of guide plate Metal area of guide plate Caution Do not touch the metal area of guide plate in the automatic duplexer You might burn yourself...

Страница 152: ...transfer unit out until it comes to a stop 9 Lift the grip then turn the knob in the direction of the arrow to remove any misfed paper Caution Do not touch the fuser unit and around the metal area You...

Страница 153: ...tional 2 Remove any misfed paper by turning the blue knob in the direction of the arrow 1 Pull the external LCF away from the copier slowly while pressing the release lever 3 When paper misfeeds insid...

Страница 154: ...fed paper Be careful not to touch the drawer slide rail Be careful not to let your fingers be caught when closing the drawer 5 Return the external LCF to its original position As shown in the figure o...

Страница 155: ...aper might not be able to be removed while the hole punch unit is used In this case perform the steps in Paper Misfeed in the Hole Punch Unit 6 Open the tray of the inserter to remove any misfed paper...

Страница 156: ...ocate the arrow within the area A on the label Under this condition the punchers are up allowing the paper shown in the figure to be removed 1 Open the upper cover of the finisher 1 2 Lift knob See th...

Страница 157: ...f step 2 on page 7 18 Paper Misfeed in the Saddle Stitch Unit optional 4 Remove any misfed paper from the paper exit area 2 Open the entrance cover of the saddle stitch unit 1 When installing the opti...

Страница 158: ...d on the exit side of the saddle stitch unit 7 Open the exit cover of the saddle stitch unit and remove any misfed paper 4 CLEAR PAPER SYMBOL Cont 4 Open the lower cover of the finisher 5 Turn the rig...

Страница 159: ...apler and slide out the staple cartridge The stapler unit has moved to its specified position Do not move the stapler unit while performing the above procedure or it will be broken 3 Remove the empty...

Страница 160: ...it is caught by the claw and fixed with a click sound 7 Close the front cover of the finisher 5 Pull out the seal holding the staples straight upward If the following message remains displayed repeat...

Страница 161: ...move the seal holding the staples until the staple case is set in the cartridge 5 Pull out the seal holding the staples straight upward Close the cover manually 6 Return the staple cartridge to its or...

Страница 162: ...ce both staple cases with new ones Do not remove the seal holding the staples before the staple case is set in the cartridge 5 Return the saddle stitch holder and the saddle stitch unit to their respe...

Страница 163: ...staple cartridge 7 Close the lower cover of the finisher Test stapling is then automatically performed on a blank sheet This operation is carried out to avoid blank stitching 6 Make sure that the fini...

Страница 164: ...ammed Remove them as described below Finisher 6 REMOVING JAMMED STAPLES OPTIONAL 2 Holding the knob lower part A 3 Remove any jammed staples using your fingertip or something sharp 4 Holding the knob...

Страница 165: ...s caught by the claw and fixed with a click sound When using 9905 9948 Saddle Stitch Unit 6 Close the front cover of the finisher A 2 Remove the empty staple case 3 While pushing down on level pull up...

Страница 166: ...HENTHE GRAPHIC SYMBOLS FLASH ONTHETOUCH PANEL 5 Return the staple case to its original position 6 REMOVING JAMMED STAPLES OPTIONAL cont Jammed staples Stapler 4 Remove any jammed staples and then retu...

Страница 167: ...in level the following message appears Please Empty Hole Punch Waste Bin Dispose of the paper bits as described below 1 Open the cover of the hole punch unit 2 Holding the black handle slide out the c...

Страница 168: ...mbol flashes the following message appears and copying is no longer possible Call your service technician Call for service When the CALL SERVICE or CLEAR PAPER symbol is flashing if you press the Clea...

Страница 169: ...1 2 3 4 5 6 7 8 9 10 11 12 8 1 8 MAINTENANCE 1 Daily inspection 8 2 2 Simple troubleshooting 8 3...

Страница 170: ...owing cases do not turn the power switch OFF when the off mode or sleep mode is set when the weekly timer is in use Weekly Maintenance Cleaning the original glass the original cover the scanning area...

Страница 171: ...ing up message displayed Reference page Page 1 2 Items to be checked Is the power cord plug firmly inserted in the outlet Is the front cover the side cover and the large capacity feeder optional firml...

Страница 172: ...easure Place the original firmly on the glass and close the reversing automatic document feeder Replace with new paper Items to be checked Does the entire original lie properly on the surface of the g...

Страница 173: ...1 2 3 4 5 6 7 8 9 10 11 12 9 1 9 SPECIFICATIONS OPTIONS 1 im8130 im6530 specifications 9 2 2 Specifications of options 9 4 3 Packing list 9 6 4 Index 9 7...

Страница 174: ...l referenced to top left referenced to center when using reversing automatic document feeder Copying System Indirect electrophotographic method Developing System 2 component magnetic brush developing...

Страница 175: ...5 6 4 2 4 2 4 4 4 4 4 3 4 0 5 2 4 5 3 7 3 7 3 9 3 9 3 7 3 4 4 3 3 7 3 3 3 3 3 4 3 4 6 5 6 5 8 1 8 1 4 8 4 8 5 0 5 0 5 0 4 8 6 1 5 6 4 2 4 2 4 4 4 4 4 3 4 0 5 2 4 5 3 7 3 7 3 9 3 9 3 7 3 4 4 3 3 7 3 3...

Страница 176: ...Rear Front Front diagonal Double The values in parentheses are the specifications when installing the staple cartridge for stapling 100 sheets in 9975 When installing the staple cartridge for staplin...

Страница 177: ...and hole diameter Available paper sizes Inserter Model Name 9935 Type Floor Type Acceptable Paper Size LD LG LT LT R COMP A3 A4 A4 R B4 B5 FOLIO Acceptable Paper Weight 16 lb Bond 140 lb Index Dimensi...

Страница 178: ...PECIFICATIONS OPTIONS 3 PACKING LIST Set up Report Photoconductive Drum Photoconductive Drum Cover Operator s manual Pocket Packing List Set up Instructions Back guide for tab paper Tray Spacer of Rev...

Страница 179: ...8 Clearing the Functions Selected 1 7 Clearing the Off Mode Sleep Mode 5 17 Clip tray 1 5 Confirming and Canceling Auto Job Start 2 13 Confirming Stored Copy Modes 5 7 Confirming Stored Image Test Pr...

Страница 180: ...lation Precautions 9 Interrupt Copying 2 14 INTERRUPT key 1 5 Items for Daily Check 8 2 J Job Memory 5 5 JOB STATUS key 1 4 K Key copy counter 1 3 Key copy counter slot 1 2 L Large Capacity Feeder 1 3...

Страница 181: ...the Drawer 4 22 Setting the Other Size Key 5 14 Setting the Automatic Energy save mode 5 16 Setting the Automatic Off Mode 5 17 Setting the Drawer for Special Uses 2 7 Setting the Clock to the Dayligh...

Страница 182: ...0 SPECIFICATIONS OPTIONS 4 INDEX Cont When Coming Across the Situations below 2 3 When Placing an Original on the Glass 2 10 When this message appears Wait 2 3 When Using the Reversing Automatic Docum...

Страница 183: ......

Страница 184: ...otice to incorporate improvements made to the products listed in this manual Imagistics International Inc 2003 Printed in USA Part Number ZD6500070 www imagistics com Imagistics International Inc 100...

Отзывы: