INSTALLATION
2
3. OPERATION
The hood is supplied with a multi speed motor.
The hood should be run at low speed under normal
conditions and at higher speeds only when there is a
heavy build-up of fumes or odour.
Ideally, the hood should be switched on as soon as
cooking is started and then kept on until all odour have
been eliminated. The controls consist of these commands.
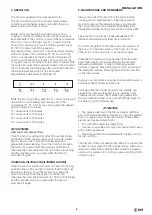
Press TL to turn on the light, press T1 to switch on the
hood at first speed and to switch off the aspirator, press
T2-T3-T4 to select functioning speeds.
By pressing of the command T1 the motor starts running
at the 1st speed. The commands T2-T3-T4 switch the
motor on respectively at the 2nd, 3rd and 4th speed. In
order to switch the motor off press T1 once if set at the
1st speed, twice if set at the 2nd, 3rd and 4th speed. With
the button T4, select the maximum speed of the extraction
fan for 5 minutes (LED blinking), after which the extraction
fan will automatically switch to the 3rd speed.
Adjustable and delayed self switching off
While the hood is working, keep the TL command pressed
until all LEDs start blinking. By pressing one of the
commands (T1, T2, T3, T4) you can program the delayed
self switching off, as follows:
T1 corresponds to 5 minutes
T2 corresponds to 10 minutes
T3 corresponds to 15 minutes
T4 corresponds to 20 minutes
FILTER TIMER:
Aluminium anti-grease filters
Once the hood is switched off, after 30 hour functioning,
all the LEDs of the speed buttons switch on with a fixed
light for 30 seconds to remind that aluminium anti-
grease filter need cleaning. To set the timer to zero keep
the button T4 pressed with the aspirator switched off,
otherwise the timer will remain set on 30 hour functioning
and the reminder will occur again when the hood is
switched off again.
CHARCOAL FILTER (FOR FILTERING HOODS)
Once the hood is switched off, after 120 hour functioning,
all LEDs blink for 30 seconds to remind that the charcoal
filter need cleaning. To set the timer to zero keep the
button T4 pressed with the aspirator switched off,
otherwise the timer will remain set on 120 hour functioning
and the reminder will occur again when the hood is
switched off again.
5. MAINTENANCE AND REMINDERS
Always disconnect the hood from the mains before
carrying out any maintenance or cleaning operation
In order to remove the remaining glue or any impurity,
the cooker hood must be cleaned immediately after
installation and after having removed the protective film.
The cooker hood must be cleaned frequently both
internally and externally (at least once a month).
Do not let dirt gather on the inner and outer surfaces of
the hood. To clean the exterior of the hood do not use
either acid or basic products, or abrasive sponges.
Clean the hood with a sponge dampen in warm water
and a little quantity of neutral detergent (for example
dishwasher detergent), in order to remove possible
particles of grease. Rinse with a damp cloth, removing all
the detergent carefully, following the satin finish direction
on the steel surface.
Drying is very important, especially in areas where water is
particularly hard and leaves limestone.
Particular attention should be paid to the metallic anti-
grease filters that are designed to trap particles of fat
contained in the fumes. The metallic anti-grease filters
must be washed at least once a month with detergent in
hot water (or in the dish-washer).
ATTENTION:
• the grease collected in the filter can easily catch fire
and it is therefore extremely important to clean the metallic
filter on a regular basis as per instructions. Grease filters
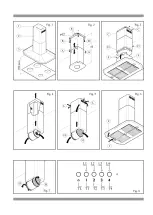
are removed as illustrated (Fig. 5).
• Do not flambé under the range hood
• Caution; accessible parts may become hot when used
with cooking appliances.
• Never leave the hob unattended when frying, as oil or
fat can catch fire.
The function of the activated carbon filters is to prevent the
spread of odour present in the cooking fumes. Clean air is
returned to the kitchen. Carbon filters cannot be washed
and must be replaced 2 or 3 times a year according to the
amount of use.
Содержание X301ISL Series
Страница 1: ...INSTRUCTION MANUAL INSTRUCTION MANUAL X301ISL SERIES ISLAND HOOD X301ISL SERIES ISLAND HOOD ...
Страница 2: ......
Страница 7: ......
Страница 8: ...INSTALLATION 4 ...
Страница 12: ......


