background image

31    

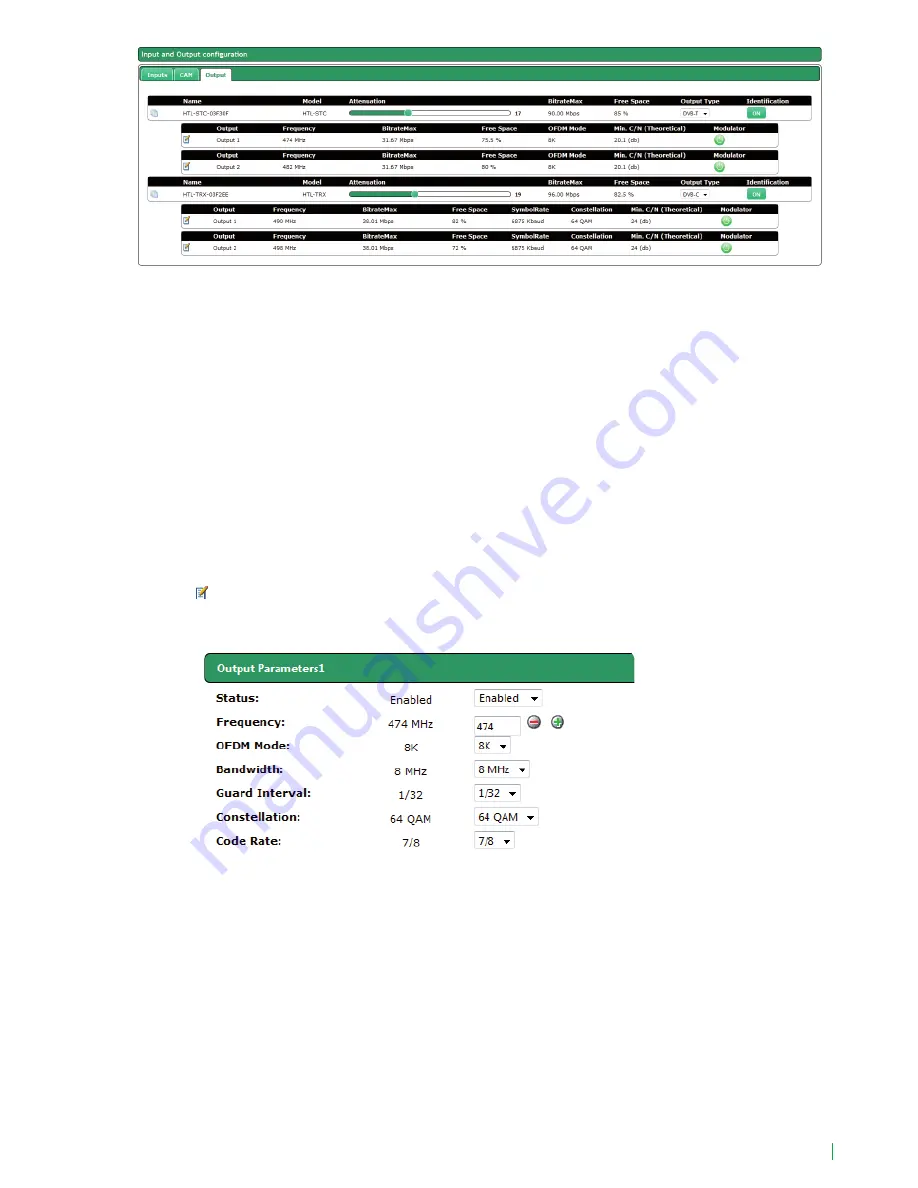
OUTPUT: Identifier of the output that is being described (Output 1 or Output 2).
FRECUENCY: Frequency of the output carrier.
BITRATEMAX: Maximum bit rate value supported by the output carrier. Depends on the output type 
and the used values for its setting.
FREE SPACE: It is the value of the unused space respect to the maximum bit rate described in the 
previous point, expressed in percentage.
OFDM Mode: Number of subcarriers of the output COFDM carrier (2K or 8K). Only available if the 
output type is DVB-T.
SYMBOLRATE: Symbol rate of the output QAM carrier. Only available if the output type is DVB-C.
CONSTELLATION: Constellation of the output QAM carrier. Only available if the output type is DVB-C.
MIN. C/N (THEORETICAL): Minimum C/N value that the signal must have at the reception point to 
make possible the demodulation of the signal without erroneous bits.
MODULADOR: It indicates if the modulator ir enabled (green icon) or disabled (red icon).

Pushing   icon you could edit each one of the outputs. The configurable parameters depends on the 
output type. Thus, in the case of a DVB-T output, the configurable parameters will be as follows:

STATUS: It allows to enable or disable any of the two outputs of the module.
FREQUENCY: It allows to select the frequency value of the carrier to be generated.
OFDM Mode: Number of subcarriers of the output COFDM carrier to be generated (2K or 8K).
BANDWIDTH: Bandwidth of the output carrier to be generated. Choose between 6 MHz, 7 MHz and 
8 MHz.
GUARD INTERVAL: Guard interval of the output carrier to be generated. Choose between 1/4, 1/8, 
1/16 and 1/32.
CONSTELLATION: Constellation of each one subcarrier of the COFDM output carrier. Choose between 
QPSK, 16QAM and 64QAM.
CODE RATE: Value of the convolutional code rate used as error protection. Choose between 1/2, 2/3, 
3/4, 5/6 and 7/8.

Содержание HTL-STC

Страница 1: ...Web Interface guide HTL STC HTL TRX Ref 3860 Ref 3861 ...

Страница 2: ...ice management 13 4 5 1 Satellite input case 14 4 5 2 Terrestrial cable input case 16 4 6 Step 6 Service configuration 17 4 7 Step 7 LCN SID Output Name configuration 19 4 8 Step 8 Search for supported configuration 20 4 9 Step 9 Confirmation of the new service configuration 21 5 Manual Configuration 23 5 1 Headend 23 5 1 1 Main Parameters 23 5 1 2 Un Register Modules 27 5 1 3 Input and Output Con...

Страница 3: ...he unit being damaged The unit must be appropriately ventilated Install the unit in a dust free location Do not place the unit in a location where the ventilation slots are covered or blocked Install the unit in a location with at least 20 cm around it free of other objects Do not expose the unit to rain or moisture Install the equipment in a dry location with no infiltration or condensation of wa...

Страница 4: ... from a cold to a warm area after a cold room is heated when this device is placed in a damp room The device should not be used in a very dusty or saline environment Dust or salt particles and other foreign objects may damage the device Do not expose the device to extreme vibrations It may damage the internal components 2 General description This headend station is designed for broadcasting DVB T ...

Страница 5: ...p mainly focusing on the Wizard CFP 900 POWER 24V 18V 300 mA 22 KHz 12V 9A 13V 300 mA 22 KHz 18V 300 mA 13V 300 mA I TOT max 700 mA MSS 0520 Ref 3656 Stand Alone Multiswitch 5 in 20 out FREQUENCY RANGE SAT 950 2300 MHz TERR 5 862 MHz 10 100 HTL STC Link Act 10 100 Link Act DVB RF IN LOOP OUT IN 1 IN 2 IN OUT VAUX DVB RF OUT CAM 10 100 HTL STC Link Act 10 100 Link Act DVB RF IN LOOP OUT IN 1 IN 2 I...

Страница 6: ...EADEND DISCOVERY applicatiohn the network card IPV6 protocol will be automatically enabled or permission will be requested to do so The window will show the names of the connected modules along with the last six numbers of the MAC address and the batch serial number Select the module you want to convert in master and push on Log in button The web browser of the PC will open automatically showing t...

Страница 7: ...nguage Enter the folowing data User Admin Password admin Push Accept button A window as the following one will open Push Master Module mode enable button The module will launch a readjustment process and after few seconds it will display again the access screen Enter again User Admin Password admin As it is the first connection setup wizard will be launched automatically ...

Страница 8: ...mote access configuration The first step consists on configuring the remote access A window with information about the modules of the headend will open By default external access option is disabled To enable it go to drop down Enable external access list and select ON Select DHCP ON when the network settings are provided automatically by a DHCP server In other case select OFF and enter the network...

Страница 9: ...g used in the installation HD or SD This parameter will be used by the headend in order to activate transcoding when the contents are HD and the TVs are SD In the case both type of TVs were present select SD RF Input mode choose the signal type is going to be received DVB S S2 DVB T T2 or DVB C RF Output mode select the type of modulation used in the RF distribution DVB T or DVB C NOTE TV Types pa...

Страница 10: ...ailable channels By default setup wizard proposes the lowest channels To change that selection move the channels manually dragging and dropping them in an empty channel NOTE As a useful aid the unwanted channes can be marked for example because they are already occupied by other services which do not form part of this headend clicking on the channel boxes background colour will change ...

Страница 11: ...12 Push Next button to accept the channel distribution ...

Страница 12: ...f the multiswitch in Number of polarities in the example 4 inputs i e a complete satellite In the case there is not a multiswitch select DiSEqC OFF In oscillators box introduce the oscillator frecuencies used by your LNB Finally Multiswitch Input box is displayed For each of the inputs defined by its position and grouped in fours you must identify which polarity is Vertical or Horizontal and in wh...

Страница 13: ...se In the case you have configured DVB S S2 as RF input in the step 2 a window as the following one will be displayed Push Add transponder button A window will open where you must indicate the frequencies of the transponders you want to receive and in which position of the multiswitch are After introducing a transponder push Save button The headend will try to tune it Once it tunes it a list with ...

Страница 14: ...e process with all the satellite transponders In this example the headend is formed by 2 HTL TRX modules therefore you can receive up to 4 satellite transponders If you want to remove any of the transponders push button ...

Страница 15: ...HTL TRX module is able to transcode up to 4 HD services If you select more HD services than the headend can trascode and the TVs are SD a message will be displayed indicating the transcoding capacity has been exceeded After selecting the desired services push Next button to go to step 6 4 5 2 Terrestrial cable input case In the case you have configured DVB T T2 or DVB C as RF iput in the step 2 a ...

Страница 16: ... box next to those services If you want to select all the services of a multiplex push button NOTE Each HTL TRX module is able to transcode up to 4 HD services If you select more HD services than the headend can trascode and the TVs are SD a message will be displayed indicating the transcoding capacity has been exceeded After selecting the desired services push Next button to go to step 6 4 6 Step...

Страница 17: ...to the audios To do that push button or over icon Audio configuration box will open The headend has two working modes disaggregated languages or aggregated languages When disaggregated languages mode is selected in the case a multi language service one service will be ...

Страница 18: ...languages will be generated Select Aggregate as audio mode to work with aggregated languages However if you want to work with disaggregated languages select Disaggregate In that case also you can choose which audio channeles are included and which aren t Furthermore when you select Disaggregate that change will be reflected in Language icon becoming to After doing the desired adjustments push Next...

Страница 19: ...up wizard push Send button A confirmation window will open informing that the configuration will be stored in the modules If you agree push Continue button 4 8 Step 8 Search for supported configuration The headend will calculate how to apply the proposed configuration over the headend While this calculation process is in course a waiting screen will be displayed ...

Страница 20: ... and setup wizard will go to step 9 4 9 Step 9 Confirmation of the new service configuration In the final step a summarize window will be displayed with a list of the services that forms the selected channel lineup indicating in which RF channel will be transmitted each one ...

Страница 21: ...r of the channels generated by the module that is processing that service To finish with setup wizard push Close button Browser will go automatically to the Advanced adjustment menu From there you can relaunch setup wizard when you want selecting Wizard option ...

Страница 22: ...ENTIFIER Used to enter a designation to identify the headend LOCATION Used to enter the name of the city where the unit is installed INSTALLATION DATE Used to enter the installation date of the headend unit Save Click on the button to keep the changes Password USER Enter the username By default it is admin OLD PASSWORD Enter the current homepage password NEW PASSWORD Enter the new password CONFIRM...

Страница 23: ...Click on the button to keep the changes Country CURRENT DATE AND TIME Shows the current time and date COUNTRY Used to enter the country where the unit is installed TIME ZONE The time zone is presented depending on the country entered Save Click on the button to keep the changes Audio Language tab allows to inform to the headend which is the list of preferred audios This list is used by the transco...

Страница 24: ...Click on the drop down list to select the vertical or horizontal polarity BAND Click on the drop down list to select the band Low or High MULTISWITCH INPUT NAME Informs of the multiswitch input being described Save Click on the button to keep the changes Autoscan DTT Inputs Autoscan DTT inputs tab allows to enable disable automatic scanning of DTT inputs in case of a change in the frequency plan T...

Страница 25: ... the user or download it to another station Add a backup file Used to choose backup files stored in any of the available storage units Default Configuration APPLY DEFAULT CONFIGURATION Used to carry out a factory reset module by module or for the whole headend station at the same time NOTE Do not disconnect the module until the end of the reset process The window shows the following information fo...

Страница 26: ...n all of which are factory set The master module is the only one which cannot be unregistered Thus it presents a padlock icon instead of the recycle bin icon used to unregister modules The other modules can be registered or unregistered by clicking on the symbol or the recycle bin icon respectively and more straightforwardly by clicking on each of the modules and dragging them from one window to t...

Страница 27: ... loop to facilitate the signal distribution INPUT TYPE Dropdown list that allows to define the input type that can be received Choose between DVB S S2 DVB T T2 and DVB C IDENTIFICATION It allows to identify the module in the headend visually Pushing ON button red led of the associated module starts blinking To stop blinking push OFF button Besides these parameters pushing icon the status and the s...

Страница 28: ...f the multiplex to be received BANDWIDTH It allows to select the bandwith of the multiplex to be received HIERARCHY In broadcasting with several hierarchies it allows to select the hierarchy of the signal to be received AUTOSCAN It allows to enable or disable the automatic scan of the DTT inputs in case of a change in the frequency plan Finally when the input signal is DVB C the displayed paramete...

Страница 29: ...e displayed Output tab shows the following parameters NAME Name to identify each module MODEL Module type designation ATENUATION Slider bar that allows to modify the power level generated by each module BITRATEMAX Maximum bit rate value that can be offered to the output modulators Depends on the performance of the CAM that is inserted and on the hw version of the module FREE SPACE It is the value ...

Страница 30: ...the demodulation of the signal without erroneous bits MODULADOR It indicates if the modulator ir enabled green icon or disabled red icon Pushing icon you could edit each one of the outputs The configurable parameters depends on the output type Thus in the case of a DVB T output the configurable parameters will be as follows STATUS It allows to enable or disable any of the two outputs of the module...

Страница 31: ...lue of the carrier to be generated SYMBOLRATE It allows to select the symbol rate the symbol rate of the output carrier to be generated CONSTELLATION Constellation of the output carrier Choose between 16QAM 32QAM 64QAM 128QAM 256QAM Push Save button to store the changes 5 1 Headend 5 1 4 Headend networks Networks configuration Click on the drop down list to check and edit the following parameters ...

Страница 32: ... the three available NIT models NO NIT PATTERN The master module generates a NIT from zero based on the selected output frequencies the output services and the selected LCNs MERGED NITS Calculates a new NIT based on the NITs in the input signals if there is relevant information in the input NITs it is sent to the output INPUT NITS Calculates a new NIT based on the input NITs selected as pattern DV...

Страница 33: ...the module IKUNET IDENTIFICATION The ON button is used to identify the module position the red LED flashes RESTART MODULE Used to restart the module Three icons identify the different windows which can be accessed This icon shows detailed information on the status of the module input parameters output parameters and CAM where appropriate The drop down list shows basic module information The drop d...

Страница 34: ...5 1 6 Detailed Status This section contains all the information on the status of the headend modules The screen shows the input and output parameters corresponding to each module along with the alarms and CAM details ...

Страница 35: ...nes the LCN position of the first service HD TVs If it is enabled it indicates that there are HD TVs in the current premises This parameter will be used by the headend to activate the transcoding when the TV contents are HD and the TVs are SD TELETEXT It allows to block or to not block to decript or to not decrypt the teletext information of the source signal ...

Страница 36: ...ame of the slot service input SID The clone option is used to copy a service in the same output as many times as necessary This means a different audio can be assigned to each one on the same video Click on the recycle bin icon to delete a service The changes will be saved when retuning the TV set The cut option scissors icon provides the option to delete the current service and leave the space em...

Страница 37: ...38 5 3 System Logs This query screen is used to obtain an overview of all incidents in the status of the headend in chronological order ...

Страница 38: ...39 5 4 Upgrade Report This screen is used to see if all the firmware upgrades have been completed successfully 5 5 Select Language Used to select the application language ...

Страница 39: ...ste and must be handed in at the corresponding point of collection for electric and electronic equipment By ensuring this product is disposed of correctly you will help prevent negative consequences for the environment and human health which could otherwise be caused by inappropriate waste handling of this product Recycling of materials helps preserve natural resources For more detailed informatio...

Страница 40: ...Paseo Miramón 170 20014 San Sebastián Gipuzkoa España Tel 34 943 44 89 44 Fax 34 943 44 88 20 television ikusi com www ikusi tv ...

Отзывы: