background image

ENGLISH

  BEFORE YOU OPERATE THE MONITOR  9  



Touch method

  Fingers, Conductive stylus

  If you would like to use conductive stylus, please select 8mm diameter conductive stylus. 

However, we cannot guarantee all 8mm diameter stylus work on our touch monitor.

 Signal Timing

  Change to the desired signal timing listed on page 26: COMPLIANT TIMING.

 Windows 7/8/8,1/10 Plug & Play

  The iiyama LCD monitor complies with DDC2B of VESA standard. The Plug & Play function runs 

on Windows 7/8/8,1/10 by connecting the monitor to DDC2B compliant computer with the Signal 
Cable supplied. 



For additional information on how to download the driver for your touch screen monitor,  
please access the internet site noted above.



Monitor  Drivers  are  not  required  in  most  cases  for  Macintosh  or  Unix  operating 
systems. For further information, please contact your computer dealer fi rst for advice.

COMPUTER SETTING

NOTE

NOTE



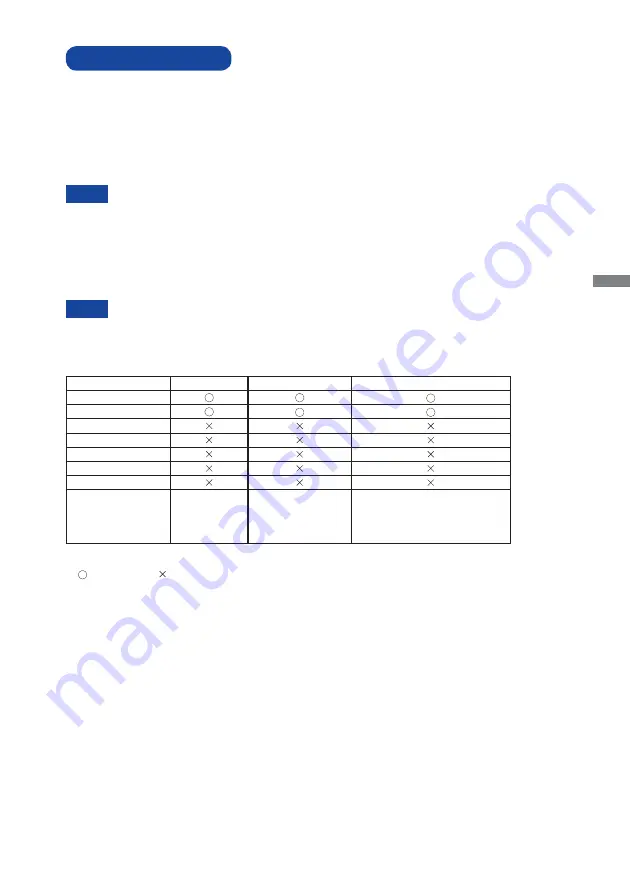
TOUCH support operation system 

Mouse

Digitizer

Gestures*

1

Windows8/8.1/10

Windows7

Windows


Vista

Windows XP

Mac OS/OS X

Linux

Android

Functions

Click
Drag
Double-Click

Mouse function
Right-Click
Flick
Visual feedback

Mouse & Digitizer functions
Press & Tap, Rotate, Zoom-in/out

The other OS Versions not listed are not supported.
 

 : Supported     : Not supported

  *

1

 Gestures can be supported by application programs.

Содержание ProLite T2236MSC-B2

Страница 1: ...ing the iiyama LCD monitor We recommend that you take a few minutes to read this comprehensive manual carefully before installing and switching on the monitor Please keep this manual in a safe place f...

Страница 2: ...ENGLISH...

Страница 3: ...ATION OF CONFORMITY This LCD monitor complies with the requirements of the EC EU Directive 2014 30 EU EMC Directive 2014 35 EU Low Voltage Directive 2009 125 EC ErP Directive and 2011 65 EU RoHS Direc...

Страница 4: ...ND REMOVAL OF BASE 6 CONTROLS AND CONNECTORS 7 CONNECTING YOUR MONITOR 8 COMPUTER SETTING 9 ADJUSTING THE VIEWING ANGLE 10 OPERATING THE MONITOR 11 ADJUSTMENT MENU CONTENTS 12 SCREEN ADJUSTMENTS 18 PO...

Страница 5: ...use re electric shock or damage INSTALL THE MONITOR ON A FLAT STABLE SURFACE The monitor may cause an injury if it falls or is dropped DO NOT USE THE MONITOR NEAR WATER Do not use where water may be s...

Страница 6: ...ISCONNECT THE CABLES WHEN YOU MOVE THE MONITOR When you move the monitor turn o the power switch unplug the monitor and be sure the signal cable is disconnected If you do not disconnect them it may ca...

Страница 7: ...iyama service center for advice or replacement packaging WARNING If you drop any materials or liquids such as water into the monitor when cleaning unplug the power cable immediately and contact your d...

Страница 8: ...ignal Cable DVI D Cable USB Cable Audio Cable Stand Base Screw for stand xing 4pcs Safety Guide Quick Start Guide BEFORE YOU OPERATE THE MONITOR CHECKING THE CONTENTS OF THE PACKAGE CAUTION FEATURES S...

Страница 9: ...thickness of the mounting stage tighten the M4 Screw with washer which L length is 7mm to fasten the monitor Using the screw longer than this may cause electric shock or damage because it may contact...

Страница 10: ...F BASE Installation Put a piece of soft cloth on the table beforehand to prevent the monitor from being scratched Lay the monitor at on a table with front face down Install the stand base to the stand...

Страница 11: ...Normal operation Orange Power Management Speakers USB Downstream Connector USB Downstream Connector USB Downstream Connector USB Upstream Connector Audio Connector VGA D sub mini 15pin Connector VGA...

Страница 12: ...er and monitor may vary with the type of computer used An incorrect connection may cause serious damage to both the monitor and the computer The cable supplied with the monitor is for a standard conne...

Страница 13: ...al Cable supplied For additional information on how to download the driver for your touch screen monitor please access the internet site noted above Monitor Drivers are not required in most cases for...

Страница 14: ...nel so that the monitor does not topple when you change the monitor s angle You are able to adjust the monitor s angle up to 90 degrees upward 5 degrees downward Do not touch the LCD screen when you c...

Страница 15: ...creen Display disappears when the time set for the Timeout has passed Also the AUTO button can be used to return previous menu and turn o the On Screen Display Any changes are automatically saved in t...

Страница 16: ...t is reduced more than Mode2 i Style Color 2 Standard For general windows environment and monitor default setting Text For text editing and viewing in a word processing environment Internet For intern...

Страница 17: ...2 Too left Too right Too low Too high H Position 2 V Position 2 Too narrow Too wide To correct ickering text or lines Image Setup Clock Phase H Position V Position 50 50 50 50 Aspect Full 1 See page 1...

Страница 18: ...st Mode3 Color Temp Gamma User R User G User B 50 50 Mode1 50 Color Temp Warm Gamma Color Temp Normal Warm Cool sRGB sRGB NOTE sRGB is an international standard which de nes and uni es the di erence o...

Страница 19: ...an Simpli ed Chinese Espa ol Spanish Portuguese Timeout H Position OSD is too left OSD is too right OSD is too low OSD is too high You can set the OSD display duration time between 5 and 60 seconds Ad...

Страница 20: ...NOTE Select the Analog input Select the Digital DVI input D SUB DVI Extra Reset Information V Frequency 60Hz Yes Signal Select Auto Input D SUB Resolution 1920 H 1080 V H Frequency 68KHz HDMI audio L...

Страница 21: ...Button for 3 4 seconds when the Menu is not displayed Volume Press the Button when the Menu is not displayed Lock Mode OSD Hold the MENU button and turn on the monitor when the monitor is power o it w...

Страница 22: ...case manual adjustments are required There are two ways to adjust the screen One way is automatic adjustment for H V POSITION H SIZE and FINE The other way is performing each adjustment manually Perf...

Страница 23: ...icture may icker during the H SIZE H V POSITION adjustment In case the picture frame is bigger or smaller than the data display area after the H SIZE adjustment repeat steps from 2 Stretch the right s...

Страница 24: ...the refresh rate of computer to low 60Hz and repeat steps from again Adjust the H POSITION after the FINE adjustment if the horizontal position moves during the adjustment Adjust the Brightness and Co...

Страница 25: ...wer Management Mode which reduces the power consumption to less than 0 5W The screen becomes dark From Power Management Mode the image reappears in several seconds when either the keyboard or the mous...

Страница 26: ...monitor The signal timing of the computer is within the speci cation of the monitor No sound The audio equipment computer etc is ON The Audio Cable is properly connected The Volume is turned up The a...

Страница 27: ...ENGLISH Recycling information 23 For better environment protection please don t dispose your monitor Please visit our web site www iiyama com recycle for monitor recycling RECYCLING INFORMATION...

Страница 28: ...tical 178 degrees Typical Maximum Screen Size 509 18mm W 286 41mm H 20 0 W 11 3 H Power Source 100 240VAC 50 60Hz 1 5A Environmental Considerations Approvals CE T V Bauart VCCI PSE CU Tilt Angle USB p...

Страница 29: ...6mm W 268 1mm H 18 8 W 10 6 H Power Source 100 240VAC 50 60Hz 1A Environmental Considerations Approvals CE T V Bauart CU Tilt Angle USB peripherals Audio equipment are not connected NOTE Brightness C...

Страница 30: ...59 887Hz 59 954Hz 60 000Hz VESA SVGA VGA XGA 1024 768 640 480 800 600 Horizontal Frequency 31 469kHz 37 500kHz 35 156kHz 37 879kHz 46 875kHz 48 363kHz 56 476kHz 60 023kHz 63 981kHz 79 976kHz 55 935kH...

Отзывы: