iHome iBT28 Скачать руководство пользователя страница 9

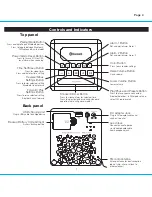
Playing your Aux-in Audio Device

1.   Connect the included stereo audio cable to the Aux-in jack located on the back of the unit and connect the other end to  

   the headphone jack or aux-out jack on your audio device. 
2.  Press and release the  


Button

 to turn on the unit. Turn on your aux audio device, too.

3. 

Press and release the 

Pairing

Mode Button

 as needed to cycle to Aux-in mode. “Aux in” will appear on the display.  

4.  Control audio playback and navigate tracks and menus from your audio device.
5.  Press the     or        

Button

 to adjust the unit volume. You may need to adjust the volume on your device, too.

6.  To turn off the unit, press and release the  


Button

. Make sure to turn off your audio device, too.

A USB port is located on the back of the unit for charging devices while the unit is connected to AC power.  
Connect one end of a compatible USB cable (not included) into the standard USB port on the unit and the other end into the 

device you wish to charge. Some devices require proprietary USB charging ports or cables. Monitor the charging status of 

your device. If the device does not charge, you will need to use the charger that came with your device.

6

Different regions of the world use different FM radio frequency steps and ranges. You will need to select the one that matches 

the standards in your region (USA, EUROPE, JAPAN, AUSTRALIA, or CHINA). The default setting is USA; if you live in the US, 

you may skip this section.

1.  Make sure the unit is OFF (not playing in any mode).  Press and hold the 

AND 

– Button

 together for about 5 seconds 

   until  “USA” appears in the lower part of the display and 1 beep sounds. Press and release the  

or 

– Button

 to set to 


your    region.

2.  Allow unit to “time out” (no button pressed within 5 seconds) to exit the radio frequency setting mode.   


  Two beeps will confirm radio frequency setting.  

Using the Unit in Other Countries

Page 9

Charging a Device with the USB Port

Содержание iBT28

Страница 1: ...lack text on white paper Size of manual 178mmW x 178mmH Date May 15 2014 r1 Model iBT28 Model iBT28N for Canada LED Color Changing Dual Alarm Clock Radio with USB Charging Questions Contact Customer Service at 1 800 288 2792 download QR code reader app and scan ...

Страница 2: ...it Maintenance Battery Information For models that use Lithium batteries Lithium batteries can explode or cause burns if disassembled shorted recharged exposed to water fire or high temperatures not handled appropriately Do not place loose batteries in a pocket purse or other container containing metal objects mix with used or other battery types or store with hazardous or combustible materials St...

Страница 3: ...er is encouraged to try to correct the interference by one or more of the following measures Reorient or relocate the receiving antenna Increase the separation between the equipment and receiver Connect the equipment into an outlet on a circuit different from that to which the receiver is connected Consult the dealer or an experienced radio TV technician for help CAN ICES 3 B NMB 3 B IC Statement ...

Страница 4: ...d setting Bluetooth track forward Reverse Minus Settings Button Press to lower selected setting Bluetooth track reverse Time Set Sleep Button Press for sleep timer Press and hold for time setting Snooze Dimmer Button Press to silence alarm for selected time Press to adjust brightness during standard operation not during alarm mode Power Alarm Reset Button Press to turn unit ON or OFF reset alarm w...

Страница 5: ...ess the or Button to change color 4 color change Attach AC adaptor cable to the DC adapter jack on back of the iBT28 and plug the other end into a wall socket Remove the tab from the battery backup compartment Power on your Bluetooth audio device and turn on Bluetooth capability on your device Settings Bluetooth on IOS Press the Button on the unit to turn the unit on The first time the unit is powe...

Страница 6: ... Connected or similar message appears or if prompted to confirm that you wish to pair connect tap on iHome iBT28 If prompted for a PIN or password enter 1234 to complete pairing 3 If pairing is successful 2 beeps will sound and PAIRED will appear on the display If FAILED appears attempt pairing again by pressing and holding the Pairing Mode Button for 2 seconds Once paired your device will auto lin...

Страница 7: ...se the Alarm Button again then press and release the or Button or the Color Button to set the color LED wake cycle DAWN amber fade leading up to alarm time FLASH flashing red while alarm sounds GLOW glowing color sequence while alarm sounds or NONE no wakeup LED effect 5 Press and release the Alarm Button again or no button within 10 seconds to exit the alarm setting mode 2 beeps will confirm alarm ...

Страница 8: ...stations 4 To listen to a preset station press the FM presets Button to choose the desired preset 5 Press the or Button on the unit to adjust the system volume 5 At the set time the alarm will sound for 1 hour 1 To turn off the sounding alarm and reset it to come on at the same time the following day press and release the Button The alarm sound will stop but the alarm icon will remain in the displ...

Страница 9: ...ble not included into the standard USB port on the unit and the other end into the device you wish to charge Some devices require proprietary USB charging ports or cables Monitor the charging status of your device If the device does not charge you will need to use the charger that came with your device 6 Different regions of the world use different FM radio frequency steps and ranges You will need...

Страница 10: ...t active in GLOW mode 7 When unit is in normal mode no alarm is sounding press the Snooze Dimmer Button to cycle through High Medium Low and Off brightness settings Settings affect both the display and cabinet LED Dimmer function will not work during GLOW color change mode When LED color mode is set to OFF pressing the Snooze Dimmer Button will place unit in 1 COLOR mode with white backlight Dimme...

Страница 11: ...teps 1 through 4 below to install the replacement battery To replace the backup battery IMPORTANT When replacing the backup battery be sure to have the unit connected to the AC outlet to maintain all of your settings otherwise it will be necessary to reset the time and alarm time after the battery is replaced 1 Place unit face down Locate the battery backup compartment found on the back of the uni...

Страница 12: ...o an AC socket 6 Cleaning The unit should be cleaned only as recommended See the Maintenance section of this manual for cleaning instructions 7 Objects and Liquid Entry Care should be taken so that objects do not fall and liquids are not spilled into any openings or vents located on the product 8 Attachments Do not use attachments not recommended by the product manufacturer 9 Lightning and Power S...

Страница 13: ...olume level is set too high Decrease the unit volume Charge device using the charger that came with it Press Color Button to cycle to other color LED modes Press Snooze Dimmer Button to cycle to other brightness modes Sound source is distorted LED color mode is set to OFF Dimmer is set to OFF Unit is running on backup battery If original sound source file is poor quality distortion and noise are e...

Страница 14: ...ption for why the unit is being returned and the return authorization number No unit can be processed without a return authorization number 4 Write the return authorization number on the side of the shipping package and send the unit prepaid and insured to the Factory Service Center address authorized by SDI Customer Service Disclaimer of Warranty NOTE This warranty is valid only if the product is...

Отзывы: