


3
Page 6
Using Bluetooth
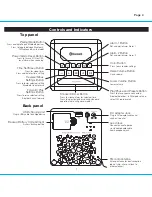
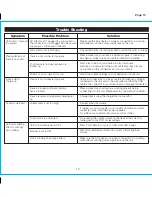
Display
Wake to indicator
PM indicator
AM indicator
Sleep mode indicator
Time display
Low Backup Battery indicator
Alarm display indicator
FM radio mode indicator display
Mode/Bedtime Sleep Timer/
FM station/alarm time display
Alarm 1 and 2 indicators
Alarm is armed and will sound at set time
Aux-in mode indicator
Bluetooth indicator:
• Flashes during pairing
• Solid when linked device is present
• Audio waves when Bluetooth audio is playing/paused
Pairing
This unit features an
auto-pair
feature: when powered on for the first time, the unit will automatically attempt to pair with a new Bluetooth
device. After this, Bluetooth devices must be paired using the
Pairing/Mode Button
.
1. Power on your Bluetooth audio device and turn on Bluetooth capability on your device (check the instructions that came with your device for
details)
2. Press and release the
Button
located on top of the unit to turn the unit ON. The first time the unit is powered on,the unit will automatically
enter pairing mode. Otherwise,
press and hold
the
Pairing
/
Mode Button
for 2 seconds to begin pairing. Pairing mode is indicated by
the Bluetooth icon and “PAIR” flashing on the display. “iHome iBT28” should appear on your device’s list of Bluetooth devices. If “Not
Paired”, “Not Connected” or similar message appears, or if prompted to confirm that you wish to pair/connect, tap on “iHome iBT28”. If
prompted for a PIN or password, enter
1234
to complete pairing.
3. If pairing is successful, 2 beeps will sound and “PAIRED” will appear on the display. If “FAILED” appears, attempt pairing again by pressing
and holding the
Pairing
/
Mode Button
for 2 seconds. Once paired, your device will auto-link to the unit whenever you are within range
(30 feet).
Playing Bluetooth Audio
1. Once paired with the unit, you can stream audio to it from your Bluetooth device. Press the
FM
presets Button
located on top of the
unit to turn the unit ON and begin play. (Audio wave icons will appear by the Bluetooth icon to indicate Bluetooth audio mode.) Press again
to pause play, and again to resume play.
Note:
If unit is ON and in FM radio mode, press and release the
Pairing
/
Mode Button
as needed to cycle to Bluetooth mode before
pressing the
FM
presets Button
.
2. Press the
+
or
– Button
to control track selection.
3. Press the or
Button
on the unit to adjust the system volume. You may need to adjust the volume on your
Bluetooth device,too.
Remote Power Via Bluetooth
When within range (about 30 feet) of the unit, your previously paired device will auto-link to the unit. Pressing play on your device will remotely
power on the unit and in a few moments your audio will play through the unit at the current set volume. On some devices, alert sounds from
the device will also be transmitted.