background image

9 SOFTWARE CONFIGURATION

9 Software Configuration

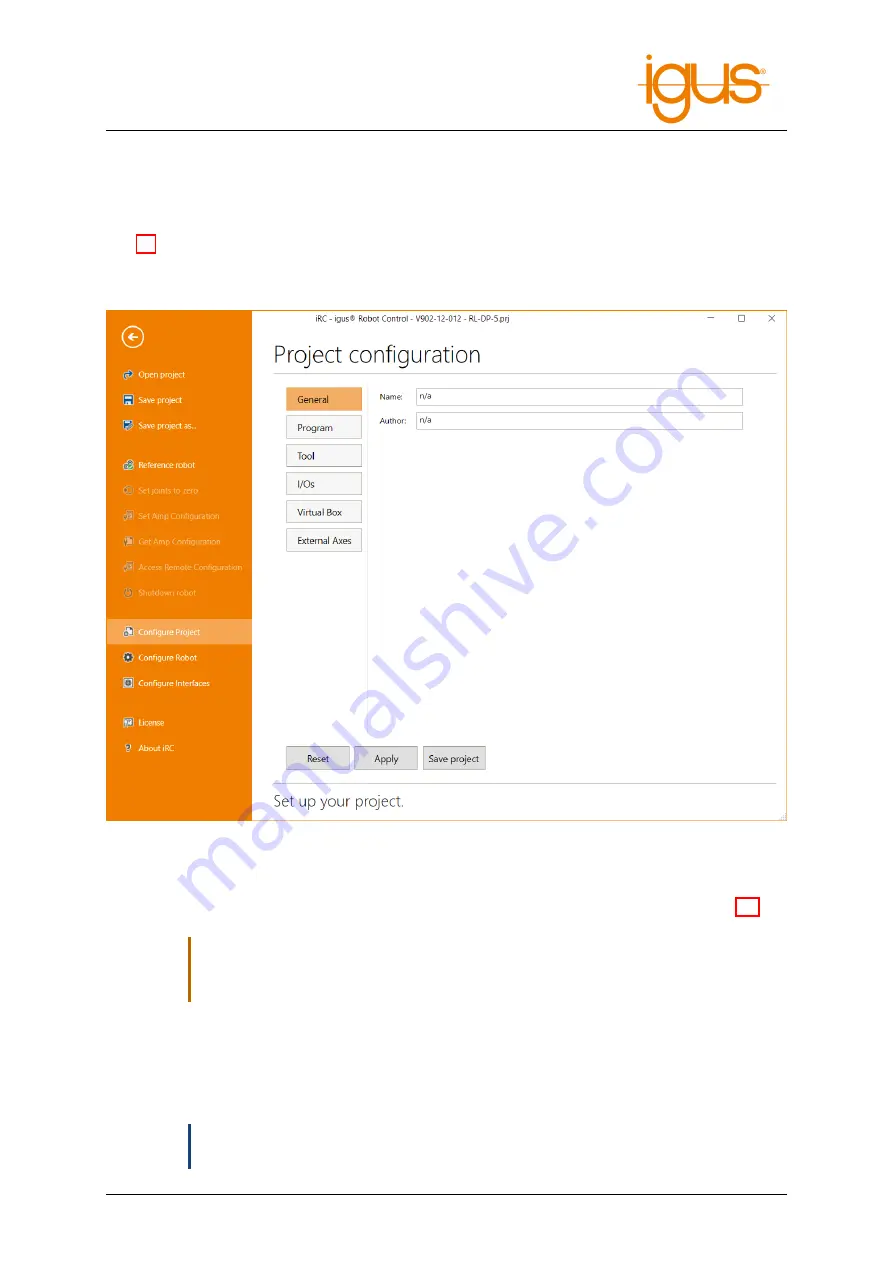
The behavior of the robot can be changed via the configuration. The most important parameters can
be found in the configuration area of iRC - igus Robot Control, which can be opened via "File" (see
Fig. 27). Settings concerning the project can be found under "Project configuration", cross-project
settings under "Robot configuration". The interfaces can also be configured on a project-by-project
basis via "interface configuration".

Figure 27: The project configuration area.

More specific settings can be made via the project, robot, and tool configuration files. The settings of
the axis modules can be accessed and changed via "Get/Set Amp Configuration" (see section 8.3).

,

Change the configuration files only if you know what you are doing! Test the robot care-
fully, because it could move unexpectedly fast or collide! Changes of the firmware pa-
rameters can lead to overheating of the motors or the electronics!

If you use a robot with integrated controller (TinyCtrl), the changes must also be made there. When
making changes via the configuration area, connect the robot first. Clicking on "Apply" or "Save
Project" will automatically synchronize the changes with the robot controller. Changes to the config-
uration files must be transferred manually, use the "Access Configuration" area.

ð

Some changes to the integrated robot controller are only applied after a restart. Wait at
least 20 seconds after the transfer and restart the robot.

©2022 igus® GmbH

40

Содержание ReBeL

Страница 1: ......

Страница 2: ...Version 13 4 PRERELEASE July 13 2022 Commonplace Robotics GmbH...

Страница 3: ...ecting and moving the robot 11 5 3 1 Preparation with the integrated computer 11 5 3 2 Moving the Robot for the First Time 11 6 Moving the Robot with iRC 14 6 1 The Graphical User Interface 14 6 1 1 S...

Страница 4: ...igital Outputs 28 7 4 3 Opening Closing the Gripper 28 7 5 Program Flow 29 7 5 1 Conditions 29 7 5 2 Stop 29 7 5 3 Pause 29 7 5 4 Wait 30 7 5 5 If then else 30 7 5 6 Loops 30 7 5 7 Matrices Palettizin...

Страница 5: ...us 51 10 1 Licensing 51 10 2 Configuration of the Modbus Server 51 10 3 TIA Portal Library 51 10 3 1 Creating the Robot Data Block 51 10 3 2 Inserting the Robot Communication FB 52 10 3 3 Data Access...

Страница 6: ...1 INTRODUCTION 1 Introduction 1 1 Contact igus GmbH Spicher Str 1a D 51147 K ln Tel 49 0 2203 96498 255 E Mail ww robot control igus net Internet www igus eu 2022 igus GmbH 4...

Страница 7: ...nd experience in handling motors and their control know and understand the contents of this technical manual know the applicable regulations 1 4 Symbols Used All notes in this document follow a consis...

Страница 8: ...epper motor driver modules In addition different referencing methods and movements are supported to transmit the actual position of the robot to the software after a cold start of the robot system Dif...

Страница 9: ...es RS232 display connection Digital inputs for enabling switch DC DC converter 5V 4A Table 3 Integrated Computer Specifications 2 2 Mechanical Dimensions For mechanical dimensions please refer to the...

Страница 10: ...e check the label on the power supply Only qualified personnel may con nect the power supply to the mains and put it into operation Work on the robot electronics should only be performed by qualified...

Страница 11: ...ve sea level without power restriction 1500m Table 4 Ambient conditions 4 2 Software Requirements To use iRC a computer with the following features is required PC min Intel i5 CPU with Windows 10 or 1...

Страница 12: ...that the cables are not under tension 3 Feed the robot cables through the large circular hole in the control cabinet and plug them into the stepper motor modules Each motor with its associated referen...

Страница 13: ...ated computer The following steps establish the LAN connection between the robot controller and the Windows PC 1 Connect your PC to the robot controller using an Ethernet cable Use the Ethernet port l...

Страница 14: ...5 QUICK START GUIDE Figure 1 Choosing a project Figure 2 Jog Commands 2022 igus GmbH 12...

Страница 15: ...5 QUICK START GUIDE Cartesian movements and programs For the use of Cartesian commands and the playing of robot programs a refer encing of the robot is mandatory 2022 igus GmbH 13...

Страница 16: ...e and offline i e with the robot or in simulation with the robot switched off or not con nected Figure 3 User interface of the iRC igus Robot Control In the upper left corner the three tabs File Scene...

Страница 17: ...r can also be accessed here 6 1 1 Selecting the type of robot iRC provides project related settings for different robot types such as gantries robot arms or delta robots Figure 4 shows the project ope...

Страница 18: ...ove Rotate and Zoom are available Reset returns you to the home screen 6 2 Connecting the robot 6 2 1 Hardware connection The real robot can be controlled in the same way as the simulated one only the...

Страница 19: ...he start of a program are only possible after referencing The status is displayed on the left side of the iRC igus Robot Control The motor modules store the position in an EEPROM However due to gravit...

Страница 20: ...nnecting a gamepad Motion parameters Selection of movement modes and speed Figure 7 Control panels for moving the robot highlighted in blue A gamepad is possibly the most intuitive way to move the rob...

Страница 21: ...the corresponding robot axis if present E1 E3 moves the external joints This may be a linear or a rotational axis 9 Base Cartesian mode moves the robot in straight lines along the X Y and Z axes of t...

Страница 22: ...ergency stop key ready 3 Start the program Click the Execute icon in the Program Exe cution button group of the Motion tab 4 Pause or interrupt the program After pressing the Pause icon the robot can...

Страница 23: ...s Especially for easy starting and stopping of programs via a PLC or pushbutton Modbus TCP interface for control via a PLC or PC CRI Ethernet interface for control and configuration via a PLC or PC Th...

Страница 24: ...g these programs 7 1 Program Editor Each command of the robot program consists of one line e g Joint or Wait Only commands that control the program flow are divided into several lines e g Loop and End...

Страница 25: ...nd and click Touch Up from the Edit menu Select the command and then press Ctrl T Open the context menu by right clicking on the command and click on Touch Up see Fig 14 The program editor then replac...

Страница 26: ...itional expression that follows the syntax described in section 7 5 1 During the execution of the motion command the in struction is continuously evaluated and the moment it evaluates to true the robo...

Страница 27: ...obots com index php Motion_Smo othing 7 3 3 Joint Motion The Joint command moves the robot to an absolute target position specified in axis coordinates The resulting movement of the TCP is usually a c...

Страница 28: ...t line The target position can be specified as follows select the corresponding source Constant The target position is a constant given by Cartesian coordinates x y z and Euler angles A B C as well as...

Страница 29: ...of movement is specified by Speed It is measured in mm s If it exceeds the maximum permissible move ment speed of the robot this will result in a kinematic error during execution 7 3 6 Circular Motion...

Страница 30: ...tions and add or subtract the radius along the Cartesian axes 7 3 7 Set Velocity The instruction Set Velocity instructs an external axis to move at a constant velocity for example for a conveyor belt...

Страница 31: ...greater than 350 The syntax of conditional statements is defined by the following EBNF definition Expression Boolean BooleanOperator Boolean Boolean BooleanConstant Expression Expression Com pExpressi...

Страница 32: ...executed if the condition evaluates to true Otherwise the statements between Else and EndIf will be executed Figure 16 The If statement branches the program flow 7 5 6 Loops The Loop command allows t...

Страница 33: ...er The position variables specified as Point A Point B and Point C define the corners of the area covered by the raster loop see figure 17 The number of steps to be taken is specified by counter X fro...

Страница 34: ...her such a variable is interpreted as cartesian or joint depends on the context The cartesian components x y z are in mm the euler angles A B C are in degrees The joint values are measured in mm or de...

Страница 35: ...ariables The following predefined variables are available without having to define them position The current position of the robot programrunning 1 if the robot program is running otherwise 0 logicpro...

Страница 36: ...first operand divided by the value of the second operand Modulus The remainder of the division of the first operand by the second operand is stored in the first operand The following combinations of...

Страница 37: ...whether the camera has actually detected an object The orientation of the object can cause a slow linear movement of the robot If the rotation of the tool axis takes longer than the movement of the t...

Страница 38: ...output modules can be connected and configured Global signals These are virtual inputs outputs They can be set and read via robot programs the CRI interface or the Modbus interface Up to 100 global s...

Страница 39: ...inout of the DIO socket at the base left to right Pin Function Cable color according to binder cables 1 24VDC max 500mA Brown 2 DIn32 White 3 GND Blue 4 DIn31 Black 5 DOut32 Gray 6 DOut31 Pink Table 8...

Страница 40: ...e must be connected to an input pin The positive side of the sensor must be connected to the power supply of the sensor The status of the inputs can be monitored in the Input Output tab at the bottom...

Страница 41: ...rol configuration For the fine adjustment of the movement and the referencing each axis module contains its own configuration set This can be retrieved and modified via the buttons File Download firmw...

Страница 42: ...accessed and changed via Get Set Amp Configuration see section 8 3 Change the configuration files only if you know what you are doing Test the robot care fully because it could move unexpectedly fast...

Страница 43: ...en the File Tool Configuration area click the Add button in the Tool Configuration area and select the new tool configuration file 9 1 3 Inputs Outputs Here the number of input output modules and the...

Страница 44: ...ecutes the following functions in succession when the button is pressed several times Pause Stop Reset Shutdown Shuts down the control computer Start Platform Mission Starts the mission of the mobile...

Страница 45: ...terface can be enabled through the interface configuration Unlike the other configu ration parameters these settings are not mirrored with the connected system to prevent the configu ration of the int...

Страница 46: ...ports USB video cameras The section below ex plains compatibility Camera Interface for Object Recognition For object recognition only the ifm O2D200 series cameras are currently supported as well as c...

Страница 47: ...ps on parameterization please refer to our Wiki ar ticle https wiki cpr robots com index php 2D_Camer a_Integration The simulation section enables the simulation of the camera This function is not ava...

Страница 48: ...y the parameters depending on the mode only the required ones are displayed Parameter Meaning SSID WiFi network name Password WiFi password IP address WiFi IP address of the controller You can use thi...

Страница 49: ...to the cloud independently USB and object detection cameras can be configured in the camera configuration area and assigned here for image transmission based on the name specified there 9 2 8 Secure S...

Страница 50: ...estarted for changes to take effect 11 To display the TinyCtrl log output live in the terminal this is especially useful after changes in the files TinyCtrl must first be terminated killall TinyCtrl 1...

Страница 51: ...der using Drag and Drop 2 Here you can edit the file with a standard text editor like Windows Notepad Notepad is a better text editor https notepad plus plus org 3 Once all changes are saved in the lo...

Страница 52: ...s to the configuration files of a robot with integrated controller is possible via File Ac cess Remote Configuration Do not change the configuration files unless you know what you are doing Test the r...

Страница 53: ...nfiguration Modbus The Modbus server becomes active when the Active box is checked and Apply or Save Project is clicked If required the port default 502 and the maximum number of connections can be ch...

Страница 54: ...e TCP IP connection with the robot can be used for resetting errors Reset Bool Resets the robot Enable Bool Enables the robot Reference Bool References all robot joints StartProgram Bool Starts the ro...

Страница 55: ...ltiple Discrete Inputs 2 Holding Registers 3 6 single 16 multiple 22 masked 23 read and write Input Registers 4 Table 22 Supported Modbus function codes decimal Since Modbus defines only 1 bit and 16...

Страница 56: ...data is possible both as coils and as discrete inputs so that fewer Modbus messages have to be sent for reading both Reading values that were previously written as coil via discrete inputs should be a...

Страница 57: ...nce 73 Set all axes to 0 100 Start MoveTo cartesian 101 Start MoveTo Cartesian relative base coordinates 102 Start MoveTo Cartesian relative tool coordinates 103 Start MoveTo joint movement 104 Start...

Страница 58: ...Cycle time target 14 uint16 0 1ms Cycle time max last 50 cycles 15 uint16 0 01Hz Cycle frequency average 16 uint16 0 01 Workload 20 uint16 Number of robot axes 21 uint16 Number of external axes 22 uin...

Страница 59: ...umber of current instruction 1 if program is not running 266 enum Reason for last program stop or pause 331 uint16 Number of entries in current directory 333 364 string Name of the selected directory...

Страница 60: ...nd position variables are available in each case Name Type Access via Modbus mb_num_r1 mb_num_r16 Number variable read only input register mb_num_w1 mb_num_w16 Number variable read and write holding r...

Страница 61: ...d from the axis positions 2 The axis positions are calculated from the Cartesian coordinates and orientation Table 28 Conversion type Beachten Sie dass m glicherweise nicht alle Positionen von der Kin...

Страница 62: ...31 Jog Mode Value Meaning 0 Program is not running 1 Program is running 2 Program paused Table 32 RunState Value Meaning 0 Run program once 1 Repeat program 2 Execute instructions step by step 3 Fast...

Страница 63: ...10 MODBUS Value Meaning Table 34 Reason for last stop pause of program 2022 igus GmbH 61...

Страница 64: ...ed with a damp cloth After the control unit is disconnected from the mains fans or ventilation slots can be cleaned carefully with a damp cloth or light compressed air In doing so the rotors of the fa...

Страница 65: ...com index php Robot_Har dware_Troubleshooting Solutions to common software problems are described in the following article https wiki cpr robots com index php CPRog_Sof tware_Troubleshooting 12 3 Tes...

Страница 66: ...st automatio n E Mail ww robot control igus net In case of software problems please send us the log files of the iRC igus Robot Control and the integrated controller To do this simply click on the que...

Отзывы: