background image

3

English

Electrical Requirements

Wiring and Grounding Instructions 

This appliance must be plugged into at least a 15 AMP 110-115 VOLT 60 Hz 

GROUNDED OUTLET. This appliance must be grounded. It is equipped with a 3-

wire cord having a grounding plug. The plug must be plugged into an outlet that 

is properly installed and grounded.

     WARNING!

  Improper use of grounded wire can result in the risk of electric 

shock. Consult a electrician if necessary. Do not attempt to 

defeat this safety feature by modifying the plug.

Avoid the use of an extension cord because it may overheat and cause a risk of 

fire. However, if it is necessary to use an extension cord:
  A. Use only 3-wire extension cords with a 3-blade grounding plug. 
  B.  The marked rating of an extension cord must be be equal to or greater than 

the rating of this appliance. 

  C.  It should be positioned such that it does not drape over the counter or 

tabletop where it can be pulled on by children intentionally. 

 SAFETY INSTRUCTIONS

Attempting any maintenance or cleaning: 

To minimize the possibility of electric shock, unplug this appliance from the power 

supply or disconnect at the household distribution panel by removing the fuse or 

switching off the circuit breaker before attempting any maintenance or cleaning.

NOTE: 

  Disconnect power plug from the power outlet before maintenance or 

cleaning  


Содержание ICE102-WHITE

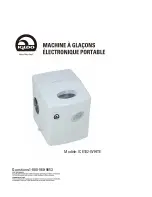
Страница 1: ...Questions 1 800 968 9853 Model ICE102 WHITE...

Страница 2: ...over the edge of a table or countertop or touch any hot surface 7 Do not operate any electrical appliance with a damaged cord or plug or after the appliance malfunctions or has been dropped or damaged...

Страница 3: ...on your IGLOO appliance PRODUCT REGISTRATION Thank you for purchasing this quality IGLOO product This easy to use manual will guide you in getting the best use out of your appliance Remember to record...

Страница 4: ...and cause a risk of fire However if it is necessary to use an extension cord A Use only 3 wire extension cords with a 3 blade grounding plug B The marked rating of an extension cord must be be equal...

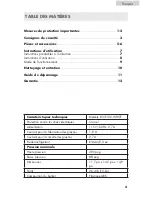
Страница 5: ...rant R134a 2 3 Oz Design Pressure High Side 290 Psig Low Side 88 Psig Dimensions 11 7 x 14 5 x 14 9 Weight 26 4 lbs 12 kg Enclosure ABS plastic Important Safeguards 1 2 Safety Instructions 3 Parts and...

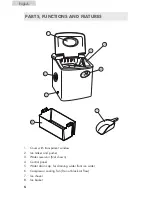
Страница 6: ...ow 2 Ice maker and pusher 3 Water reservoir Not shown 4 Control panel 5 Water drain cap for draining water from ice water 6 Compressor cooling fan Do not block air flow 7 Ice shovel 8 Ice basket 1 2 3...

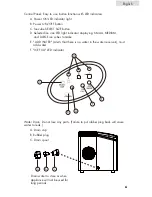
Страница 7: ...dicator displaying SMALL MEDIUM and LARGE ice cubes to make E ADD WATER Alerts that there is no water in the water reservoir must add water F ICE FULL LED indicator a b c A B D E F Water Drain Do not...

Страница 8: ...ilted angle of the ice maker cabinet should not exceed 45 during transportation or use Do not turn the appliance upside down Doing so could cause the compressor or refrigerating system to operate inco...

Страница 9: ...achine will automatically stop operating and the Add Water indicator will appear on the LED display 2 Plug the unit into a grounded outlet Push the ON OFF button on the control panel to turn on the ma...

Страница 10: ...will begin 5 When the maximum capacity of ice cubes is collected and the ice reaches the temperature sensor the ice maker will automatically stop operating The ICE FULL LED indicator will light up If...

Страница 11: ...uch as the ice storage basket water reservoir water box ice pusher and evaporator rods 6 The outside of the appliance should be cleaned regularly with a mild detergent solution warm water and a soft c...

Страница 12: ...pect relative parts remove the drain cap on the back of the unit and drain out a small amount of water Replace the drain cap and attempt to use the unit again or Check if ice is blocking the ice pushe...

Страница 13: ...g accessory wear is not covered under this warranty The product is guaranteed for 12 months if used for normal trade purposes and is valid for the original buyer only Any warranty is deemed invalid if...

Страница 14: ...Questions 1 800 968 9853 ICE102 WHITE Mod le...

Страница 15: ...pas sur un autre appareil lectrom nager 6 Ne laissez pas le cordon pendre travers la table le plan de travail ou toucher des surfaces chaudes cuisini re r chaud etc 7 N utilisez surtout pas un appare...

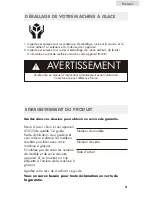
Страница 16: ...on avant de mettre en marche votre appareil IGLOO Veuillez lire ce manuel d instructions attentivement avant l utilisation Conservez le pour r f rence future AVERTISSEMENT Gardez dans vos dossiers pou...

Страница 17: ...se la terre que vous brancherez dans une prise mise la terre B Le calibre de la rallonge doit tre au moins gal ou plus puissant celui de l appareil C La rallonge ne doit pas pendre travers la table ou...

Страница 18: ...e d pannage 11 Garantie 12 TABLE DES MATI RES Caract ristiques techniques Mod le ICE102 WHITE Protection contre les chocs lectriques Classe 1 Alimentation 115 V 60 Hz 2 7 A Courant pour la fabrication...

Страница 19: ...et poussoir 3 R servoir d eau non illustr 4 Panneau de commande 5 Bouchon de vidange d eau pour vidanger l eau de glace 6 Ventilateur du compresseur ne bloquez pas la circulation d air 7 Spatule glac...

Страница 20: ...petit MEDIUM moyen et LARGE grand E ADD WATER Ajouter de l eau avertit que le r servoir d eau est vide vous devez ajouter de l eau F Voyant DEL ICE FULL Bac plein a b c A B D E F Vidange de l eau Ne...

Страница 21: ...aire Instructions de pr utilisation lire attentivement 1 Lors du transport de l appareil l angle d inclinaison ne doit pas exc der 45 degr s Ne tournez pas la machine l envers cela peut causer un mauv...

Страница 22: ...achine arr tera automatique ment de fonctionner et le t moin lumineux affichera ADD WATER ajouter de l eau 2 Branchez l appareil dans une prise murale Appuyez sur le bouton ON OFF du tableau de comman...

Страница 23: ...gla ons est obtenue et que les gla ons atteignent la sonde de temp rature la machine gla ons s arr tera automatiquement Le voyant lumineux affichera FULL plein Retirez les gla ons du compartiment de s...

Страница 24: ...e le bac gla ons le r servoir d eau le compartiment eau le poussoir de gla ons et les tiges de l vaporateur 6 Les parois externes de la machine gla ons devraient tre nettoy es r guli rement avec une s...

Страница 25: ...la ons est plein Retirez les gla ons du compartiment de stockage des gla ons pour en faire plus L appareil ne fonctionne pas L appareil ne re oit pas de courant La temp rature ambiante ou la temp ra t...

Страница 26: ...ant l usure des accessoires n est pas couverte par cette garantie Ce produit est garanti durant 12 mois si utilis de fa on normale et est valide pour le premier acheteur seulement Toute garantie est i...

Отзывы: