Print More Materials, All For Application
14
4. Print Operation
4.1 Use of The Printing Platform
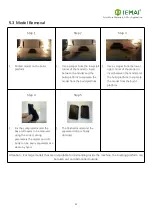
Step 1
1.The picture shows 4 fixing clips for
fixing the building platform
2.Platform is initially leveled before
shipment
3.If nozzle is at the right distance
from platform when it first returns
to zero,A4 paper distance.
4.If first layer is printed successfully,
subsequent leveling steps will not
be necessary.
Step 2
1.If the first time to return to zero
2.The nozzle is found to be close to
or remote from the platform
3.By adjusting the four butterfly nuts
below the platform to build the
platform initially level.
Step 3
1.Manually control the Z axis to
make the platform rise, when the
nozzle and platform spacing is
0.3-0.5mm, stop rising
2.Double-headed nozzle and
platform spacing should be the
same, if the spacing is not consistent
3.Please refer to step 6.5 for nozzle
height adjustment
Step 4
1.Turn the top screw clockwise
2.The top wire moves upward and
touches the limit stop
3.When you hear the machine "drop"
beep
4.It means the limit is working, stop
the rotation
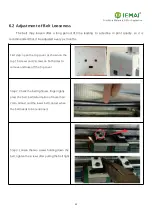
Step 5
1.Move the print head by pushing it
with your hand
2.So that the print head does not
touch the platform on all sides
3.and leave a gap of 0.3-0.5 mm
4.Ensure that the nozzle is at the
same distance from the front and
rear of the platform

