ECN-581A-QM57 Multimedia Box
Page 16
Step 7:
Reinstall the top panel.
S
te
p
0
:
3.3 Mount the System
The ECN-581A-QM57 supports wall mounting. The bottom panel of the ECN-581A-QM57
contains four screw holes for mounting (
Figure 3-5
) the system.
Figure 3-5: Mounting Screw Holes
3.3.1 Mounting the System with Mounting Brackets
To mount the embedded system onto a wall or some other surface using the two mounting
brackets, please follow the steps below.
Step 1:
Turn the embedded system over.
Step 2:
Align the two retention screw holes in each bracket with the corresponding
retention screw holes on the sides of the bottom surface.
Step 3:
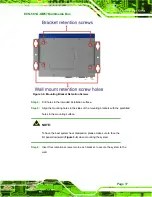
Secure the brackets to the system by inserting two retention screws into each
bracket as illustrated in
Figure 3-6
.
Содержание ECN-581A-QM57
Страница 2: ...ECN 581A QM57 Multimedia Box Page ii Revision Date Version Changes 29 July 2010 1 00 Initial release ...
Страница 10: ...ECN 581A QM57 Multimedia Box Page 1 Chapter 1 1 Introduction ...
Страница 16: ...ECN 581A QM57 Multimedia Box Page 7 Chapter 2 2 Unpacking ...
Страница 20: ...ECN 581A QM57 Multimedia Box Page 11 Chapter 3 3 Installation ...
Страница 22: ...ECN 581A QM57 Multimedia Box Page 13 Figure 3 1 Retention Screws Removal ...
Страница 40: ...ECN 581A QM57 Multimedia Box Page 31 Chapter 4 4 BIOS ...
Страница 72: ...ECN 581A QM57 Multimedia Box Page 63 Appendix A A Intel AMT Configuration ...
Страница 79: ...ECN 581A QM57 Multimedia Box Page 70 Appendix B B One Key Recovery ...
Страница 85: ...ECN 581A QM57 Multimedia Box Page 76 Figure B 3 Partition Creation Commands ...
Страница 102: ...ECN 581A QM57 Multimedia Box Page 93 Appendix C C Safety Precautions ...
Страница 106: ...ECN 581A QM57 Multimedia Box Page 97 Appendix D D Hazardous Materials Disclosure ...


