


AFL2-15A-H61
Page 104
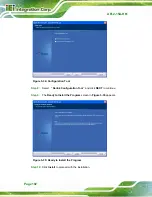
Step 13:
Click
FINISH
to complete installation.
5.9 USB 3.0 Driver Installation
To install the touch panel software driver, please follow the steps below.
Step 1:
Access the driver list. (See
Section 5.2
Step 2:
Click “
USB 3.0
”.
Step 3:
Locate the setup file and double click on it.
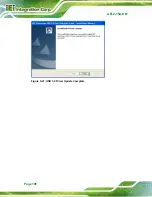
Step 4:
A
Welcome Screen
appears (Figure 5-38).
Step 5:
Click
Next
to continue.
Figure 5-38: USB 3.0 Driver Welcome Screen
Step 6:
The
License Agreement
shown in Figure 5-39 appears.
Step 7:
Accept the agreement by selecting “I accept the terms in the license
agreement”.
Содержание AFL2-15A-H61 series
Страница 14: ...AFL2 15A H61 Page XIV Figure C 42 Disable Automatically Restart 188...
Страница 18: ...AFL2 15A H61 Page 1 1 Introduction Chapter 1...
Страница 31: ...AFL2 15A H61 Page 14 2 Unpacking Chapter 2...
Страница 36: ...AFL2 15A H61 Page 19 3 Installation Chapter 3...
Страница 61: ...AFL2 15A H61 Page 44 4 BIOS Setup Chapter 4...
Страница 97: ...AFL2 15A H61 Page 80 5 Software Drivers Chapter 5...
Страница 123: ...AFL2 15A H61 Page 106 Figure 5 41 USB 3 0 Driver Update Complete...
Страница 124: ...AFL2 15A H61 Page 107 6 System Monitoring iCMC Chapter 6...
Страница 133: ...AFL2 15A H61 Page 116 7 System Maintenance Chapter 7...
Страница 142: ...AFL2 15A H61 Page 125 8 Interface Connectors Chapter 8...
Страница 160: ...AFL2 15A H61 Page 143 A Safety Precautions Appendix A...
Страница 165: ...AFL2 15A H61 Page 148 B BIOS Menu Options Appendix B...
Страница 168: ...AFL2 15A H61 Page 151 Appendix C C One Key Recovery...
Страница 176: ...AFL2 15A H61 Page 159 Figure C 5 Partition Creation Commands...
Страница 208: ...AFL2 15A H61 Page 191 Step 5 When the following window appears press S to select Specify Additional Device...
Страница 210: ...AFL2 15A H61 Page 193 D Hazardous Materials Disclosure Appendix D...