background image

1.2.6 Output Hopper 

SMART-70 Output Hopper can stack with 500 cards after printing, laminating and encoding.   

SMART-70 Output Hopper has the following features. 


Cards can be conveniently collected by large capacity cartridge which 500 CR80 cards 
(card thickness 0.8mm) can be loaded. 


When card cartridge is taken out  from  Output Hopper, the gate  of  card  cartridge  is 
automatically closed for preventing the loss of cards. 


In order to prevent the theft of cards, physical locking mechanism can prevent card 
cartridge from being taken out from Output Hopper. 


When card cartridge is full, Output Hopper can automatically check and notify the status. 


When a card is inserted into Output Hopper, stacked cards are lifted up by the support 
beam what is operated by internal CAM to protect card from scratch. 


Same card cartridge is used for Input Hopper and Output Hopper, so card cartridge can 
be shared. 


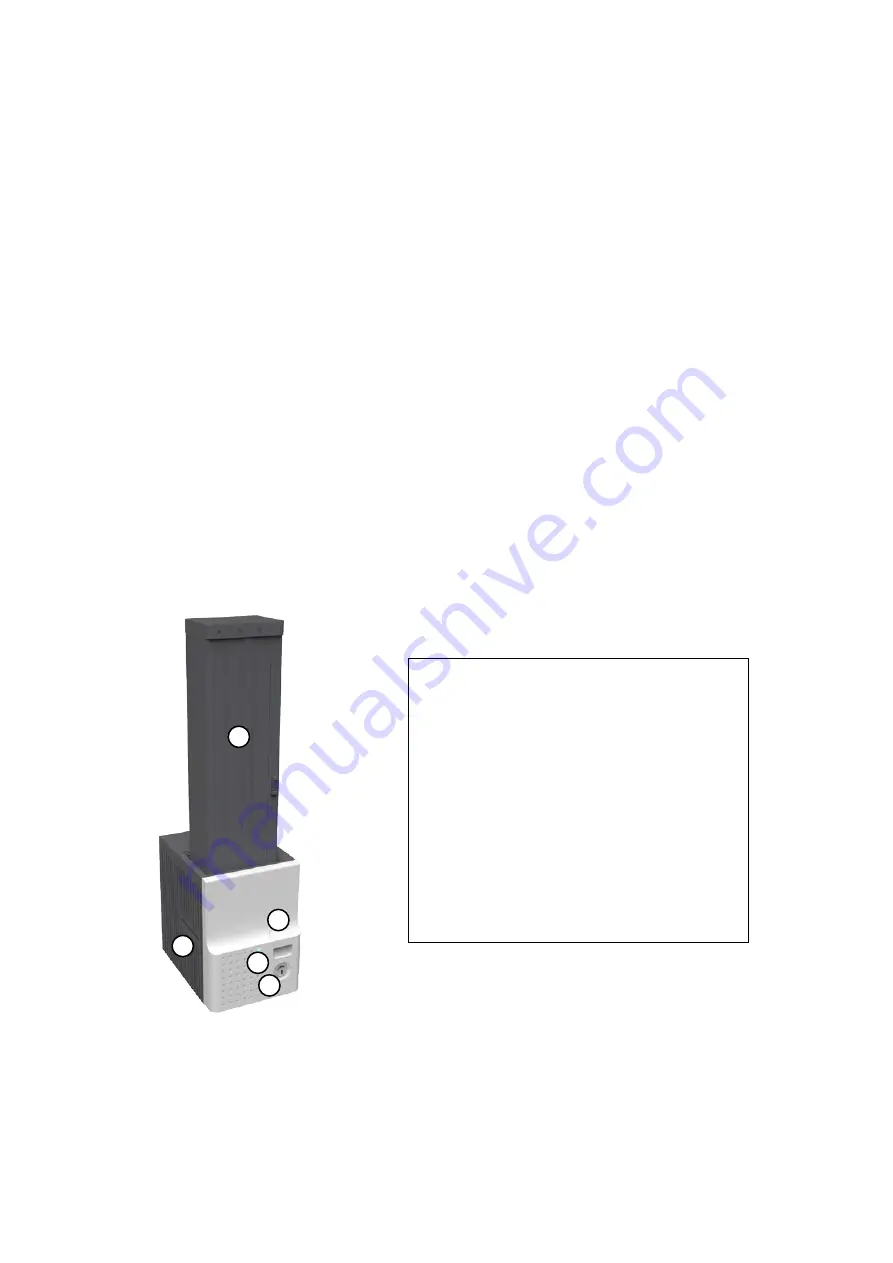
Figure 13 Front side of Output Hopper 


  Card cartridge 

500 cards can be loaded. 

 Cartridge release button 

Please  pull up card cartridge while pressing 

cartridge release button. 

 Indicator LED 

The status of Output Hopper is displayed by 

the color. 

 Physical lock 

Card cartridge is locked and can’t be taken out 

from Output Hopper. 

 Card gate 

Card is inserted from other module. 

23 


Содержание SMART-70

Страница 1: ...2015 05 SMART 70 User Manual...

Страница 2: ...stered trademarks are marks of their respective holders SMART 70 Design is a trademark of IDP Corp Ltd Return Materials Authorization In order to make a warranty claim you must contact an IDP Reseller...

Страница 3: ...onfiguration 51 3 1 Printing preferences 51 3 2 Other settings 56 4 SMART 70 Utilities 59 4 1 Printer setting 59 4 2 Printer test 67 4 3 Firmware upgrade 71 5 Troubleshooting 74 5 1 Printing quality 7...

Страница 4: ...fastening 26 Figure 18 Module connection 26 Figure 19 Power connection 27 Figure 20 Ribbon film cartridge unlocking 27 Figure 21 Pulling out ribbon film cartridge 28 Figure 22 Print ribbon laminating...

Страница 5: ...Printer menu Network Config 42 Figure 52 Printer menu Printer Config 42 Figure 53 Printer menu Operation 43 Figure 54 Printer menu Print Sample 43 Figure 55 Sample Card 43 Figure 56 Printer driver ins...

Страница 6: ...er70Setup Log in 59 Figure 89 CardPrinter70Setup Start 60 Figure 90 Basic Setup of CardPrinter70Setup 60 Figure 91 Color density 62 Figure 92 Resin Black density 62 Figure 93 Overlay density 63 Figure...

Страница 7: ...4 81 Figure 125 Card jam in Laminator 5 82 Figure 126 Card jam in Output Hopper 1 82 Figure 127 Card jam in Output Hopper 2 82 Figure 128 Card jam in Output Hopper 3 83 Figure 129 Card jam in Output H...

Страница 8: ...0 Figure 150 TPH replacement 5 90 Figure 151 TPH replacement 6 90 Figure 152 Laminator Head replacement 1 91 Figure 153 Laminator Head replacement 2 91 Figure 154 Laminator Head replacement 3 91 Figur...

Страница 9: ...binations according to different customer requirements Required modules can easily be added to extend functions depending on your needs Figure 1 Combination of SMART 70 Key features of SMART 70 are as...

Страница 10: ...Input Output Hopper Encoding SMART 70 can encode magnetic stripe and smart cards by using Encoding Station or the encoding options installed into Printer module In case of using Encoding station magne...

Страница 11: ...lity programs for adjusting the configuration and checking the status of Printer and powerful SDK Software Development Kit for easily developing customized applications are also provided without coast...

Страница 12: ...he cards are stuck by the static 500 cards are loaded but the loaded cards don t make scratch because the weight of loaded cards is dispersed when the lowest card has to be supplied When card cartridg...

Страница 13: ...chased according to your needs Barcode reader 1D Barcode Code32 Code39 Code93 Code128 Codaba EAN 128 2D Barcode PDF417 MicroPDF417 MaxiCode DataMatrix QR Code Magnetic encoder ISO7811 HiCo LoCo Card J...

Страница 14: ...e of Encoding Station 1 2 3 4 5 Control panel LCD The status of Encoding Station is displayed Control panel buttons Buttons are used to check configuration or status Physical lock Front cover is locke...

Страница 15: ...of Printer For improving the convenience of changing print ribbon ribbon cartridge is designed as the drawer type and the print ribbon can easily be changed By using ribbon cartridge lock lever ribbo...

Страница 16: ...as printer driver and utility programs are provided free of charge additional software is not needed to purchase Figure 6 Front side of Printer 1 2 3 5 7 4 6 Control panel LCD The status of Printer i...

Страница 17: ...connect to an adjacent module Serial communication port This port is to communicate with external device except SMART 70 modules Ethernet port This port is for network communication USB host port Thi...

Страница 18: ...issue count Network Config DHCP To set whether to use DHCP function Default is On IP Address IP address to be used when DHCP is OFF Network Mask Network Mask to be used when DHCP is OFF Gateway Gatewa...

Страница 19: ...n is in its minimum quantity HeadResister To set resistance value of TPH Thermal Print Head Operation Print Sample To print a sample card Information Printer Serial To show the serial number of Printe...

Страница 20: ...on lock Kensington lock is usable Communication port To communicate between SMART 70 modules please connect to an adjacent module Power port Please connect the 24V DC power adaptor provided with Flipp...

Страница 21: ...film cartridge can easily be locked and laminate head can be moved up and down for the convenience of maintenance For the prevention of thefts physical locking mechanism and Kensington lock are design...

Страница 22: ...er adaptor provided with Laminator Power switch Turn On Off 1 2 3 5 7 4 6 1 2 3 2 4 5 6 Control panel LCD The status of Laminator is displayed Control panel buttons Buttons are used to adjust configur...

Страница 23: ...m Output Hopper When card cartridge is full Output Hopper can automatically check and notify the status When a card is inserted into Output Hopper stacked cards are lifted up by the support beam what...

Страница 24: ...igure 15 Stacker 1 2 3 4 5 Kensington lock Kensington lock is usable Serial communication port This port is used when external device needs to control Output Hopper Power port Please connect the 24V D...

Страница 25: ...odules from left to right is Input Hopper Encoding Station Printer Laminator and Output Hopper When some module is not required please remove unnecessary modules from above placing order For example i...

Страница 26: ...T 70 modules Please place the cramp on floor and put a module on the cramp as shown as figure Figure 17 Module fastening 2 1 3 Module connection Please connect the red communication cables provided wi...

Страница 27: ...to all modules Printer must be connected to the 24 DC power adaptor provided with Printer Figure 19 Power connection 2 1 5 Print ribbon and laminating film installation A Please turn ribbon film cart...

Страница 28: ...figure To properly mount print ribbon or laminating film please refer to the install guideline on the print ribbon or laminating film box Ribbon cartridge in Printer is different with film cartridge i...

Страница 29: ...s shown as figure Figure 23 Print ribbon mounting When laminating film is being mounted please refer to the mounting instruction on the inside of film cartridge as figure If vertical laminating positi...

Страница 30: ...ht side of cartridge to tension print ribbon or laminating film as figure Figure 25 Print ribbon laminating film alignment E Please push ribbon or film cartridge into Printer or Laminator Figure 26 Ri...

Страница 31: ...degrees so the lever is returned to the vertical Figure 27 Ribbon film cartridge locking 2 1 6 Disposable cleaning roller installation A Please detach disposable cleaning roller holder from Input Hopp...

Страница 32: ...ase remove used disposable cleaning roller from holder Figure 29 Used disposable cleaning roller removal C Please mount a new disposable cleaning roller Figure 30 New disposable cleaning roller mounti...

Страница 33: ...f disposable cleaning roller Figure 31 Removal of new disposable cleaning roller protector E Please install disposable cleaning roller holder into Input Hopper as figure Figure 32 Installation of disp...

Страница 34: ...ard cartridge while pressing cartridge release button Figure 33 Card cartridge release from Input Hopper B Please adjust the gate of card cartridge depending on card thickness by using control lever F...

Страница 35: ...ton on card cartridge down and open cartridge cover as figure Figure 35 Card cartridge open D Please remove the tape for fixing the weight in card cartridge as figure Figure 36 Removal of the tape for...

Страница 36: ...Please pull up the weight and fix it to the top Figure 37 Card cartridge s weight fixing F Please take care not to touch the surface of cards and load the cards into cartridge Figure 38 Card loading 3...

Страница 37: ...on loaded cards as figure Figure 39 Putting down the card cartridge s weight H Please close card cartridge cover and put card cartridge into Input Hopper until click is heard Figure 40 Loading card ca...

Страница 38: ...tput Hopper until click is heard In order to take card cartridge out please pull up the cartridge while pressing cartridge release button Figure 41 Loading card cartridge into Output Hopper 2 1 9 Powe...

Страница 39: ...different with the configuration for multiple modules combination Indicator LED is turned to yellow and the message for checking modules combination is displayed Please follow below steps to set the...

Страница 40: ...red arrow to save the configuration for detected multiple modules combination Figure 45 Adjusted modules combination D The saved multiple modules combination is shown Figure 46 Saved module combinatio...

Страница 41: ...at indicator LEDs on all modules are blue and the status of Printer and Laminator is ready Figure 48 System status checking 2 1 12 Sample card printing A Please press the Menu button indicated by red...

Страница 42: ...arrow Figure 50 Printer menu System Config C On Network Config menu please press the button indicated by red arrow Figure 51 Printer menu Network Config D On Printer Config menu please press the butto...

Страница 43: ...dicated by red arrow Figure 53 Printer menu Operation F On Print Sample menu please press the Select button indicated by red arrow Figure 54 Printer menu Print Sample G Please wait a while until sampl...

Страница 44: ...er for USB please turn off Printer before installation When you want to install printer driver for network please turn on Printer Figure 57 Printer driver installation 2 2 2 2 User Account Control Whe...

Страница 45: ...tallation STEP 2 2 Please click Install this driver software anyway when Windows Security window comes up Figure 61 Printer driver installation 6 2 2 6 Driver Installation STEP 3 1 Please click Next w...

Страница 46: ...nter select window Printer is not connected to network So please check the status of network connection Figure 63 Printer driver installation 8 2 2 8 USB port connection Please connect USB cable to Pr...

Страница 47: ...n is completed please click Close Figure 66 Printer driver installation 11 2 2 11 Driver installation check 1 Please open Devices and Printers window and check that IDP SMART 70 Card Printer is create...

Страница 48: ...stallation 14 2 2 14 Driver installation check 4 When test page is being printed the widow for checking printing status comes up After checking printed test card if the test card is properly printed p...

Отзывы: