B-2048-1(1)
INSTRUCTION SHEET - HS1T Series
Solenoid Type Safety Switch
( 5 / 9 )
2019.07
• In applications using ferrules for stranded wires, choose the ferrule listed in the table.
mm
2
AI0.5-6WH
AI0.75-6GY
AI1-6RD
TE0.5-8
TE0.75-8
TE1.0-8
0.5
0.75
1
0.5
0.75
1
AWG
AI0.34-6TQ
0.34
20
18
18
20
18
18
22
Phoenix
Contact
Nichifu
Part No.
Manufacturer
Applicable wire
(stranded)
6
Wiring
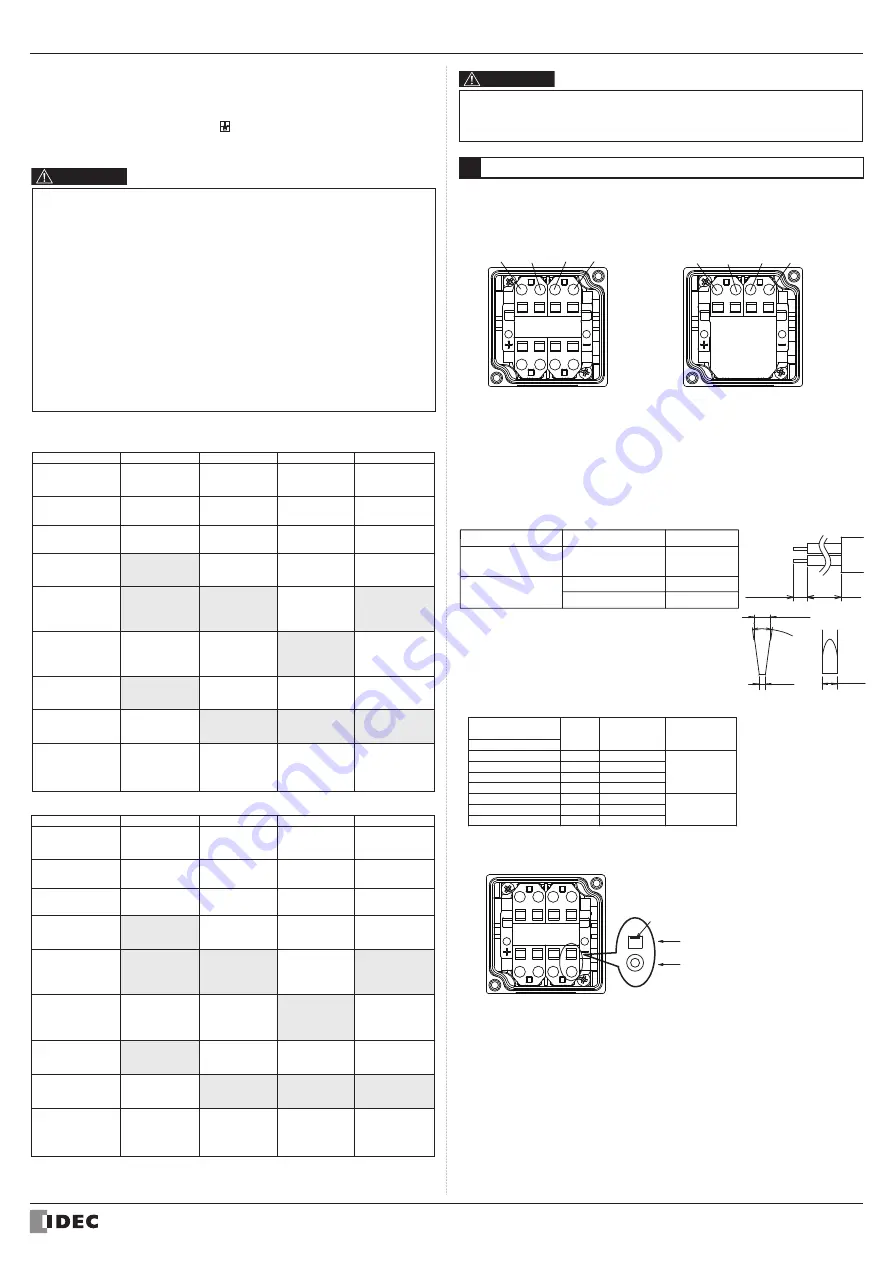
Terminal wiring method
• Terminal NO.
‹4 contact type›
‹2 contact type›
• Wire insertion positions, screwdriver insertion positions, and the directions of
screwdriver tip are shown below.
The round-shaped Wire Port
The square-shaped Screwdriver
Port Direction of Screwdriver Tip
Screwdriver Tip
• Contact operation is based on the condition that the actuator is inserted into the
center of the safety switch slot.
• Contact operation shows the HS9Z-A11T/A12T actuator.
• Use main circuit or monitor circuit with for the input to safety circuit.
• Indicator turns on when solenoid is energized.
Note :
• The following type circuits are shipped with jumpers connecting the indicated terminals.
A,B,C,D,F,G,J type circuits: Jumper connecting 12-41
DD type circuit: Jumpers connecting 12-41 and 22-51
• When the NC contacts (11-12)/(21-22) of the door monitor circuit and NC contacts
(41-42)/(51-52) of the lock monitor circuit are connected in series as inputs to the safety
circuit, connect 12-41 or 22-51 before use.
• Wire length and example of layout
• Recommended Wire Core Size : 0.3 to 1.5 mm
2
(AWG22 to 16)
Routing direction
Wire Length: L1
Type
HS1T-
□
△
*
4LM-G
HS1T-
□
△
*
4M-G
HS1T-
□
△
*
4LSM-G
HS1T-
□
△
*
4SM-G
Straight orientation
Straight orientation
Horizontal orientation
30 to 35mm
50 to 55mm
40 to 45mm
8 to 9mm
L1
• For wiring, use the following applicable screwdriver.
(Tip shape of the driver is according to the standard of
DIN5264)
0.4
7° to 13°
Φ2.5
2.5
A1
A2
CAUTION
*12 Do not attempt manual unlocking when the solenoid is energized.
*13 Do not energize the solenoid for a long time while the door is open or when the
door is unlocked manually.
CAUTION
*9 This locking monitoring marking has been newly described in section 9.2.1 of
EN ISO / ISO14119. It indicates that any devices with this marking meet the
following EN ISO / ISO 14119 requirements:
- General (- General requirements for guard locking devices) (Section 5.7.1) *
- Locking monitoring (- Locking monitoring for guard locking devices) (Section
5.7.2.2)
When a lock monitor circuit (contact) has the locking monitoring marking, it
means that one circuit (contact) can monitor the position and the locking
function of the protective door. (The locking monitoring circuit (contact) turns
ON only when the protective door is closed and locked.)
*note Both types of HS1T safety switches - spring lock type switches and solenoid
lock type switches - have obtained the locking monitoring certifica ion marking.
Based on risk assessment results, solenoid lock type switches can be used
only for limited applications which do not especially need to be locked for
safety.
*10 Type No. in [ ] are not supplied as standard. See 1. Type for standard.
*11 These are the image of locking position with actuator inserted.
• Solenoid Lock Type (HS1T-
□
7Y)
Main Circuit
11-42
21-52
Monitor Circuit
11-12
21-22
31-32
Monitor Circuit
13-14
23-24
33-34
Monitor Circuit
41-42
51-52
Monitor Circuit
53-54
63-64
Door is
locked.
The machine
can be
operated.
Door is
unlocked.
The machine
can not be
operated.
The machine
can not be
operated.
Door is
unlocked.
The machine
can not be
operated.
Open
OFF/ON
*13
Closed
Turn the
key to unlock
position
Turn he
key to lock
position
Returned
status
When
operating
the Button
Closed
Closed
Closed
Closed
Closed
Closed
Closed
Closed
Closed
Open
Open
Open
Open
Open
Open
Open
Open
Open
Open
Open
OFF
*12 *13
Manual
Unlock Key
Rear Unlock
Button
Closed
OFF
ON
Closed
Turn the
key to lock
position
Turn the
key to lock
posi ion
Returned
status
Returned
status
Door States
Solenoid
Power
A1-A2
Operation Cycle
• Spring Lock Type (HS1T-
□
4)
Manual
Unlock Key
Rear Unlock
Button
Main Circuit
11-42
21-52
Monitor Circuit
11-12
21-22
31-32
Monitor Circuit
13-14
23-24
33-34
Monitor Circuit
41-42
51-52
Monitor Circuit
53-54
63-64
Door is
locked.
The machine
can be
operated.
Door is
unlocked.
The machine
can not be
operated.
The machine
can not be
operated.
Door is
unlocked.
The machine
can not be
operated.
Closed
Open
OFF
ON
ON/OFF
Closed
Closed
OFF
Turn the
key to lock
position
Turn the
key to unlock
position
Turn the
key to lock
posi ion
Turn he
key to lock
position
Returned
status
Returned
status
Returned
status
When
operating
the Button
Closed
Closed
Closed
Closed
Closed
Closed
Closed
Closed
Closed
Open
Open
Open
Open
Open
Open
Open
Open
Open
Open
Open
Door States
Solenoid
Power
A1-A2
21/23/
41/43
22/24/
42/44
11/13/
51/53
12/14/
52/54
31/33/
51/53
32/34/
52/54
21/23/
63
22/24/
64
12
11
42
41
A1
A2
A1
A2


