background image

3

1

PANEL DESCRIPTION

i


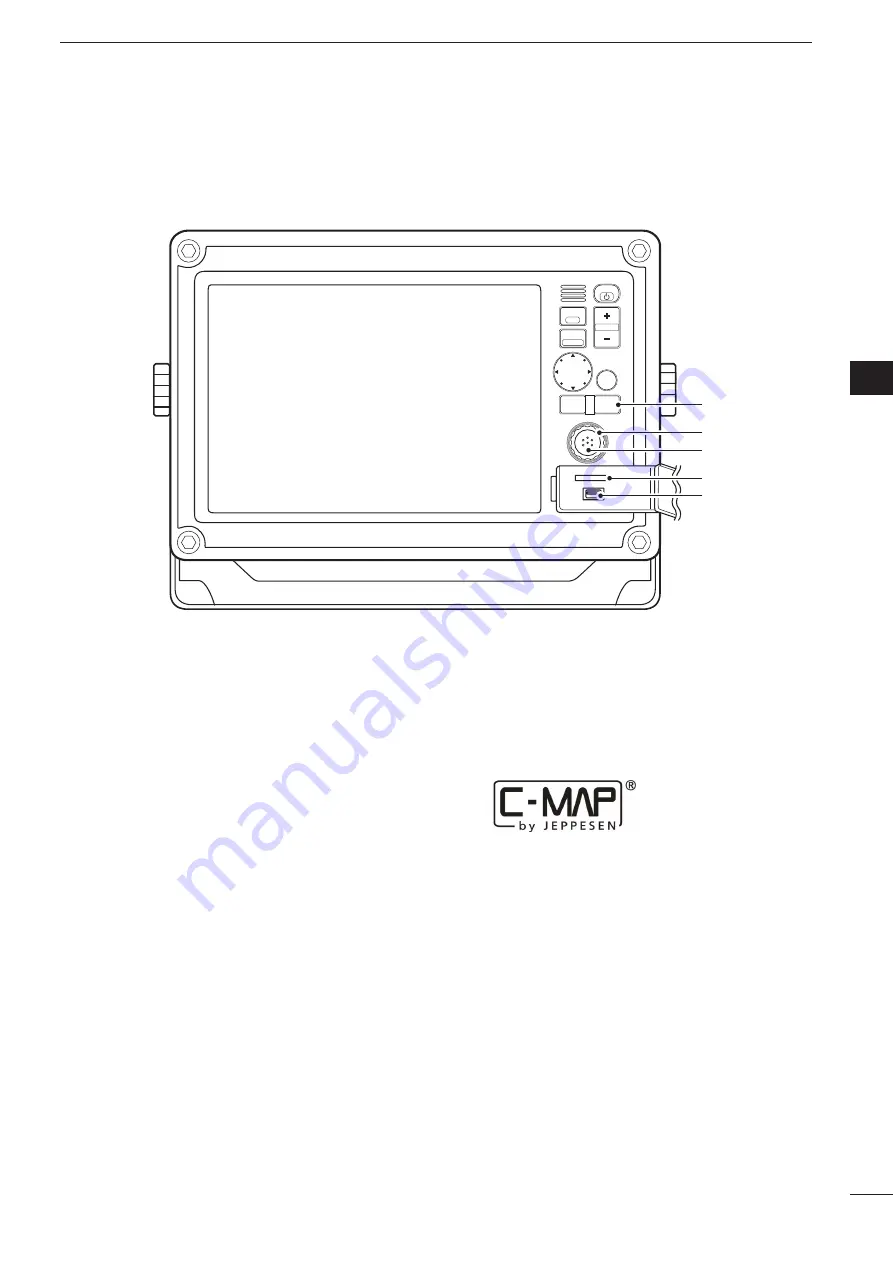
CLEAR SWITCH [CLEAR]

    Push to cancel the current function.
   While opening the Menu screen, push to cancel 

and return to the upper menu, or cancel the Menu 
screen. 

o


SELECTION DIAL [DIAL]


    In the Menu screen, rotate to select a menu item 

or option. 


 In Quick Menu 1 or Quick Menu 2, rotate to se-
lect an option or adjust a level.

  On the Plotter screen


    Rotate to set the heading position. 

!0

 ENTER SWITCH


  In the Menu screen, push to access the selected 

menu or function.


  Push to access Quick Menu 2.

      On the Plotter screen


•  Quick Menu 2 includes the Center Ship and Perspec-

tive Angle functions.

      On the Radar screen

      •  Quick Menu 2 includes the GAIN, SEA, RAIN, Radar 

TX menu and Heading line OFF functions.

      On the Sounder screen

      •  Quick  Menu  2  includes  the  GAIN  50kHz,  GAIN 

200kHz, STC 50kHz and STC 200kHz control func-
tions.

!1


SD CARD PORT

   Insert  an  SD  Card  which  contains  C-MAP  MAX 

chart* by JEPPESEN.

  * Chart data is not supplied by Icom.

  •  An  unmount  operation  should  be  performed  before 

removing the SD Card. If you do not unmount the SD 
Card, the MarineCommander

tm

 will stop operating.

!2


USB MEMORY PORT

   Connect a USB memory stick.

  •  An unmount operation should be performed before re-

moving the USB memory stick. If you do not unmount 
the USB memory stick, the MarineCommander

tm

 will 

stop operating.

PU

SH 

TO ENTE

R

MENU

WPT

FOCUS

LAYOUT

MOB

CLEAR

SUB

BRILL

RANGE

i

o
!0

!1
!2

D

 Front panel

1
2
3
4
5
6
7
8
9
10
11
12
13
14
15
16
17
18
19
20
21

Содержание MarineCommander MXP-5000

Страница 1: ...his device complies with Part 15 of the FCC Rules Opera tion is subject to the following two conditions 1 this device may not cause harmful interference and 2 this device must accept any interference...

Страница 2: ...4 2 Spring washers M4 2 FCC INFORMATION FOR CLASS A UNINTENTIONAL RADIATORS This equipment has been tested and found to comply with the limits for a Class A digital device pursuant to part 15 of the F...

Страница 3: ...LATION AND CONNECTIONS 6 11 Connection 6 Mounting the Main unit 7 Power source requirement 7 Ground connection 7 Installing the Display unit 8 Front cover attachment 10 Bolt cap attachment 10 Removing...

Страница 4: ...ection is made after cutting the Main unit may be damaged R WARNING NEVER open the bottom cover of the Main unit There are no user adjustment points This may result in an electric shock and incorrect...

Страница 5: ...BLACK BOX CONNECTORS Connector 1 to 3 Connect a black box unit such as an MXR 5000R T Radar unit an MXF 5000 Fish finder unit or another MXP 5000 Main unit Connector 4 Not used If you connect an MXR 5...

Страница 6: ...to the MOB point Position and bearing data are neces sary Hold down MOB for 3 seconds to cancel the func tion e RANGE UP DOWN SWITCHES Push or to set a suitable screen range r FOCUS DISPLAY LAYOUT SW...

Страница 7: ...een Quick Menu 2 includes the GAIN SEA RAIN Radar TX menu and Heading line OFF functions On the Sounder screen Quick Menu 2 includes the GAIN 50kHz GAIN 200kHz STC 50kHz and STC 200kHz control func ti...

Страница 8: ...is invalid the position data is shown in red for 1 minute After 1 minute has passed invalid data will appear ePALETTE2 Shows various information Default COG Shows your vessel s course over ground T s...

Страница 9: ...nit 1FISH FINDER ICON Display as an animation when a companion Icom fish finder is connected and operating Appears but not as an animation when the fish finder is connected but not operating An X appe...

Страница 10: ...round 12 V 24 V battery White Black Green Thinner Black KEEP the terminal guard attached after connecting the cable NOTE Use crimp or solder terminals for the wire connections Solder Crimp Radar unit...

Страница 11: ...3 14 15 16 17 18 19 20 21 Power source requirement CAUTION Before connecting the DC power cable check the following important items Make sure Output voltage of the power source is 12 V 24 V DC DC powe...

Страница 12: ...fter installation Select a location which can support the weight of the display unit DO NOT select areas subject to extreme heat cold vibrations or direct sunlight D Mounting The mounting bracket supp...

Страница 13: ...he four bolts from the four corners of the display unit w Carefully cut a hole in the instrument panel or wherever you plan to mount the display unit e Drill four holes for the mounting screw r Slide...

Страница 14: ...ront cover attachment The supplied front cover can be attached to the front of the display unit Front cover Bolt cap attachment The supplied bolt caps can be attached to the four corner bolts to prote...

Страница 15: ...ide nut Ferrite EMI filter Ferrite EMI filter CAUTION NEVER cut the display cable or display extension cable NOTE About Display Cable The Display cable can also be removed to install it through a hole...

Страница 16: ...o the MarineCommander MXA 5000 ais receiver Allows you to receive other vessel s information such as the vessel name MMSI code vessel type position data speed course destination and more MXG 5000 gps...

Страница 17: ...consumption Less than 1 0 A at maximum brightness Usable temperature range 20 C to 60 C 4 F to 140 F Dimensions without Bracket 386 W 274 H 69 2 D mm 15 2 W 10 8 H 2 7 D in with Bracket 404 W 299 H 10...

Страница 18: ...IS 1 IN Grey Black 1 15 AIS COMMON Common line for AIS 2 Port 4 VHF Orange Black 2 19 DSC IN Input level Less than 2 mA with 2 V applied DSC DSE PICOA Connects to the NMEA input output con nector of a...

Страница 19: ...15 MEMO 1 2 3 4 5 6 7 8 9 10 11 12 13 14 15 16 17 18 19 20 21...

Страница 20: ...1 1 32 Kamiminami Hirano ku Osaka 547 0003 Japan A 6755H 1EX Printed in Japan 2011 Icom Inc...

Отзывы: